Bold Peasant Stenciling Craft
HOW TO STENCIL
MATERIALS:
EQUIPMENT: Sharp stencil-cutting tool or razor blade. Stencil paper—in small packages or large sheets. Stencil brushes— very stiff bristles and flat circular bottom. (No. 6 with ½" diameter good, or artists’ oil brushes with stiff bristles.) 2B drawing pencil. Textile paints, with directions for using and setting colors, usually a jar of extendor. Cleaning fluid—any reliable fabric cleaner—for cleaning brushes and stencil plates. Soft cotton rags. Desk-size white blotter. Right-angle triangle. Masking tape. Flat piece of glass on which to cut stencils, or Manila paper (cardboard makes knife stick).
Fabrics: All cottons, linens, rayons and silk. (Avoid rough weaves. It is hard to manipulate brush on them.) For washable articles, first remove all sizing by washing in lukewarm water and soapsuds, so color will not partially wash out.
Silks, chiffons and very fragile materials should be taped or pinned to a white blotter so they will not stick to stencil brushes. Heavy fabric need not be taped down. Unbleached cotton, Indian Head or mat side of chintz takes stenciling well. When stenciling garments, cut out first, stencil pieces separately, then sew.
Color of Fabrics: Textile colors, being transparent, are most effective used on light or medium backgrounds. If dark colored material is used, add white to colors to make them opaque. White does not penetrate fibre of fabric sufficiently to give secure anchorage, therefore will not be as washable as other colors.
HOW TO MAKE WORKING TRACINGS OF DESIGNS
Before using designs, they should be traced onto working sheets. Lay a sheet of tracing paper over page. Use a small amount of artist’s rubber cement, applied to each corner of tracing paper only, to hold it in place. Remove paper carefully. Rubber cement traces are easily rubbed away with fingertips. If rubber cement is not available, attach with small pieces of Scotch tape or masking tape. Tapes are difficult to remove. To avoid tearing page, cut the tape at edges of paper and leave tape on page.
WORKING PROCEDURE
Tracing: Place tracing sheet over white paper so lines will show clearly; then place on flat surface and tape to prevent slipping. Lay stencil paper over tracing. Tape. Trace, using pencil lightly. If you dig into stencil paper, both cut and printed edges will be fuzzy. Do not try to make lines black, just plain enough to see when cutting.
Cutting: Place stencil paper on glass or Manila envelope. Follow outlines with knife, cutting all the way through, so that cut shape will fall out easily. Knife should always point toward cut-out shape and be held at angle to obtain slightly beveled edge; this keeps paint from creeping under stencil edges when printing. Always cut toward you, that is, from top to bottom. Keep turning stencil paper around so that this is possible. Keep sharpening knife on moist sharpening stone.
Mixing Colors: Use plate, palette or any hard surface. Little color is needed. Amount on tip of knife will go a long way. Read directions carefully which come with stencil paints. Some textile paints need to be mixed with extendor, which is a necessary chemical ingredient. Never mix more paint than needed for painting at one time, as fabric paint dries rapidly.
Printing: Place fabric on white blotter. Tape. Lay stencil where you want it. Tape, or hold firmly with hand. Dig brush into color and rub off on piece of paper until almost dry. Work paint into fabric, through stencil openings, holding brush upright. With rotating motion, work from edge of opening toward center. Work color well into fabric. Do not load too much paint onto brush if you wish to make area solid. Better to repeat until entire area is covered. To shade, cover areas you wish to darken with other coats of paint.
Care of Stencils and Brushes: Do not wash stencils after using, as cleaning wears edges. Turn each stencil face down on blotter; with soft rag and a little cleaning fluid, gently wipe back clean. Store with sheet of paper between stencils.
Wash brushes in cleaning fluid; dry well. It is desirable to have a separate brush for each color. For example, a red brush may be used for all shades of red. Brushes should not be washed more than necessary. A little paint in bristles helps to keep them stiff.
Setting: Allow finished work to dry more than 24 hours and not more than 3 days. Then place fabric on ironing board, face up; cover with dry cloth and press for 3 minutes at 300° Fahrenheit, or at linen temperature on adjustable iron. Steam iron may be used. Turn material and press back with pressing cloth, dampened if desired. Fabrics which require a low heat should be set by pressing them a few minutes longer than directed above at a lower temperature.
HANDKERCHIEFS
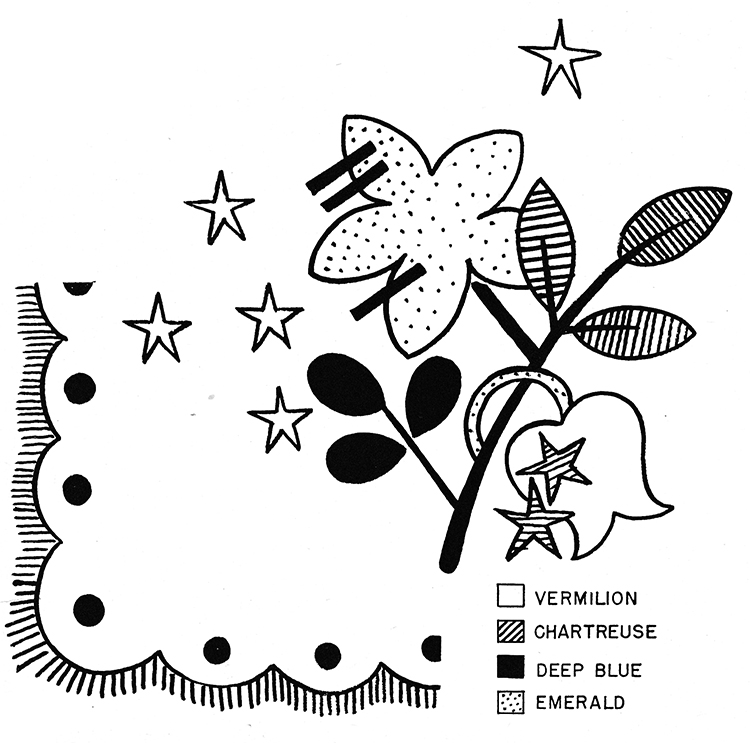
GENERAL DIRECTIONS: Separate stencils must be cut for each symbol indicated by key given with designs. Sometimes shading is applied at edges with a second coat, as in the sweet pea design. Cut pink stencil, use same stencil for shading lavender at edge. Be sure to establish register angle on each stencil. Ascertain register angle on handkerchief and mark with masking tape.
Put first stencil in place and print. Continue with other stencils until design is completed.
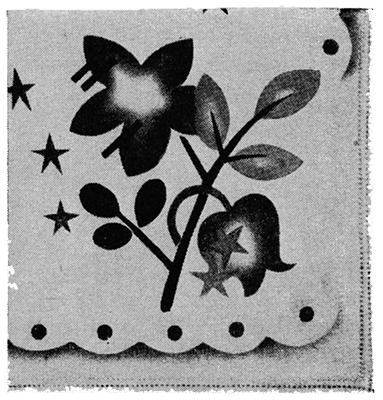
Bold Peasant Design: Cut 4 stencils following directions. Mix and print chartreuse first. Continue with vermilion, emerald and deep blue stencils. Edge is done by cutting scalloped strip and corner from stencil paper; stenciling is done over and away from edge.
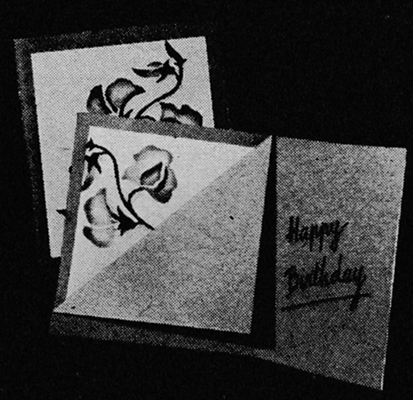
FOLDERS FOR HANDKERCHIEFS: A folder to hold the stenciled handkerchief may be made with matching design on front. Use it as a birthday card.
Materials: Construction paper to match or contrast with color of handkerchief; white paper; textile paints; paste.
Print matching flower design on white paper, 3¾" x 4½", using stencils. Use textile paints or poster paints with very little paint on brush.
Fold a piece of colored construction paper 9" x 10½" in half, lengthwise. Use folded edge as bottom of card. Now fold crosswise so that folder opens from right to left. Fold down top left edge of inside page to center line to form a pocket for handkerchief. (See photograph).
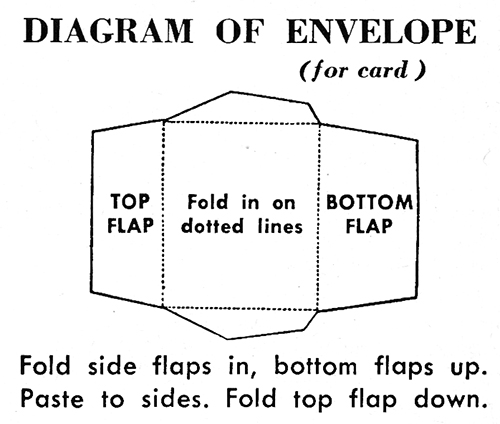
Mount flower print on front of folder, pasting down on upper corners only. Write a birthday greeting on inside of folder. To make envelope, see diagram.
Embroider an Eagle
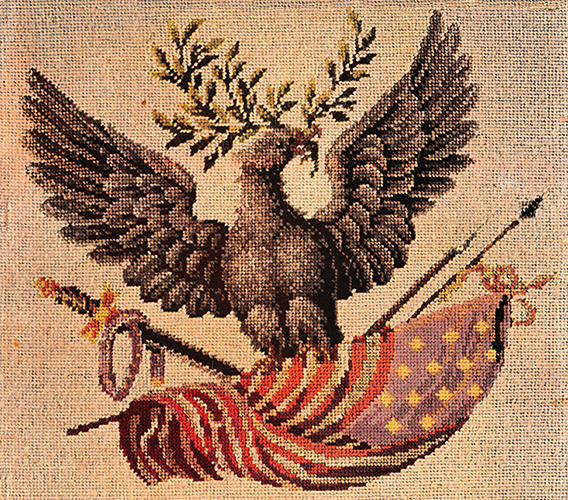
Needlepoint eagle, handsome heritage from the mid-nineteenth century—harmonious accent for period furnishings, touch of tradition for a modern room.
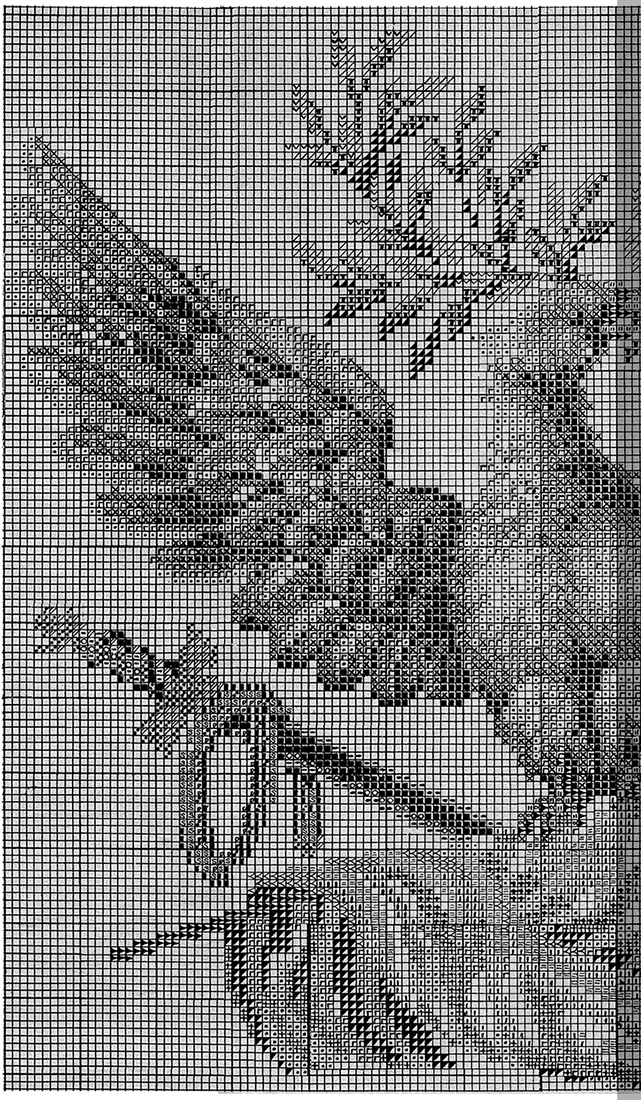
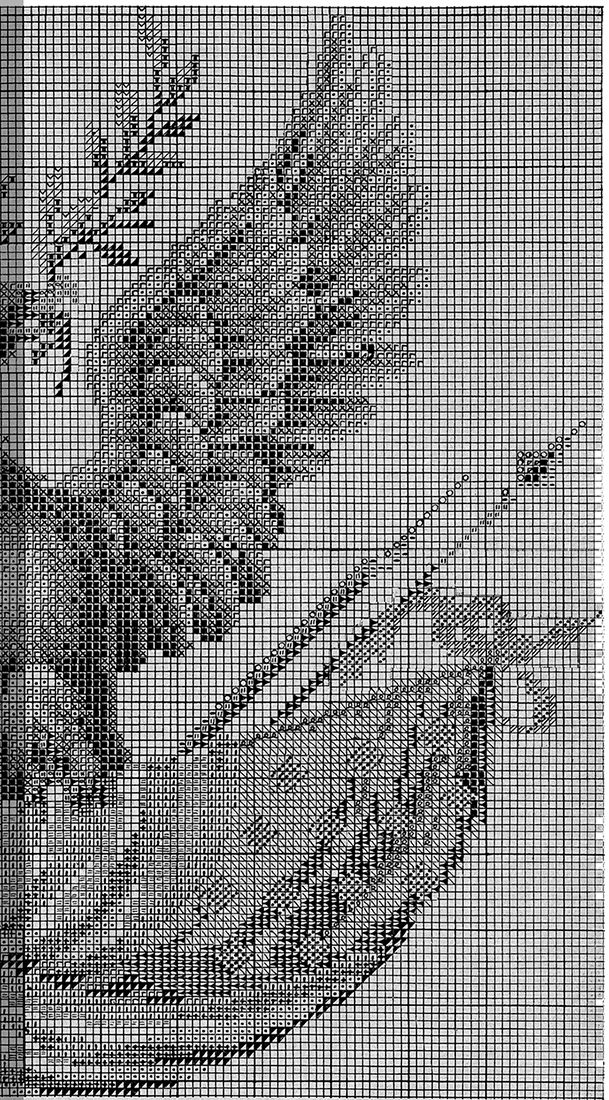
DIRECTIONS FOR NEEDLEPOINT PICTURE
MATERIALS: Ten mesh-to-the-inch canvas, 23" x 22½"; D.M.C. cottons and 12½ yd. skeins of tapestry wool in amounts given with color key; nineteen 40 yd. skeins of beige tapestry wool for background; tapestry needle; bias tape or heavy paper to bind canvas; picture frame, rabbet measure, 20" wide x 19½" high (size of embroidered background); ⅛" thick cardboard, ¼" smaller than rabbet.
DIRECTIONS: Bind edges of canvas with bias tape or heavy paper. Mark horizontal and vertical center lines on canvas as guides for placing eagle in center. Work eagle first, then background. Use either Continental or Diagonal Stitch. Cut working strands of wool about 18" long—wool cut too long will wear thin in working. Keep wool from twisting when working to avoid thin places in work. Fasten wool by going through stitches on back, then clipping ends close to canvas. To prevent work from getting crooked, be careful not to jerk wool tight—hold thumb on yarn until you have pulled it through canvas; then lift thumb, pull wool gently into place.
Blocking: Cover an old table, bread board or drawing board with brown paper and mark on this the size of canvas, being sure that corners are square. Place needlepoint, right side down, over guide and fasten with thumb tacks apart along edge of canvas. Wet thoroughly with cold water; let dry. If work is too badly warped to be pulled straight the first time, dry and re-stretch. Wet again, and dry.
Framing: Stretch canvas over cardboard backing, keeping lines of needlepoint straight. Hold in place with straight pins pushed into edge of cardboard. Begins pinning at centers of sides and at corners. Continue stretching and pinning until there is a border of pins about ¼" apart.


Lemon Chart Pattern

Pattern includes 11 fruit motifs: peach 3¾ x 3¾ inches; pear 3⅜ x 4¼; orange 3¾ x 4¼; cherries 4⅜ x 4¼; grapes 4¾ x 4½; strawberries 2¾ x 3; pineapple 4 x 8⅛; lemon 3 x 3⅝; plums 3⅜ x 3¾; apple 3¾ x 4¼; and bananas 4⅜ x 4¾. A chart for placing the colors and diagrams showing how to arrange the motifs on lunch cloths, table cloth, runner and luncheon set are also included.
This colorful fruit design for cross stitch makes a charming decoration for lunch cloths, runners, lunch sets, table cloths, curtains and slip covers for chair backs. The 10 to the inch crosses are suitable for six strand cotton.
Suggested Materials—Linen, cotton with a linen finish, cotton broadcloth, percale, gingham, and unbleached muslin are suitable materials. The diagrams in the pattern show the pieces made of 36-inch material. The large cloth can be made of 36, 54 or 72-inch material.
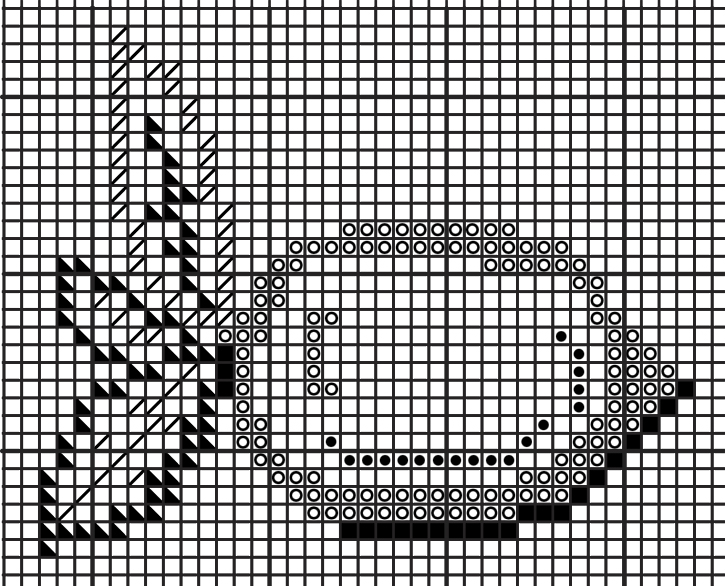
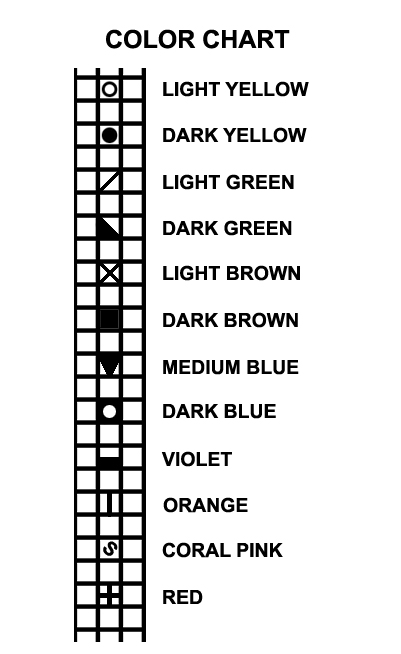
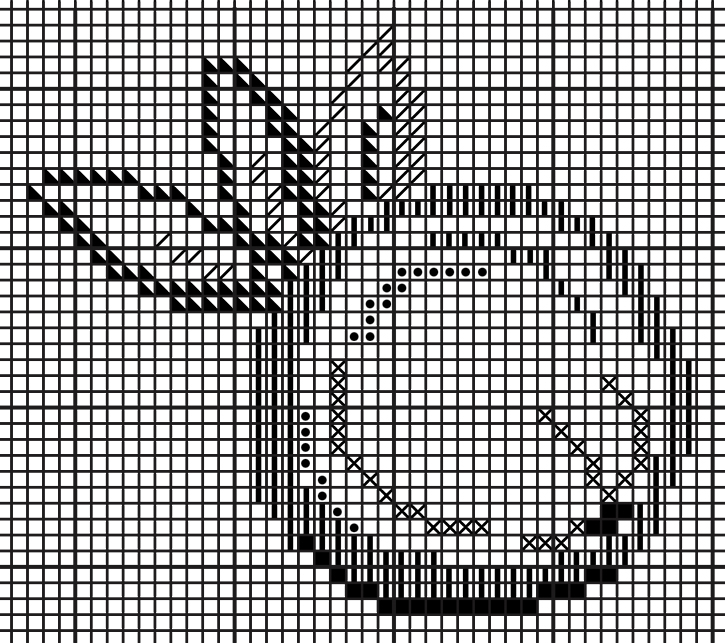
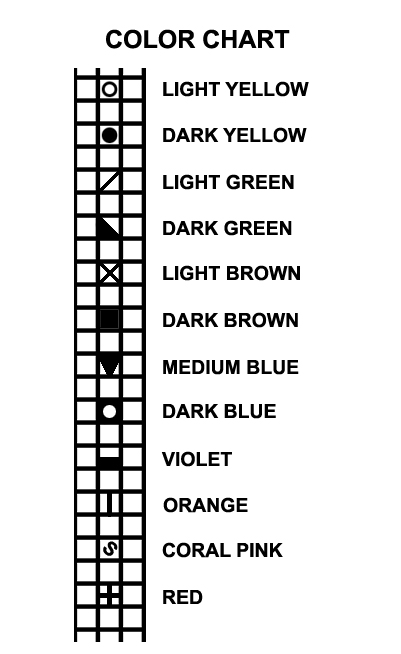
Orange Chart Pattern

Pattern includes 11 fruit motifs: peach 3¾ x 3¾ inches; pear 3⅜ x 4¼; orange 3¾ x 4¼; cherries 4⅜ x 4¼; grapes 4¾ x 4½; strawberries 2¾ x 3; pineapple 4 x 8⅛; lemon 3 x 3⅝; plums 3⅜ x 3¾; apple 3¾ x 4¼; and bananas 4⅜ x 4¾. A chart for placing the colors and diagrams showing how to arrange the motifs on lunch cloths, table cloth, runner and luncheon set are also included.
This colorful fruit design for cross stitch makes a charming decoration for lunch cloths, runners, lunch sets, table cloths, curtains and slip covers for chair backs. The 10 to the inch crosses are suitable for six strand cotton.
Suggested Materials—Linen, cotton with a linen finish, cotton broadcloth, percale, gingham, and unbleached muslin are suitable materials. The diagrams in the pattern show the pieces made of 36-inch material. The large cloth can be made of 36, 54 or 72-inch material.
Old Time Crochet Patterns & Designs Magazine | Summer 1984
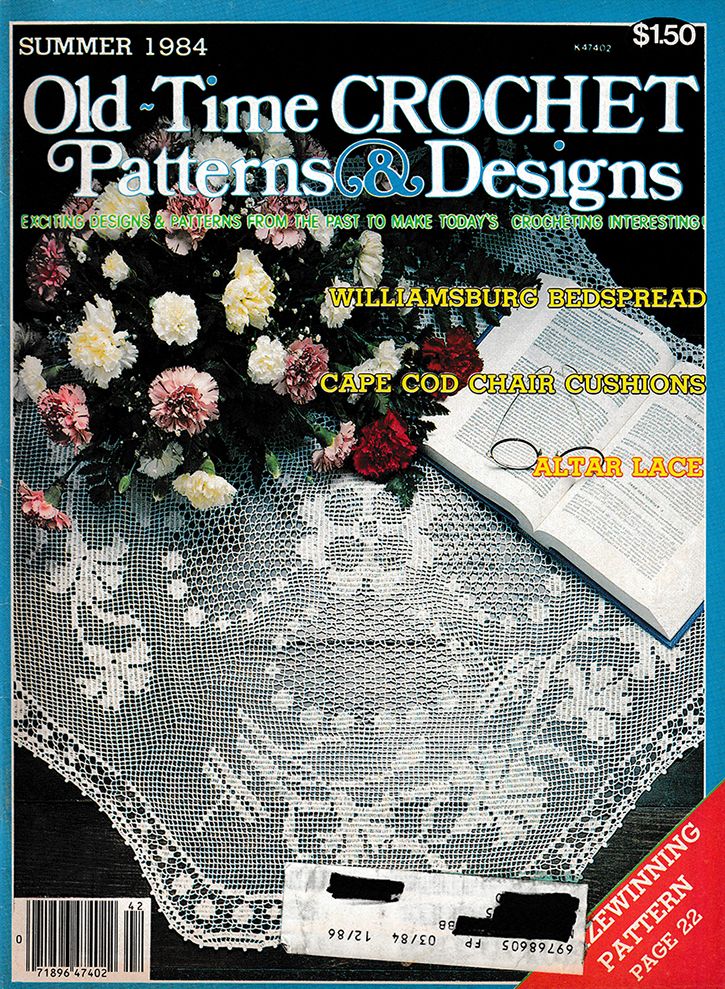
Old Time Crochet Patterns & Designs Magazine
Volume 6, Number 1
Summer 1984
Exciting designs & patterns from the past to make today's crocheting interesting!
Magazine developed to bring back designs and patterns from the past. Distributed in quarterly issues from 1979 to 2002.
| PATTERN NAME | YEAR | ORIG PUBLICATION |
| Crocheted Cotton Lace Dress | 1933 | Coats |
| Sundial Doily #D-125 | 1948 | Spool Cotton #252 |
| Sports Jacket #169 | 1935 | Spool Cotton #62 |
| Flower Bouquet Doily | 1950 | Star #71 |
| Child's Crocheted Sweater | 1916 | |
| Cape Cod Chair Cushions | Royal Society | |
| Williamsburg Bedspread | Royal Society | |
| Grand Manner Tablecloth #7597 | Spool Cotton #202 | |
| Patriotic Pillow | 1918 | |
| Crocheted Lace for Round Lunch Cloth | 1914 | |
| Carnation Design Doily | 1935 | Mary Card |
| Quarter-masters' Corps Emblem Pillow-Cover | ||
| United States Marine Corps Emblem Pillow-Cover | ||
| Laces of Cluny Crochet Pincushion Top | ||
| Laces of Cluny Crochet Narrow Edging | ||
| Laces of Cluny Crochet Edging and Insertion | ||
| Butterfly Scarf End in Filet Crochet | 1923 | |
| Camisole | ||
| Boudoir Cap | ||
| Nightgown Yoke | ||
| Bread Tray Ruffle Doily | American Thread | |
| Snowflake Doyley | ||
| Scarf-End for Library Table | 1919 | Mary Card |
| Tray Cloth | ||
| Potholder Mitt | 1945 | Spool Cotton |
| Mystic Shrine Emblem Pillow-Cover | 1920 | |
| Handsome Sideboard Scarf | 1920 | |
| Neckwear with Crochet Trim | 1926 | |
| Lace for Altar Cloth | 1916 | |
| Marguerite Crocheted Shawl | 1953 | Star #103 |
| Irish Crochet Lace with Insertion | 1903 |
Whimsical Lamp Shade Cut and Paste Paper Craft
HOW TO MAKE WORKING TRACINGS OF DESIGNS
Before using designs, they should be traced onto working sheets. Lay a sheet of tracing paper over page. Use a small amount of artist’s rubber cement, applied to each corner of tracing paper only, to hold it in place. Remove paper carefully. Rubber cement traces are easily rubbed away with fingertips. If rubber cement is not available, attach with small pieces of Scotch tape or masking tape. Tapes are difficult to remove. To avoid tearing page, cut the tape at edges of paper and leave tape on page.
EQUIPMENT: Tracing paper; hard and soft pencils; white chalk; scissors; glue or paste; small water-color brush; black India ink; fine-pointed pen.
MATERIALS: Any colored paper may be used—wallpaper, construction paper, designers' paper, or Dennison's gummed crepe paper made especially for applique. See other materials under directions for each item.
GENERAL DIRECTIONS
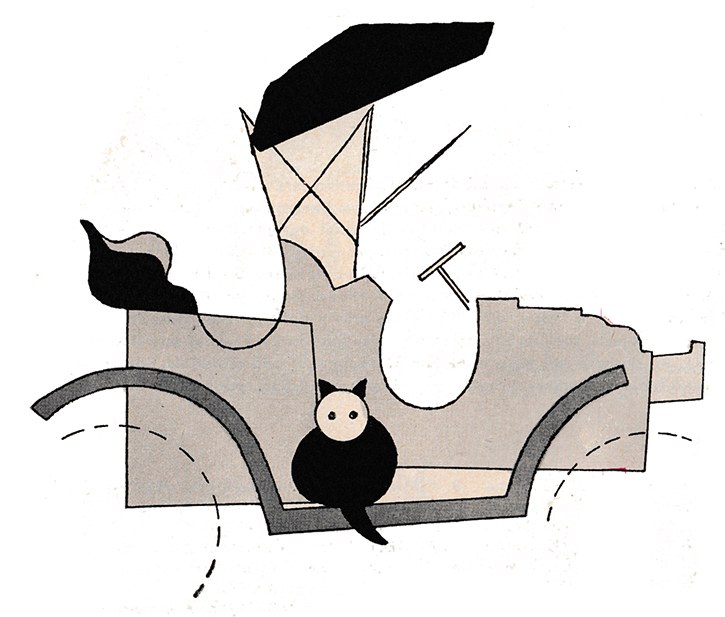
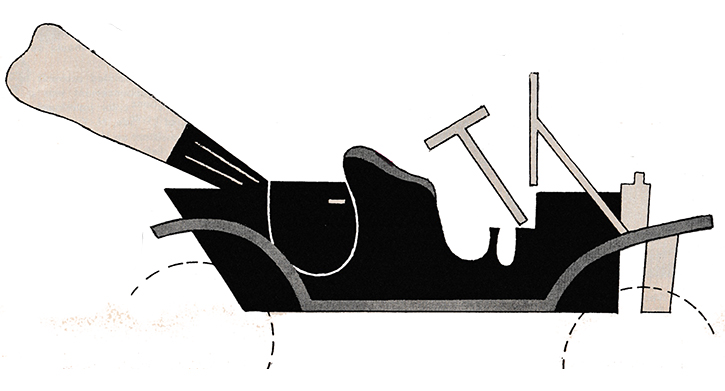
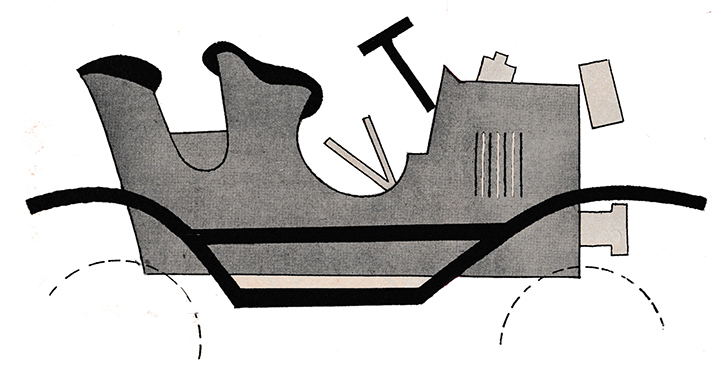
Trace patterns onto tracing paper. Make one complete tracing for placing pattern, separate tracings for individual parts. For placing pattern, trace parts to be covered with applique slightly inside the outlines, all other lines (those drawn in with paint or ink) exactly as on pattern. Trace patterns for individual parts about ⅛" larger on edges where they are overlapped by another part (e. g., make Tommy Stout's breeches ⅛" longer where overlapped by stockings). Make patterns for underparts in one piece (e. g., make entire car bodies in one piece, including areas overlaid by fenders).
Go over lines on reverse side of tracing with soft pencil (use white chalk for patterns to be cut from dark paper or felt). Use tracing, right side up. Trace outlines. Cut out.
Draw in painted or inked lines before pasting pieces into position.
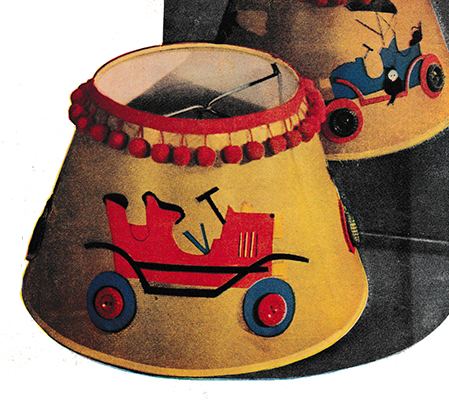
LAMP SHADE
MATERIALS: Lamp shade, 6¾" high, 6" across top, 10" across bottom, chartreuse or desired color. Paper: black, orange, green, yellow, blue. Buttons: matching pair of red, blue, and green for wheels; 1 white pearl button for cat's face. White poster paint. Red ball fringe—enough to circle top of shade, allowing 1" overlap.
DIRECTIONS: Follow "General Directions" for cutting and assembling. Colors for touring car: car, black; fenders and running board, front seat upholstery, orange; wheels, convertible top, windshield and radiator pieces, yellow; steering wheel, green.
With white paint and small brush, draw door, door handle, two fold lines on convertible top of black car, alternate vent lines on hood of orange car. With pen and ink, draw remaining vent lines and small back door of orange car; door and hand grip on back seat of blue car.
Paste pieces of cars onto shade. Paste buttons onto wheels. (Use blue buttons for black car.) Paste on buttons for cat's face. With pen and ink, draw steering wheel and supporting struts for top of blue car. Paste ball fringe around top.
Nursery Rhyme Shadow-Box Pictures Cut and Paste Paper Craft
HOW TO MAKE WORKING TRACINGS OF DESIGNS
Before using designs, they should be traced onto working sheets. Lay a sheet of tracing paper over page. Use a small amount of artist’s rubber cement, applied to each corner of tracing paper only, to hold it in place. Remove paper carefully. Rubber cement traces are easily rubbed away with fingertips. If rubber cement is not available, attach with small pieces of Scotch tape or masking tape. Tapes are difficult to remove. To avoid tearing page, cut the tape at edges of paper and leave tape on page.
EQUIPMENT: Tracing paper; hard and soft pencils; white chalk; scissors; glue or paste; small water-color brush; black India ink; fine-pointed pen.
MATERIALS: Any colored paper may be used—wallpaper, construction paper, designers' paper, or Dennison's gummed crepe paper made especially for applique. See other materials under directions for each item.
GENERAL DIRECTIONS
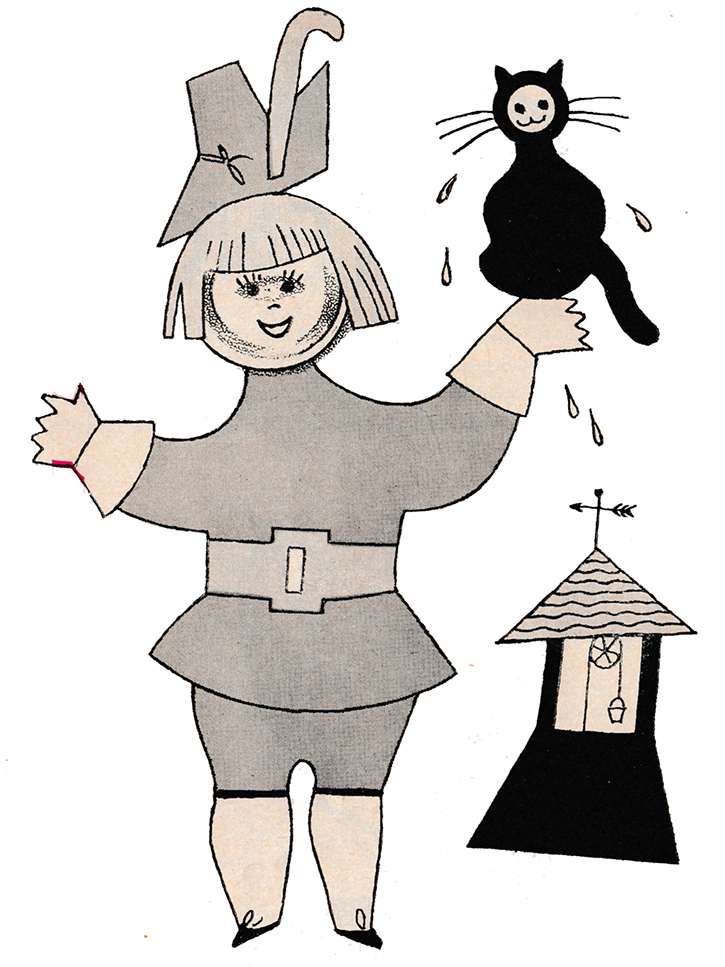
Trace patterns onto tracing paper. Make one complete tracing for placing pattern, separate tracings for individual parts. For placing pattern, trace parts to be covered with applique slightly inside the outlines, all other lines (those drawn in with paint or ink) exactly as on pattern. Trace patterns for individual parts about ⅛" larger on edges where they are overlapped by another part (e. g., make Tommy Stout's breeches ⅛" longer where overlapped by stockings). Make patterns for underparts in one piece (e. g., make entire car bodies in one piece, including areas overlaid by fenders).
Go over lines on reverse side of tracing with soft pencil (use white chalk for patterns to be cut from dark paper or felt). Use tracing, right side up. Trace outlines. Cut out.
Draw in painted or inked lines before pasting pieces into position.
SHADOW-BOX PICTURES
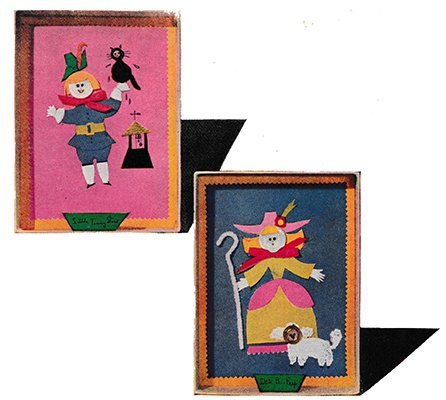
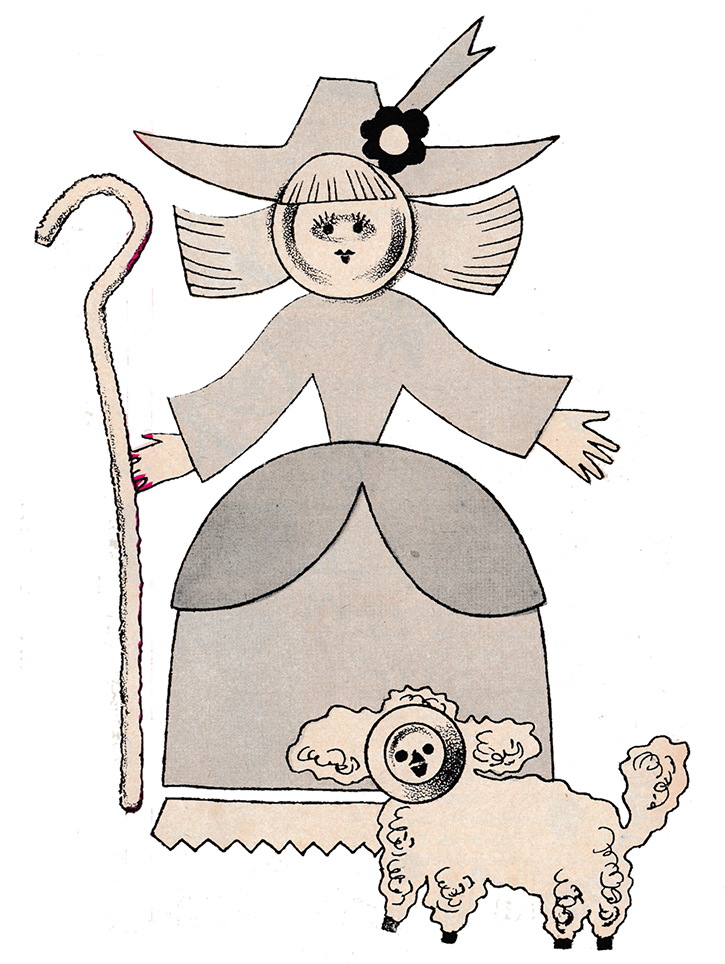
MATERIALS: 2 cardboard boxes, 8½" x 6¼" x 1½" deep (or larger if desired). Paper: blue, yellow, green, fuchsia, pink, black, white, orange, chartreuse. Felt: black for cat, wine-red for flower on Bo- Peep's hat. Buttons: 2 white pearl, 2-hole, 1⅛" across for faces; 1 gold, 2-hole, indented center, across for lamb's head; 1 black, 2-hole, indented center, ½" across for cat's head. Poster paints: red, white, fuchsia. Pipe cleaner.
DIRECTIONS: To place colors of backgrounds and separate parts, see photographs. Prepare paper parts according to "General Directions." Fringe hair as indicated. Decorate as follows: Paint red mouths on face buttons; outline rims of buttonhole "eyes" and draw eyelashes with pen and ink. Paint center of button for lamb's face fuchsia, for cat's face, white. When dry, paint red mouth on cat. With pen and ink, draw the following: on lamb —nose, mouth, hooves, "curls"; on Tommy—shoes, bows, stocking tops, wrist lines on gloves, buttons on suit, cord on hat; details on Tommy's background.
Paste backgrounds into boxes. Frame with ½" strips of yellow paper, pinked along inner edge. Paste parts for each picture into position. Paste cerise bows under chins. Bend pipe cleaner into a crook and paste into Bo-Peep's box. Cut markers from green paper; letter or write on them "Little Bo-Peep" and "Little Tommy Stout." Fold as indicated, paste into boxes.
Little Wooden Boxes Cut and Paste Paper Craft
HOW TO MAKE WORKING TRACINGS OF DESIGNS
Before using designs, they should be traced onto working sheets. Lay a sheet of tracing paper over page. Use a small amount of artist’s rubber cement, applied to each corner of tracing paper only, to hold it in place. Remove paper carefully. Rubber cement traces are easily rubbed away with fingertips. If rubber cement is not available, attach with small pieces of Scotch tape or masking tape. Tapes are difficult to remove. To avoid tearing page, cut the tape at edges of paper and leave tape on page.
EQUIPMENT: Tracing paper; hard and soft pencils; white chalk; scissors; glue or paste; small water-color brush; black India ink; fine-pointed pen.
MATERIALS: Any colored paper may be used—wallpaper, construction paper, designers' paper, or Dennison's gummed crepe paper made especially for applique. See other materials under directions for each item.
GENERAL DIRECTIONS
Trace patterns onto tracing paper. Make one complete tracing for placing pattern, separate tracings for individual parts. For placing pattern, trace parts to be covered with applique slightly inside the outlines, all other lines (those drawn in with paint or ink) exactly as on pattern. Trace patterns for individual parts about ⅛" larger on edges where they are overlapped by another part (e. g., make Tommy Stout's breeches ⅛" longer where overlapped by stockings). Make patterns for underparts in one piece (e. g., make entire car bodies in one piece, including areas overlaid by fenders).
Go over lines on reverse side of tracing with soft pencil (use white chalk for patterns to be cut from dark paper or felt). Use tracing, right side up. Trace outlines. Cut out.
Draw in painted or inked lines before pasting pieces into position.
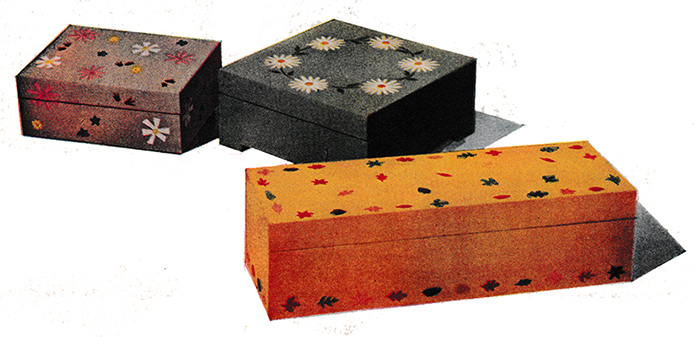
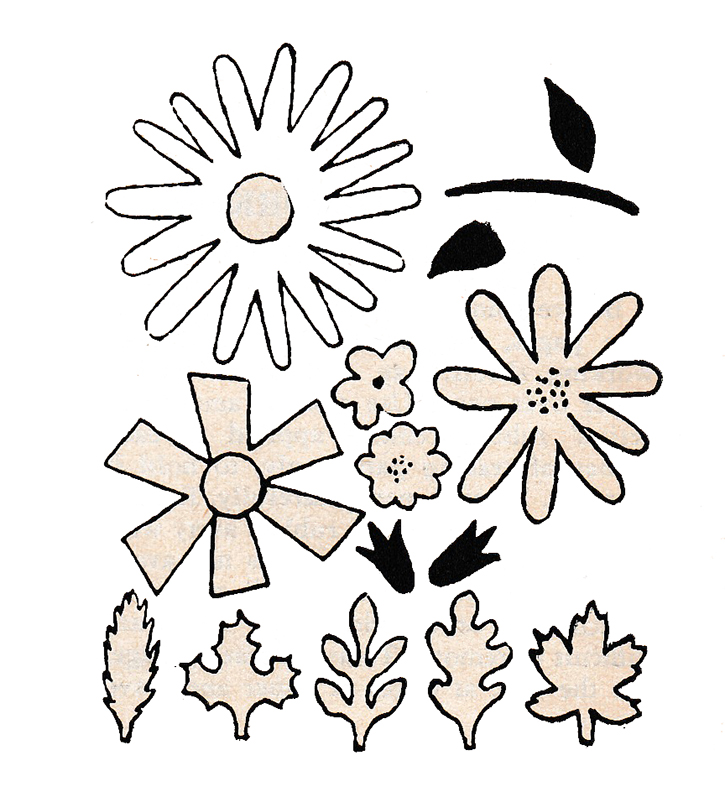
MATERIALS: For All Boxes: Fine sandpaper; paint brush; shellac; alcohol to clean shellac brush; enamel or poster paint; turpentine, if using oil-base paints.
Daisy-Wreath Box: Hinged-top, footed box, 6" square x 2⅝" deep. Paint: aqua for outside, bright yellow for inside and bottom. Paper: dark green, white, bright yellow.
Field-Flower Box: Hinged-top box, 5½" x 4" x 2⅛" deep. Paint: gray for outside, aqua for inside and bottom, small amount of red for flower centers. Paper: white, yellow, rose, dark green, aqua.
Autumn-Leaf Box: Hinged-top box, 10¾" x 3¾" x 2⅞" deep. Paint: golden yellow for outside, soft medium green for inside and bottom. Paper: aqua, pink, tan, rust, wine red, medium blue.
DIRECTIONS:
Sand box smooth. Wipe off. Paint inside and bottom. Dry. Paint outside. Dry. No placing patterns are required. Trace and cut out paper pieces as described under "General Directions." For colors and placing, see photographs.
Daisy-Wreath Box: Paste flowers, stems and leaves in a circle on top.
Field-Flower Box: Paste flowers and leaves at random on top and sides of box. Let flowers overlap box-opening. When paste is dry, cut through these flowers along opening with a sharp razor blade. Stipple centers of rose-colored flowers with red paint; dot centers of blue flowers with black ink.
Autumn-Leaf Box: Paste a border of leaves around base and top of box. Scatter more leaves at random on top. Shellac tops and sides of boxes.
Childhood Is Royalty | Blye Jordan
Childhood Is Royalty
By BLYE JORDAN
"You be king, and I'll be queen!"
A lady and her lord!
Oh, give them crowns of the arnica-bloom,
And scepters of goldenrod!
"Forty young dukes a-roaming,"
Beside the cedar-hedge;
Each maid is dressed to look her best,
For they've come for a bridal pledge.
"London Bridge is falling down!"
Games of childhood, these;
And each "fair lady" wears a gown
Some gallant knight to please.
'Tis a birthday-party on the law,
A rainbow company
Of shimmering frocks, like hollyhocks,
Or the robes of royalty.
Frocks that vie with summer sky,
Broidered and frilled like a flower.
Flutings of lace, their dainty grace
Costing many a busy hour.
For mothers are willing and worshipful slaves.
Who with hand and heart and head,
Toil with hook adn needlework-book,
Shuttle and scissors and thread.
"See my new dress! Look, Mary and Bess -
The present that mother gave!"
And the beaming pride of the gay young queen
Is ample reward for the slave!
Pineapple Chart Pattern
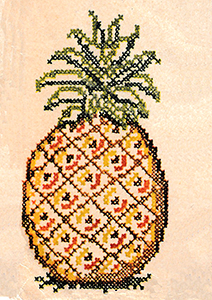
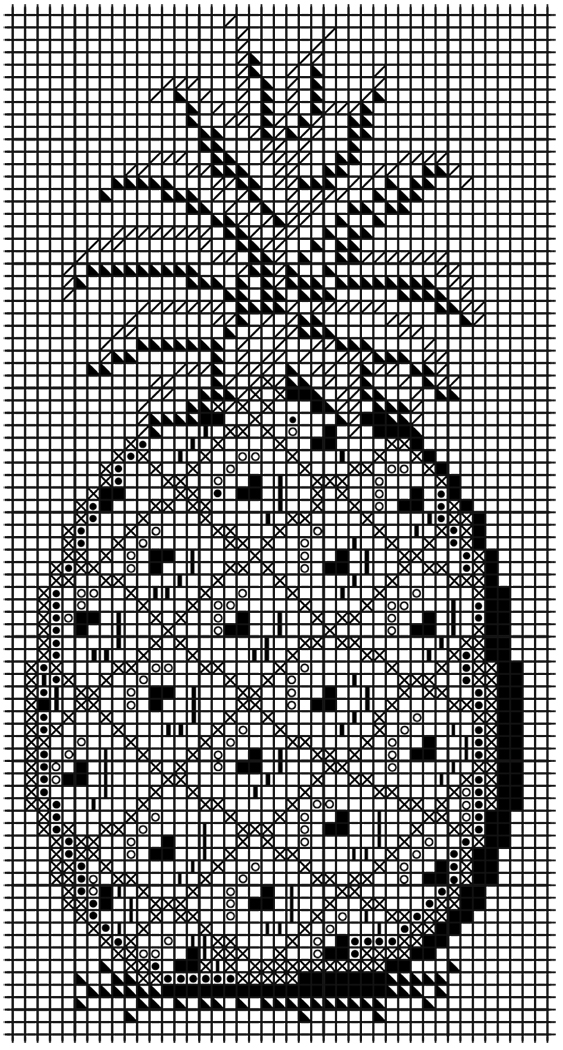
Pattern includes 11 fruit motifs: peach 3¾ x 3¾ inches; pear 3⅜ x 4¼; orange 3¾ x 4¼; cherries 4⅜ x 4¼; grapes 4¾ x 4½; strawberries 2¾ x 3; pineapple 4 x 8⅛; lemon 3 x 3⅝; plums 3⅜ x 3¾; apple 3¾ x 4¼; and bananas 4⅜ x 4¾. A chart for placing the colors and diagrams showing how to arrange the motifs on lunch cloths, table cloth, runner and luncheon set are also included.
This colorful fruit design for cross stitch makes a charming decoration for lunch cloths, runners, lunch sets, table cloths, curtains and slip covers for chair backs. The 10 to the inch crosses are suitable for six strand cotton.
Suggested Materials—Linen, cotton with a linen finish, cotton broadcloth, percale, gingham, and unbleached muslin are suitable materials. The diagrams in the pattern show the pieces made of 36-inch material. The large cloth can be made of 36, 54 or 72-inch material.

| Pattern Categories Browse the categories to help you find the patterns you're looking for. |
||


