Maple Leaf and Oak Leaf Stenciling Craft

HOW TO STENCIL
MATERIALS:
EQUIPMENT: Sharp stencil-cutting tool or razor blade. Stencil paper—in small packages or large sheets. Stencil brushes— very stiff bristles and flat circular bottom. (No. 6 with ½" diameter good, or artists’ oil brushes with stiff bristles.) 2B drawing pencil. Textile paints, with directions for using and setting colors, usually a jar of extendor. Cleaning fluid—any reliable fabric cleaner—for cleaning brushes and stencil plates. Soft cotton rags. Desk-size white blotter. Right-angle triangle. Masking tape. Flat piece of glass on which to cut stencils, or Manila paper (cardboard makes knife stick).
Fabrics: All cottons, linens, rayons and silk. (Avoid rough weaves. It is hard to manipulate brush on them.) For washable articles, first remove all sizing by washing in lukewarm water and soapsuds, so color will not partially wash out.
Silks, chiffons and very fragile materials should be taped or pinned to a white blotter so they will not stick to stencil brushes. Heavy fabric need not be taped down. Unbleached cotton, Indian Head or mat side of chintz takes stenciling well. When stenciling garments, cut out first, stencil pieces separately, then sew.
Color of Fabrics: Textile colors, being transparent, are most effective used on light or medium backgrounds. If dark colored material is used, add white to colors to make them opaque. White does not penetrate fibre of fabric sufficiently to give secure anchorage, therefore will not be as washable as other colors.
HOW TO MAKE WORKING TRACINGS OF DESIGNS
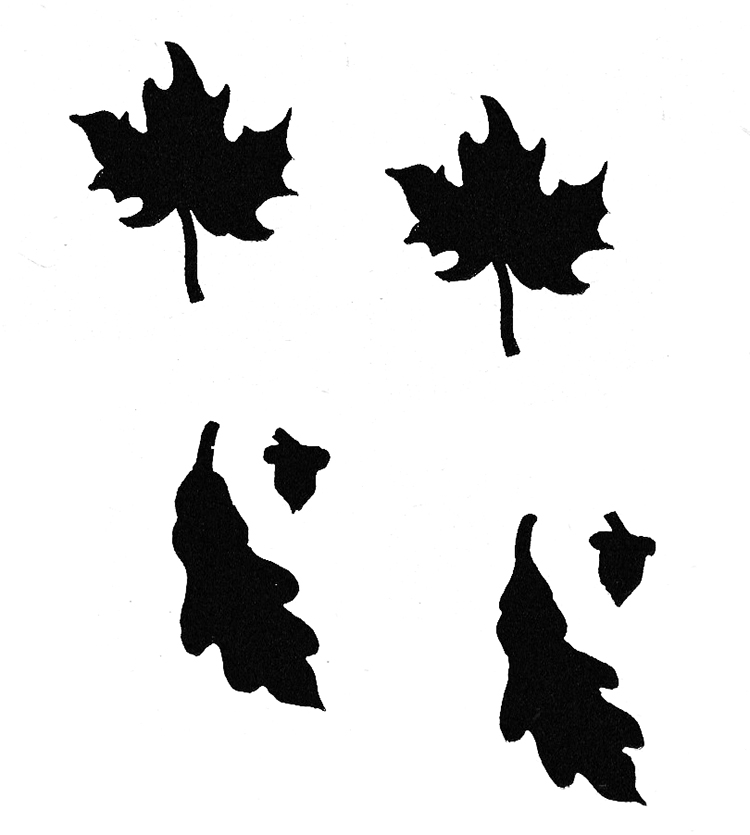
Before using designs, they should be traced onto working sheets. Lay a sheet of tracing paper over page. Use a small amount of artist’s rubber cement, applied to each corner of tracing paper only, to hold it in place. Remove paper carefully. Rubber cement traces are easily rubbed away with fingertips. If rubber cement is not available, attach with small pieces of Scotch tape or masking tape. Tapes are difficult to remove. To avoid tearing page, cut the tape at edges of paper and leave tape on page.
WORKING PROCEDURE
Tracing: Place tracing sheet over white paper so lines will show clearly; then place on flat surface and tape to prevent slipping. Lay stencil paper over tracing. Tape. Trace, using pencil lightly. If you dig into stencil paper, both cut and printed edges will be fuzzy. Do not try to make lines black, just plain enough to see when cutting.
Cutting: Place stencil paper on glass or Manila envelope. Follow outlines with knife, cutting all the way through, so that cut shape will fall out easily. Knife should always point toward cut-out shape and be held at angle to obtain slightly beveled edge; this keeps paint from creeping under stencil edges when printing. Always cut toward you, that is, from top to bottom. Keep turning stencil paper around so that this is possible. Keep sharpening knife on moist sharpening stone.
Mixing Colors: Use plate, palette or any hard surface. Little color is needed. Amount on tip of knife will go a long way. Read directions carefully which come with stencil paints. Some textile paints need to be mixed with extendor, which is a necessary chemical ingredient. Never mix more paint than needed for painting at one time, as fabric paint dries rapidly.
Printing: Place fabric on white blotter. Tape. Lay stencil where you want it. Tape, or hold firmly with hand. Dig brush into color and rub off on piece of paper until almost dry. Work paint into fabric, through stencil openings, holding brush upright. With rotating motion, work from edge of opening toward center. Work color well into fabric. Do not load too much paint onto brush if you wish to make area solid. Better to repeat until entire area is covered. To shade, cover areas you wish to darken with other coats of paint.
Care of Stencils and Brushes: Do not wash stencils after using, as cleaning wears edges. Turn each stencil face down on blotter; with soft rag and a little cleaning fluid, gently wipe back clean. Store with sheet of paper between stencils.
Wash brushes in cleaning fluid; dry well. It is desirable to have a separate brush for each color. For example, a red brush may be used for all shades of red. Brushes should not be washed more than necessary. A little paint in bristles helps to keep them stiff.
Setting: Allow finished work to dry more than 24 hours and not more than 3 days. Then place fabric on ironing board, face up; cover with dry cloth and press for 3 minutes at 300° Fahrenheit, or at linen temperature on adjustable iron. Steam iron may be used. Turn material and press back with pressing cloth, dampened if desired. Fabrics which require a low heat should be set by pressing them a few minutes longer than directed above at a lower temperature.
TO STENCIL TIES
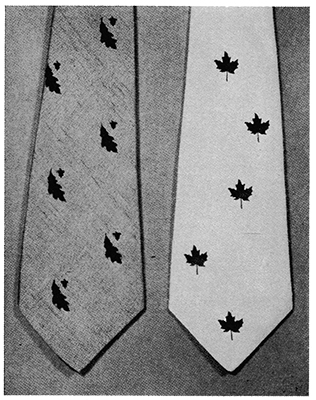
Cut a stencil for maple leaf or oak leaf and acorn, following directions. Print designs solid on silk ties in scatter effect or repeat designs.

| Pattern Categories Browse the categories to help you find the patterns you're looking for. |
||


