Little Wooden Boxes Cut and Paste Paper Craft

HOW TO MAKE WORKING TRACINGS OF DESIGNS
Before using designs, they should be traced onto working sheets. Lay a sheet of tracing paper over page. Use a small amount of artist’s rubber cement, applied to each corner of tracing paper only, to hold it in place. Remove paper carefully. Rubber cement traces are easily rubbed away with fingertips. If rubber cement is not available, attach with small pieces of Scotch tape or masking tape. Tapes are difficult to remove. To avoid tearing page, cut the tape at edges of paper and leave tape on page.
EQUIPMENT: Tracing paper; hard and soft pencils; white chalk; scissors; glue or paste; small water-color brush; black India ink; fine-pointed pen.
MATERIALS: Any colored paper may be used—wallpaper, construction paper, designers' paper, or Dennison's gummed crepe paper made especially for applique. See other materials under directions for each item.
GENERAL DIRECTIONS
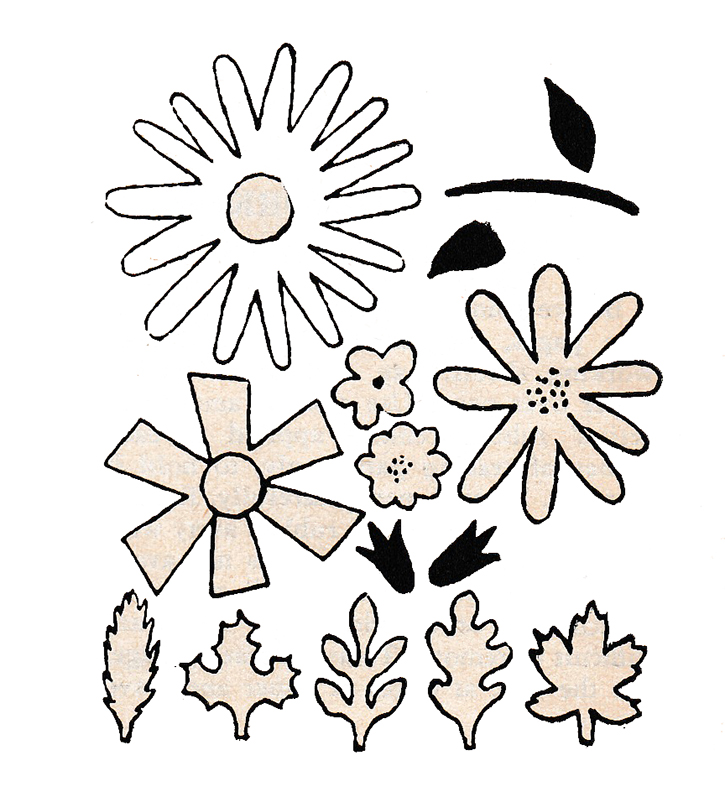
Trace patterns onto tracing paper. Make one complete tracing for placing pattern, separate tracings for individual parts. For placing pattern, trace parts to be covered with applique slightly inside the outlines, all other lines (those drawn in with paint or ink) exactly as on pattern. Trace patterns for individual parts about ⅛" larger on edges where they are overlapped by another part (e. g., make Tommy Stout's breeches ⅛" longer where overlapped by stockings). Make patterns for underparts in one piece (e. g., make entire car bodies in one piece, including areas overlaid by fenders).
Go over lines on reverse side of tracing with soft pencil (use white chalk for patterns to be cut from dark paper or felt). Use tracing, right side up. Trace outlines. Cut out.
Draw in painted or inked lines before pasting pieces into position.
MATERIALS: For All Boxes: Fine sandpaper; paint brush; shellac; alcohol to clean shellac brush; enamel or poster paint; turpentine, if using oil-base paints.
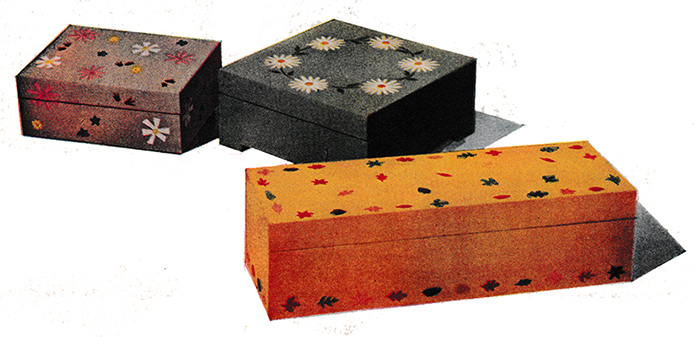
Daisy-Wreath Box: Hinged-top, footed box, 6" square x 2⅝" deep. Paint: aqua for outside, bright yellow for inside and bottom. Paper: dark green, white, bright yellow.
Field-Flower Box: Hinged-top box, 5½" x 4" x 2⅛" deep. Paint: gray for outside, aqua for inside and bottom, small amount of red for flower centers. Paper: white, yellow, rose, dark green, aqua.
Autumn-Leaf Box: Hinged-top box, 10¾" x 3¾" x 2⅞" deep. Paint: golden yellow for outside, soft medium green for inside and bottom. Paper: aqua, pink, tan, rust, wine red, medium blue.
DIRECTIONS:
Sand box smooth. Wipe off. Paint inside and bottom. Dry. Paint outside. Dry. No placing patterns are required. Trace and cut out paper pieces as described under "General Directions." For colors and placing, see photographs.
Daisy-Wreath Box: Paste flowers, stems and leaves in a circle on top.
Field-Flower Box: Paste flowers and leaves at random on top and sides of box. Let flowers overlap box-opening. When paste is dry, cut through these flowers along opening with a sharp razor blade. Stipple centers of rose-colored flowers with red paint; dot centers of blue flowers with black ink.
Autumn-Leaf Box: Paste a border of leaves around base and top of box. Scatter more leaves at random on top. Shellac tops and sides of boxes.

| Pattern Categories Browse the categories to help you find the patterns you're looking for. |
||


