 |
Shaggy Bearskin Rug Pattern

Shaggy Bearskin rugs are quickly made of ENTERPRISE Yarn by tying tassels to the face of a canvas rug back. Select a piece of heavy canvas or drill of the size desired for rug—draw lines on this canvas (or mark dots) ¾" apart lengthwise of the rug and 1 apart across the rug. For a round rug draw circles ¾" apart around the rug and place tassels 1" apart on the circles.
Tassels are made of a number of pieces of yarn cut to desired length and tied to the back at the spots marked by intersection of the lines.
Shaggier rugs with pile are made in solid plain colors. When made with 12 to 14 ends to the tassel, they are especially desirable for living rooms, porch, or bedrooms. (See picture at bottom.)
Designed rugs are best with 2" pile made of 16 to 20 ends. The colors will show as pictured above and many beautiful designs may be made for bath and bedrooms, or the living room.
TO CUT TASSELS
As when knitting, yarn from both ends of each ball may be used and if 5 balls are used 10 ends is the result. To get 20 ends in the simplest manner is the aim. The number of balls of each color to be used in the rug will determine the method to be followed.
If 10 balls of a color are needed, remove "unwind from this end" labels and stand all upright in box on floor, and bring all ten ends up over edge of table and cut into 4" lengths—two lengths will make a tassel.
If only 9 or 8 balls, or less—use yarn from both ends of 1 or 2 or more balls to get 10 ends—after unwinding a portion, change balls feeding from both ends and rotate so that all will run out at one time.
If only one ball of a color is needed, use yarn from both ends and wind 10 times around winding card for each tassel.
A winding card will also help—cut a piece of heavy cardboard 2" wide and 8 or 10 inches long. Around this yarn from 1 to 10 balls (or even all 20 balls) may be wound for 30 to 50 turns to fill the card. After filling the card, the yarn is cut along one edge with a sharp scissors or razor blade. The result is a number of pieces that may be picked up in units of 20 ends and piled criss-cross as shown, ready to attach to the back when desired.
Sewing to Back: The position of each tassel is indicated on the rug back by the crossing of the lines (shown here as four dots). Use a heavy darning needle, threaded with ENTERPRISE Yarn in same color as used for pile of the rug. Stitch through the first two dots and then bring yarn back and stitch through the second two dots of the same set, across the rug—see No. 1 on sketch. Do not pull through, but leave a loop as shown. Into this loop insert one of the tassels (already cut). Find the center of tassel—No. 2 on sketch—and sew to back. To find center, place both ends of the tassel together and pull up against the loop, and then pull the needle end of the thread to tighten loop around the tassel. The tassel should now be allowed to lie out, opened on the rug back and must be placed lengthwise of the rug. See No. 3 on sketch. Grasp both ends of the stitching thread and tie a square knot to fasten securely to the back. Trim off ends of the tying thread even with the top end of the tassel. Repeat, until every set of dots on rug has a tassel on it.
If making conventional designs like stripes, squares, blocks, borders, etc., only these spots are used. If floral, triangular, round, or other unsymmetrical shapes are to be made, it may be necessary to fill in hollow spots with extra tassels to make the desirable smooth texture.
Designs are simple to lay out on the back. Using a soft pencil or crayon, draw the design by connecting dots on which color blocks, stripes, or spots are to be placed. Many designs can be made— copied from almost everything you see; rugs—pictures—drawings —cross stitch designs, etc.
On curved ends as on oval rugs, tie the tassels parallel to the lines drawn on back for 2 or 3 rows—they will drape more symmetrically and "terrace" up to the center more gracefully.
| MATERIAL REQUIRED: | 14 end 3" | 20 end 2" |
| 20" x 30" Rug | (725 tassels) 18 balls | 15 balls |
| 30" Round Rug | (940 tassels) 23 balls | 19 balls |
| 30" Square Rug | (1170 tassels) 28 balls | 23 balls |
| 30" x 45" Rug | (1680 tassels) 42 balls | 34 balls |
| 24" x 36" Rug | (1152 tassels) 28 balls | 23 balls |
The above is figured on 7⅓ feet of yarn to each tassel. If vari-color designs are inserted, as on the 20 x 30 initial rug, count the tassels covered with the colors—in this design 292 tassels = 292 x 7⅓ = 2141 ft. = 714 yds. or 6 balls (125 yds. to ball). Balance of rug will take 9 balls.
Personal initials as shown are always desirable. A single large initial may also be laid out on any size or shape back.
School and college initials in school colors are suitable for the boys' or girls' room, in round or rectangular shapes.


Dusting Glove Pattern
Shaggy Bearskin Rug Pattern
Striped Bedroom Rug Pattern
Sugar 'N Cream Pot Holder Patterns
Pots and Pans Pot Holder Patterns
Hearts Pot Holder Pattern
Diamonds Pot Holder Pattern
Bag Pattern
Crocheted Chenille Rug Pattern
Hot Dish Mats Pattern
Barbecue Mitts Pattern
Floral Rug Patterns
Super Absorbent Coasters Pattern
V's Table Mat Set Patterns
Blocks and Bands Table Mat Set Patterns
Lantana Blossoms Table Mat Set Patterns
Colonial Rug and Chair Seat Set Patterns
Kitten and Bunny Rug Pattern
Dutch Boy and Girl Rug Pattern
Initials in Puff Stitch Patterns
Hot Plate Mat and Pot Holder Patterns
Fluffy Puppy Toy Pattern
Posy Glass Muffs Pattern
Practical Hot Dish Mats Pattern
Chair Set and Placement Set Patterns
Mid-Riff Sweater Pattern
Soaker Pattern
Soaker Pattern
Dusting Glove Pattern

For a quick dusting job it cannot be beat, and may be used for applying furniture polish, polishing and dusting in the home or garage. The glove pictured is a canvas work glove, obtainable in any store (purchase the size needed), covered with tassels (do not cut ends as for rugs) made by wrapping a single end of ENTERPRISE Yarn, around a card 3 to 3½ inches wide. Wind nine to ten turns for each tassel and pull from the end of the card, double and tie in the middle to the desired spot, as for a rug, to make a bunch of loops.
Tie a row of tassels down each finger and the thumb, and fill the palm to the wrist, with tassels about one inch apart.
Colors can be mixed, or not, as wanted. The fingers can be all of a dark color, and the palm in light shades—any pleasing effect wanted will serve the purpose.
Gloves can be right or left handed, or both, as desired. Try it— you'll like the way it works. Each glove takes about 100 yards of yarn.
Dusting Glove Pattern
Shaggy Bearskin Rug Pattern
Striped Bedroom Rug Pattern
Sugar 'N Cream Pot Holder Patterns
Pots and Pans Pot Holder Patterns
Hearts Pot Holder Pattern
Diamonds Pot Holder Pattern
Bag Pattern
Crocheted Chenille Rug Pattern
Hot Dish Mats Pattern
Barbecue Mitts Pattern
Floral Rug Patterns
Super Absorbent Coasters Pattern
V's Table Mat Set Patterns
Blocks and Bands Table Mat Set Patterns
Lantana Blossoms Table Mat Set Patterns
Colonial Rug and Chair Seat Set Patterns
Kitten and Bunny Rug Pattern
Dutch Boy and Girl Rug Pattern
Initials in Puff Stitch Patterns
Hot Plate Mat and Pot Holder Patterns
Fluffy Puppy Toy Pattern
Posy Glass Muffs Pattern
Practical Hot Dish Mats Pattern
Chair Set and Placement Set Patterns
Mid-Riff Sweater Pattern
Soaker Pattern
Soaker Pattern
eBook Bundle Pack Subscriptions
Browse and print the patterns for free, or buy the ad-free eBooks. Purchase of these eBooks and bundle packs help defray the costs of the websites. Thank you for your support!
Please note: An eBook is an electronic, downloadable book. You will not receive a hard copy in the mail.
After purchase, you will have access by logging into your account at any time. Your download never expires. Please note: An eBook is an electronic, downloadable book. You will not receive a hard copy in the mail.
Feel free to try out a free eBook first to see what you can expect.
 |
2007-2012 eBook Bundle Pack Subscription Get the entire ePattern Library restored through 2012! That's 125 digitally restored knit & crochet leaflets plus 2 bonus vintage books! |
  |
|
 |
2013 eBook Bundle Pack Subscription Get a lifetime subscription for the entire ePattern Library restored between 2007 and 2013! That's 57 digitally restored knit & crochet leaflets plus 2 bonus vintage books! |
|
|
 |
2014-2015 eBook Bundle Pack Subscription Get a lifetime subscription for the entire ePattern Library restored in 2014 & 2015 - both years! That's 62 digitally restored knit, crochet, and craft leaflets! |
|
|
 |
2016-2018 eBook Bundle Pack Subscription Get a lifetime subscription for the entire ePattern Library restored restored in 2016, 2017, & 2018 - all three years! That's 65 digitally restored knit, crochet, and craft leaflets! |
|
|
 |
2019-2022 eBook Bundle Pack Subscription Get a lifetime subscription for the entire ePattern Library that will be restored in 2019, 2020, 2021, & 2022 - all four years! That's 60 digitally restored knit, crochet, & cross stitch leaflets and patterns plus three bonus Purple Kitty originals! |
|
|
Mary's Dollies | Juvenile Styles Volume No. 15

Mary's Dollies
Volume 15
Juvenile Styles Publishing Company
Original Copyright 1952
  |   |   |
Little girls ... big girls, too, will get a big thrill and endless hours of enjoyment dressing their dolls in these beautiful costumes that you have made. You'll find her clothes so easy to knit, crochet and sew! Patterns are made for 14-inch dolls.
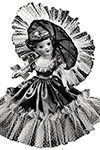


Dolly Madison Costume Pattern

Material: Satin – ¼ yd (0.23m)
Dotted Flocked nylon net – ¼ yd (0.23m)
Satin skirt: 9 in (22.9cm) long, 36 in (91.4cm) wide
Flocked nylon ruffle: 3 yds (2.74m), 28 in (71.1cm) long, 4-¼ in (11.5cm) wide
Sleeve bands: 3 in (7.6cm) long, 1 in (2.5cm) wide
Sleeve ruffle: 9 in (22.9cm) long, 1 in (2.5cm) wide
Neck ruffle: 24 in (61.0cm) long, 1 in (2.5cm) wide
Parasol ruffle: 3 yds (2.74m) long, 3-½ in (8.9cm) wide
Parasol top ruffle: 18 in (45.7cm) long, 2-½ in (6.4cm) wide
Parasol: Eight pieces of satin
Be sure to measure the garment on the doll as you sew.
NET YOKE: Place right sides together. Sew around backs and neck, turn. Sew two darts in bodice on front. Sew shoulder seams. Mark center of bodice yoke and center of net yoke, holding right sides together. Baste yoke to bodice; starting at center front, topstitch. Finish hems on backs. Gather frilling for yoke. Sew on yoke as shown in Illustration.
SLEEVES: Gather bottom of sleeves to measure 3 in (7.6cm). Sew sleeve band on right side, then turn band under and topstitch. Gather ruffle on top of band. Gather top of sleeve, having most fullness at top of sleeve, insert into armhole. Sew side seams and sleeve seams.
SKIRT: Hem bottom of skirt. Gather ruffle to measure same as skirt. Sew on skirt leaving ½ in (1.3cm) below skirt hem. Hem vents at back 3-¼ in (8.3cm) from top. Gather top of skirt to measure same as bottom of bodice. Mark center of bodice and center of skirt. Sew skirt to bodice, then turn and topstitch. Sew back of skirt. Sew three small snaps on bodice.
PARASOL: Join eight pieces taking ¼ in (0.65cm) seams. Press seams open. Turn bottom edge back on right side, topstitch. Open parasol and measure parasol covering on frame to see if it fits properly. Now gather ruffle for parasol same as for dress. Sew on parasol on right side about ⅛ in (0.31cm) from edge. Place parasol on opened frame. Sew seams to ends of ribs. Gather 18 in (45.7cm) ruffle to fit top of parasol. Draw up tightly and sew over raw edges.

Dolly Madison Costume Pattern
Alice Blue Dress and Pinafore Pattern
Sun Bonnet Sue Outfit Pattern
Playtime Togs Terry Cloth Beach Robe Pattern
Playtime Togs Slacks and Shirt Pattern
Playtime Togs Shorts and Halter Pattern
Isabelle Knitted Skating Costume Pattern
Renee Crocheted Sun Dress and Cape Pattern
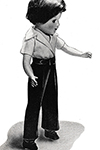
Playtime Togs Slacks and Shirt Pattern

Material: Poplin or Cotton – ½ yd (0.46m)
Be sure to measure the garment on the doll as you sew.
BELT: Fold both ends of binding towards center, stitch together open ends. Fit robe on doll and stitch center of belt at back.
SLACKS: Sew fronts together with right sides facing, from top to crotch. Hem vents at back to notch. Turn top of slacks down ¼ in (0.65cm) and hem. Hem bottom of legs. Sew backs together from bottom of vents to crotch. With right sides facing, sew legs together. Turn and press seams and crease in fronts. Sew on snap at back.
SHIRT: With right sides together, sew shoulder seams. Sew two small darts in sleeve. Insert sleeves into armhole, easing top of sleeve. Hem bottom of sleeves. Sew underarm and sleeve seams. Stitch ends of collar on wrong side, turn. Now baste collar on right side of shirt, having notch of collar and back meet. Fold facing at notch, lay facing (on top of collar) and machine stitch across top of shirt having notches meet. Stitch facing at bottom of shirt, on both sides. Turn on right side and hem remaining bottom of shirt. Sew on snap at front and two small buttons if desired.


Dolly Madison Costume Pattern
Alice Blue Dress and Pinafore Pattern
Sun Bonnet Sue Outfit Pattern
Playtime Togs Terry Cloth Beach Robe Pattern
Playtime Togs Slacks and Shirt Pattern
Playtime Togs Shorts and Halter Pattern
Isabelle Knitted Skating Costume Pattern
Renee Crocheted Sun Dress and Cape Pattern
Playtime Togs Terry Cloth Beach Robe Pattern

Material: Poplin or Cotton – ½ yd (0.46m)
Terry Cloth Beach Robe: Terry Cloth – ¼ yd (0.23m)
Bias Tape for Halter and Terry Cloth Beach Robe: 4 yds (3.66m)
Be sure to measure the garment on the doll as you sew.
TERRY CLOTH BEACH ROBE: With right sides facing, sew shoulder seams. Open and lay right side of binding on right side of sleeve opening, turn ¼ in (0.65cm) hem on inside of binding and stitch binding. Turn binding on other side and topstitch. Sew side seams and underarm. Starting at back, sew on binding completely around robe same as for sleeves.


Dolly Madison Costume Pattern
Alice Blue Dress and Pinafore Pattern
Sun Bonnet Sue Outfit Pattern
Playtime Togs Terry Cloth Beach Robe Pattern
Playtime Togs Slacks and Shirt Pattern
Playtime Togs Shorts and Halter Pattern
Isabelle Knitted Skating Costume Pattern
Renee Crocheted Sun Dress and Cape Pattern
Playtime Togs Shorts and Halter Pattern

Material: Poplin or Cotton – ½ yd (0.46m)
Bias Tape for Halter and Terry Cloth Beach Robe: 4 yds (3.66m)
Be sure to measure the garment on the doll as you sew.
SHORTS: Sew same as for slacks only turn hems (on top of shorts and bottom of shorts) under twice.
HALTER: With right sides facing, sew two pieces at notch. Sew two other pieces together at notch. Press seams open. With right sides together, sew ends and inside of halter, turn. Open and lay right side of binding on edge of halter, allow ¼ in (0.65cm) hem at each end of binding to turn under. Stitch binding to outside of halter.


Dolly Madison Costume Pattern
Alice Blue Dress and Pinafore Pattern
Sun Bonnet Sue Outfit Pattern
Playtime Togs Terry Cloth Beach Robe Pattern
Playtime Togs Slacks and Shirt Pattern
Playtime Togs Shorts and Halter Pattern
Isabelle Knitted Skating Costume Pattern
Renee Crocheted Sun Dress and Cape Pattern
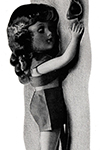
Sun Bonnet Sue Outfit Pattern

Material: Poplin or Polished Cotton – ¼ yd (0.23m)
Rickrack: 1 yd (0.91m)
Skirt: 4½ in (11.5cm) long, 36 in (91.4cm) wide
Be sure to measure the garment on the doll as you sew.
BODICE: Turn back hems on bodice at armhole edge, front and backs. Place right sides together and sew shoulder seams. Sew rickrack on armhole edges. Hem backs. Hem neck edge, sew on rickrack. Sew side seams.
SKIRT: Turn back hem ½ in (1.3cm) and sew on rickrack. Gather skirt to fit bodice. Sew vents at back of skirt. Right sides facing, sew skirt to bodice. Hem back of skirt. Sew two small snaps on bodice.
BONNET: Back of bonnet: Place right sides together and sew ¼ in (0.65cm) seam on bottom. Turn to right side and press. Gather between x's.
BRIM: Place right sides together (curve of brim), sew and turn. Mark center back of cap on gathered edge and center of brim on raw edge side, baste together, then sew, having centers meet. Sew rickrack on inside of brim allowing 7 in (17.8cm) on each side to tie.
PANTIES: Sew fronts together with right sides facing (from top to crotch). Hem vents at back. Hem top and legs of panties. Sew backs together from notch to crotch. Fold in half so center seams meet, with right sides facing, sew crotch. Sew on small snap.


Dolly Madison Costume Pattern
Alice Blue Dress and Pinafore Pattern
Sun Bonnet Sue Outfit Pattern
Playtime Togs Terry Cloth Beach Robe Pattern
Playtime Togs Slacks and Shirt Pattern
Playtime Togs Shorts and Halter Pattern
Isabelle Knitted Skating Costume Pattern
Renee Crocheted Sun Dress and Cape Pattern
Alice Blue Dress and Pinafore Pattern

Materials:
Pinafore: Organdy – ¼ yd (0.23m)
Dress: Material without nap – ¼ yd (0.23m)
Skirt: 4½ in (11.5cm) long, 30 in (76.2cm) wide
Neck Band: 6 in (15.2cm) long, ¾ in (2.0cm) wide
Sleeve Bands: 3in (7.6cm) long, 1 in (2.5cm) wide
Pinafore: 3¾ in (9.6cm) long, 13 in (33.0cm) wide
Tie: 24 in (61.0cm) long, 1½ in (3.8cm) wide
Be sure to measure the garment on the doll as you sew.
BODICE: Sew two darts on front. Sew shoulder seams. Sew neck band on neck edge on right side, raw seams facing. Turn band to wrong side and topstitch on right side.
SLEEVES: Gather bottom of sleeve to measure 3 in (7.6cm). Sew on bands same as for neck binding. Gather top of sleeves, insert into armholes. Turn hems on backs ¼ in (0.65cm) to fit doll. Sew sleeve seams and sides of bodice together.
SKIRT: Hem bottom of skirt. Sew vents at back. Gather top of skirt to fit bodice and sew skirt and bodice together on wrong sides, turn and topstitch. Hem back of skirt.
PINAFORE: Sew upper edges of bib together, turn. Gather lace on raw edges. Hem bottom and sides of pinafore. Gather top to measure 3 in (7.6cm). Sew lace on bottom of pinafore, easing lace as you sew.
SASH: Fold and press ¼ in (0.65cm) to inside of sash on both edges. Fold sash in half lengthwise and press. Mark center of sash and center of pinafore and topstitch sash to pinafore. Baste bottom of bib to center of skirt band inside of folds. Baste ends of bib at ends of apron. Topstitch upper edge of sash, including bib.

Dolly Madison Costume Pattern
Alice Blue Dress and Pinafore Pattern
Sun Bonnet Sue Outfit Pattern
Playtime Togs Terry Cloth Beach Robe Pattern
Playtime Togs Slacks and Shirt Pattern
Playtime Togs Shorts and Halter Pattern
Isabelle Knitted Skating Costume Pattern
Renee Crocheted Sun Dress and Cape Pattern
| Pattern Categories Browse the categories to help you find the patterns you're looking for. |
||
    
|
|
|


Navigation

All contents © 2003-2026 Purple Kitty LLC. All rights reserved.
Privacy Policy | FAQ | About Me