 |
Camels - Ships of the Desert Cross Stitch Chart

In these days of transit so very rapid that it quite takes away one's breath even to think of it, the quaint design for runner-ends presented is sure to prove most appealing. Airships which fly from New York to Paris between two days are all very well; we cannot refrain from glorying in such wonderful achievements—we rejoice that we live in this age of marvels. At the same time there is need of a bit of relaxation from the stress and strain of the headlong pace set for us, and we find it in the vogue of needlecraft—simple in style and easy of execution. Truly the slow-moving "ships of the desert" tell a story delightfully different from that of the "miles-a-minute" aircraft, and it is a joy to reproduce it at the point of the needle.
Real Chinese embroidery is perfection itself, so far as regularity and evenness in the placement of stitches are concerned. Especially is this true of cross-stitch, probably the oldest as well as one of the simplest forms of needle- decoration. The stitches are very small, ten or more to the inch, and set with the utmost precision; and there are no knots or ends of threads showing on the wrong side of the work, which is as perfect in appearance as the right side, save that the little upright stitches give a very different effect than the crosses.
Grass-cloth, light tan in tint, makes a most pleasing foundation for the quaint embroidery, and the ends of the runner are finished with a two-inch hem topped by a line of the simplest hemstitching. Everybody knows just how to do cross-stitch, of course; it really seems quite like carrying coals to Newcastle to say more about it. There are, however, two rules which are sometimes overlooked. One is that the same stitch-direction should be observed throughout—must be, indeed, in order to secure the smooth, even effect which is the charm of cross-stitch work; there should also be the same tension. Again, each finished stitch, made by the two crossing threads, should form a perfect square, and there should be no space left between them. The work is done over cross-stitch or Penelope canvas, and is as easy to do as it is fascinating, since the chart, with color-symbols, show just how to place each stitch. Simply baste the canvas evenly on the material and work over it, taking care not to catch your needle into any of its threads; then, when the embroidery is finished, you have only to pull out these threads, one by one, leaving the cross-stitched design as perfect as possible. Work one half of a line of stitches first—from right to left or from left to right, as is most convenient—and returning cross with the second half. This gives a series of neat vertical stitches on the wrong or reverse side, less thread is needed than when each cross is completed at once, and the work is more evenly and quickly done. It is an excellent plan, when several colors are used and rows of stitches are correspondingly short, to have a needle threaded with each color, as used, dropping one when taking another; or, as other workers prefer, to finish with one color before putting in another. So that the two rules suggested are followed, one may safely choose the method by which she attains the best result in the easiest way.
The leading-string is in outline-stitch, done with black, as are the little upright lines attached to the saddlebags. Two strands of embroidery-cotton may be used for working the design with ten cross-stitches to the inch, more in proportion as the size is increased, should this be desired. The work is rapidly developed and very pleasing in effect, the coloring soft and harmonious, and the design unique, hence this latest adventure in cross-stitchery is sure to prove a happy one.


Angel Choir Figures Instructions and Pattern

Pixies from clothespins, cherubs from thimbles, angels from bottle caps! Mundane materials for making these ethereal little figures! Tops of nail polish bottles as fluted robes – a golf tee as a slender feminine form – a drop pearl as a puffed sleeve – and from such ordinary objects, you can fashion an enchanting angel choir.
EQUIPMENT: Coping saw. Triangle metal file, fine. Small pliers. Scissors. Round camel's hair brush, medium size (about No. 5), for all but fine details. No. 1 round red sable brush for features and fine details. Pencils. Tracing paper. Fine sandpaper. Beading needle. Household cement. Cotton. Nail polish remover. Containers for mixing paints. Turpentine.
MATERIALS: White household enamel. Artist's oil colors for tinting enamel: alizarin crimson; yellow ochre; cadmium yellow, light; cobalt blue; burnt umber; burnt sienna; black. Gold paint. For angels' bodies, bottle caps and lipstick covers as specified in individual directions; 2 plastic thimbles; 2 round wood clothespins; 1 wood golf tee. For heads, ½" diameter wood heads. For arms, toothpicks and wood matches; 2 drop pearls. For wings, thin white cardboard. Sheet of gold paper. Scraps of white paper. A few spangles. Cream of Wheat cereal. Tiny pearls. Lipstick. Sewing thread.
GENERAL DIRECTIONS: Wherever necessary, file top of object to be used for body with flat side of metal file, so head will adhere firmly when cemented in place.
To mix soft pastel colors, combine white enamel with small amounts of oil colors.
Paint bodies with two coats of enamel in color specified in individual directions. Sand lightly after first coat.
Arms: Toothpick—Cut ⅝" lengths from wide ends of toothpicks. File an indentation about ¼" in from narrow end to simulate hand. Matchstick—Burn heads from matches and cut to 1" lengths. With file, smooth and shape one end to simulate hand. Round opposite end, or, for extended arms, sand away one side to 45° angle. Paint all arms to match bodies; paint all bands flesh color (see instructions given under "heads" for how to mix).
Heads: Place beads on toothpicks for easier handling. Paint faces flesh color, using enamel softened with yellow ochre and a touch of burnt sienna. Add red dots for noses and mouths. Use dots of black for eyes. Tint cheeks with lipstick.
Hair: Pencil outline of hair on head. Use painted hair on brunette angels, mixing white enamel with burnt sienna and burnt umber to desired shade. Use textured hair on blond angels: cover hair outline with cement; dip head in Cream of Wheat. Dry and repeat. Paint white or yellow according to individual directions.
Painted Wings: On tracing paper, copy and identify all wing patterns; cut. For each wing unit, cut an oblong of thin cardboard a little larger than required. Enamel both sides to match angel's body. Dry thoroughly. Trace pattern onto painted surface with pencil; cut. Crease wing unit lightly along middle. Fasten to body with cement placed along crease. Hold in place until cement begins to set.
Complete angels by cementing arms to body and finished head to "neck."
BOTTLE-TOP ANGELS: Use tops from nail polish, polish remover, cuticle remover preparations; size ½" to 1¼" high. Remove brushes and clean tops with absorbent cotton soaked in polish remover.
Pink Angels: Use matchstick arms with tops angled, No. 1 wing pattern, Cream of Wheat hair. Following General Directions, paint all parts; paint hair white. Assemble. Tie a tiny bow of pink thread around neck. String pearls, tie into a circle, cement to hair as halo. Cement single pearls around bottom of robe.
White Angels (middle row, center, in photograph): Use matchstick arms with angled tops, No. 2 wing pattern, Cream of Wheat hair. Paint all parts, coloring hair yellow. Assemble. Add scalloped trim around neck and bottom of robe with gold paint; add gold cuff at edge of sleeve. Pair of angels may be joined as illustrated by cementing hands together.
Blue Angels (ends of top row in photograph): Use toothpick arms, No. 3 wing pattern, Cream of Wheat hair. Paint all parts, using baby blue for body, arms, wings; paint hair white. Assemble. Paint gold polka dots on robe as illustrated.
THIMBLE CHERUBS (ends of bottom row in photograph): Use white plastic thimbles, toothpick arms, No. 2 wing pattern, painted brown hair. Paint all parts, making body, arms, and wings white. Assemble. Cement a spangle halo Hat to head; center with a pearl. Paint or paste a tiny bow tie of gold paper beneath chin. Paint gold buttons down front of robe.
CLOTHESPIN PIXIES (center of bottom row; center left of top row): With coping saw, cut off round head and prongs of clothespins, thus reducing to a tapered cylinder 1¼" long. Sand smooth, making sure broad end is flat so figure will stand well.
Blue Pixie: Use matchstick arms, No. 4 wing pattern, painted hair. Make a pointed hat. about 1½" high, from a quarter circle of paper rolled to form a cone which fits head. Paint all parts; paint body, arms, wings, and hat, blue. Assemble. Add collar, cuffs, and polka dots of gold paint.
White Pixie: Use matchstick arms. No. 2 wing pattern, Cream of Wheat hair. Paint all parts, making hair white. Assemble. From pattern below, cut a pointed halo of doubled gold paper; cement to head. Add collar, cuffs, and polka dots of gold paint.
GOLF TEE ANGEL: File point of tee flat to receive head. Use No. 1 wing pattern, Cream of Wheat hair. Paint body and wings blue, hair yellow. For sleeves and arms, use two drop pearls. With pliers, open and straighten wire loops at ends of pearls. Bend tiny new loops at ends to simulate hands. Paint pearls blue; wire, flesh color. Cement near top of tee; hold in place until cement starts to set.
Assemble. Add gold collar, cuffs, and polka dots.
LIPSTICK CASE ANGELS: Wash lipstick cases thoroughly; file tops flat.
Follow General Directions for preparing heads. Use Cream of Wheat hair; while still damp, imbeded upright spangle halos as illustrated. Paint hair white.
Make wings and arms of two sheets of gold paper cemented together. Use No. 5 wing pattern for one figure, No. 6 for other. For arms, cut ¼" wide, 3" long strips of doubled gold paper. Cement at center to center backs of figures; bring ends around and cement to bodies in front to simulate folded hands. Add a pearl-centered spangle where "hands" meet. Cement wings and heads in place. Add pearl centers to halos.

Wilma the Worm Pattern

Materials Required: AMERICAN THREAD COMPANY
"AUNT LYDIA'S" HEAVY RUG YARN, Article 235
1 skein Chartreuse or color of your choice
1 inch square White felt
1 yard ¼ inch ribbon
2 flowers
3 — 18 inch lengths of medium wire
Body: Wind yarn over a 24 inch cardboard 48 times. Tie through center at one end with yarn, top of head. Cut opposite end. Tie tightly with yarn about 3½ inches from top of head for neck. Fill this section with paper. Divide lower section into 3 equal parts, insert a piece of wire in each section and braid to within 2 inches, tie tightly with yarn, trim ends.
Make face with felt as illustrated.
Trim with flowers and ribbon.
Heads Up Pattern
Wilma the Worm Pattern
Crocheted Doll Dress, Panties, and Hat Pattern
Wild Rose Doily Pattern
Top of the Morning Bedjacket Pattern
Hot Plate Mat Pattern
Crocheted Booties with Doll Trim Pattern
Knitted Suspender Skirt, Sweater and Jibber Pattern
Best Foot Forward Slippers Pattern
Jolly St. Nick Pattern
Snow Man Pattern
Angel Ornament Pattern
Jack Frost Ornament Pattern
Santa Ornament Pattern
Santa Doorknob Pattern
Heads Up Pattern

Materials Required: AMERICAN THREAD COMPANY
"AUNT LYDIA'S" HEAVY RUG YARN, Article 235
1 skein each White and Lt. Yellow or colors of your choice
1 yard ¼ inch ribbon
Cotton for filling Felt
Wind yarn over a 4 inch cardboard 100 times, tie through center at one end with a 10 inch length of yarn, tie other end through center in same manner. Slip off cardboard. Fill this section with cotton.
Hair: Wind yarn over a 13 inch cardboard 36 times. Cut one end. Braid tightly each side to within 1 inch from each end leaving about 2 inches free at center. Tie with ribbon and finish with a bow. Sew hair in position with "STAR" MERCERIZED SEWING THREAD or dress hair to your own preference.
Face: Using felt as illustrated, mouth in Red, eyes in Blue, eyebrows in Black.
If styrofoam ball is used for head work hair in same manner.
Glue or pin to ball. Pin or glue sequins in position for eyes, nose and mouth.
Heads Up Pattern
Wilma the Worm Pattern
Crocheted Doll Dress, Panties, and Hat Pattern
Wild Rose Doily Pattern
Top of the Morning Bedjacket Pattern
Hot Plate Mat Pattern
Crocheted Booties with Doll Trim Pattern
Knitted Suspender Skirt, Sweater and Jibber Pattern
Best Foot Forward Slippers Pattern
Jolly St. Nick Pattern
Snow Man Pattern
Angel Ornament Pattern
Jack Frost Ornament Pattern
Santa Ornament Pattern
Santa Doorknob Pattern
Peace on Earth Needlepoint Chart

Duet in Needlepoint
Needlepoint pictures, both traditional in feeling, fit the same size frame. “Peace on Earth,” like all favorite Yuletide decorations, can make an appearance every year; the hoop skirted strollers might occupy the frame at other seasons. Both embroidered pieces are 10¼” square.
Peaceful holiday scene embroidered in warm, rich colors might hang from Thanksgiving to New Year’s. White frame harmonizes with fireplace, or frame to match your décor may be used.
Quaint needlepoint picture, “Taking a Walk,” done in sunny, spring-like pastels might replace the holiday scene for the rest of the year.
Materials: Ten-mesh-to-the-inch canvas, 14” square. (To enlarge or reduce size of picture, choose larger or smaller mesh canvas.) 12½ yd. skeins of tapestry wool in amounts given with color key. Tapestry needle. Bias tape or heavy paper to bind canvas. Picture frame, rabbet measure 10¼” square, ⅛” thick cardboard, ¼” smaller than rabbet of frame.
Directions: Bind edges of canvas with bias tape or heavy paper. Mark horizontal and vertical center lines on canvas as guides for centering designs. Charts include background area. Start design at upper right-hand corner of canvas. Following chart, work design, then background. Use either continental or diagonal stitch. Cut working strands of wool about 18” long – wool cut too long will wear thin in working.
Keep wool from twisting to avoid thin places in work. Fasten wool by going through stitches on back, then clipping ends close to canvas. To prevent work from getting crooked, be careful not to jerk wool tight – hold thumb on yarn until you have pulled it through canvas; then life thumb, pull wool gently into place.
Blocking: Cover an old table, bread board or drawing board with brown paper and mark on this the size of canvas, being sure that corners are square. Place needlepoint, right side down, over guide and fasten with thumbtacks ¾” apart along edge of canvas. Wet thoroughly with cold water; let dry. If work is badly warped, dry and restretch. Wet again, and dry.
Framing: Stretch canvas over cardboard backing, keeping lines of needlepoint straight. Hold in place with straight pins pushed into edge of cardboard. Begin pinning at centers of sides and at corners. Continue stretching and pinning until there is a border of pins about ¼” apart. Frame with or without glass.


Taking a Walk Needlepoint Chart

Duet in Needlepoint
Needlepoint pictures, both traditional in feeling, fit the same size frame. “Peace on Earth,” like all favorite Yuletide decorations, can make an appearance every year; the hoop skirted strollers might occupy the frame at other seasons. Both embroidered pieces are 10¼” square.
Peaceful holiday scene embroidered in warm, rich colors might hang from Thanksgiving to New Year’s. White frame harmonizes with fireplace, or frame to match your décor may be used.
Quaint needlepoint picture, “Taking a Walk,” done in sunny, spring-like pastels might replace the holiday scene for the rest of the year.
Materials: Ten-mesh-to-the-inch canvas, 14” square. (To enlarge or reduce size of picture, choose larger or smaller mesh canvas.) 12½ yd. skeins of tapestry wool in amounts given with color key. Tapestry needle. Bias tape or heavy paper to bind canvas. Picture frame, rabbet measure 10¼” square, ⅛” thick cardboard, ¼” smaller than rabbet of frame.
Directions: Bind edges of canvas with bias tape or heavy paper. Mark horizontal and vertical center lines on canvas as guides for centering designs. Charts include background area. Start design at upper right-hand corner of canvas. Following chart, work design, then background. Use either continental or diagonal stitch. Cut working strands of wool about 18” long – wool cut too long will wear thin in working.
Keep wool from twisting to avoid thin places in work. Fasten wool by going through stitches on back, then clipping ends close to canvas. To prevent work from getting crooked, be careful not to jerk wool tight – hold thumb on yarn until you have pulled it through canvas; then life thumb, pull wool gently into place.
Blocking: Cover an old table, bread board or drawing board with brown paper and mark on this the size of canvas, being sure that corners are square. Place needlepoint, right side down, over guide and fasten with thumbtacks ¾” apart along edge of canvas. Wet thoroughly with cold water; let dry. If work is badly warped, dry and restretch. Wet again, and dry.
Framing: Stretch canvas over cardboard backing, keeping lines of needlepoint straight. Hold in place with straight pins pushed into edge of cardboard. Begin pinning at centers of sides and at corners. Continue stretching and pinning until there is a border of pins about ¼” apart. Frame with or without glass.


McCall's Needlework & Crafts Magazine | Annual Volume V

McCall's Needlework & Crafts Annual Magazine
Volume V
McCall Corporation
Original Copyright 1954
Pattern List
| Pattern Name | Yarn Company | Orig. Publication |
Two-Tone Separates Blouse and Skirt |
Columbia Minerva |
|
Saint Nicholas Cross Stitch Chart P17099S
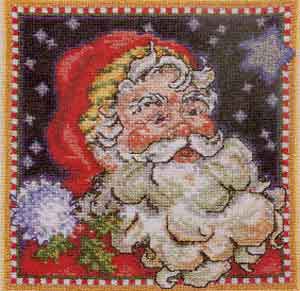
There are many stories of 4th century Saint Nicolas, a Russian bishop and patron saint of children. Saint Nicholas's feast, is celebrated on Christmas, December 25th. This "Old World" Saint Nicholas is a favorite subject of needle workers around the world, and can be yours too, in Anchor's brilliant palette of floss colors.
Designed by Ursula Michael
Dimensions: 100 x 100 stitches
Approximate finished size: 7 1/8" x 7 1/8"
Size to cut fabric: 17" x 17"
Anchor Embroidery Ross as listed in color key.
Model stitched on Aida 14 white, over 2 threads, using 2 strands for cross-stitch and 1 strand for backstitch.
CLICK HERE to download Cross Stitch Chart
INSTRUCTIONS
1. Find center of fabric by folding it in half both ways; mark with thread or washable marker.
2. Using 18-inch (46 cm.) strands, separate plies. Place the required number of plies (2) side by side and thread needle.
3. Determine starting point by finding center of design (marked by side arrows on chart) and counting up and left from center to symbol at upper left corner. Begin stitching at this point.
4. Place fabric in hoop. Pull floss through fabric leaving 1" extending on wrong side. Hold in place so that end is overcast by first stitches taken. Never knot thread.
5. Work all the stitches in an area of the same color at one time.
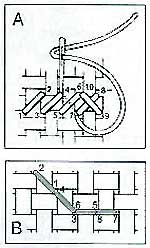
6. Work each stitch according to Diagram A, crossing each "X" in the same direction.
7. To end thread, weave through several stitches on the wrong side. Cut end close to work.
8. Work all cross-stitch first, then do backstitching (Diagram B).
TIPS
If thread twists while stitching, let needle dangle so that thread unwinds.
Mark off sections of stitches on chart as you work.
Prevent threads shadowing through on the front of project by ending threads, rather than making long stitches on back of work.
Work from left to right, starting at the top. Avoid jumping from one area of design to another, as it is easy to miscount.
Pattern © by Coats & Clark Inc. Reproduced with permission from Coats & Clark Inc. PurpleKittyYarns.com is not endorsed by Coats & Clark Inc. It is not permissible to contract production of projects made from designs published by Coats & Clark to a third party for sale or distribution.
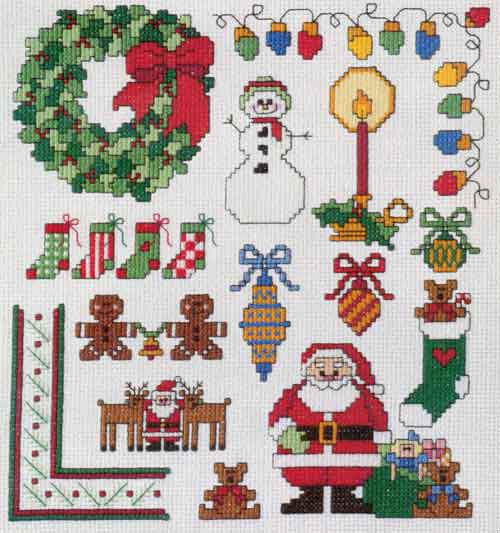
Mini Christmas Cross Stitch Chart P17079
CLICK HERE to download Cross Stitch Chart
Pattern © by Coats & Clark Inc. Reproduced with permission from Coats & Clark Inc. PurpleKittyYarns.com is not endorsed by Coats & Clark Inc. It is not permissible to contract production of projects made from designs published by Coats & Clark to a third party for sale or distribution.
Rosebud Cross Stitch Chart


| Pattern Categories Browse the categories to help you find the patterns you're looking for. |
||
    
|
|
|


Navigation

All contents © 2003-2026 Purple Kitty LLC. All rights reserved.
Privacy Policy | FAQ | About Me