Angel Choir Figures Instructions and Pattern

Pixies from clothespins, cherubs from thimbles, angels from bottle caps! Mundane materials for making these ethereal little figures! Tops of nail polish bottles as fluted robes – a golf tee as a slender feminine form – a drop pearl as a puffed sleeve – and from such ordinary objects, you can fashion an enchanting angel choir.
EQUIPMENT: Coping saw. Triangle metal file, fine. Small pliers. Scissors. Round camel's hair brush, medium size (about No. 5), for all but fine details. No. 1 round red sable brush for features and fine details. Pencils. Tracing paper. Fine sandpaper. Beading needle. Household cement. Cotton. Nail polish remover. Containers for mixing paints. Turpentine.
MATERIALS: White household enamel. Artist's oil colors for tinting enamel: alizarin crimson; yellow ochre; cadmium yellow, light; cobalt blue; burnt umber; burnt sienna; black. Gold paint. For angels' bodies, bottle caps and lipstick covers as specified in individual directions; 2 plastic thimbles; 2 round wood clothespins; 1 wood golf tee. For heads, ½" diameter wood heads. For arms, toothpicks and wood matches; 2 drop pearls. For wings, thin white cardboard. Sheet of gold paper. Scraps of white paper. A few spangles. Cream of Wheat cereal. Tiny pearls. Lipstick. Sewing thread.
GENERAL DIRECTIONS: Wherever necessary, file top of object to be used for body with flat side of metal file, so head will adhere firmly when cemented in place.
To mix soft pastel colors, combine white enamel with small amounts of oil colors.
Paint bodies with two coats of enamel in color specified in individual directions. Sand lightly after first coat.
Arms: Toothpick—Cut ⅝" lengths from wide ends of toothpicks. File an indentation about ¼" in from narrow end to simulate hand. Matchstick—Burn heads from matches and cut to 1" lengths. With file, smooth and shape one end to simulate hand. Round opposite end, or, for extended arms, sand away one side to 45° angle. Paint all arms to match bodies; paint all bands flesh color (see instructions given under "heads" for how to mix).
Heads: Place beads on toothpicks for easier handling. Paint faces flesh color, using enamel softened with yellow ochre and a touch of burnt sienna. Add red dots for noses and mouths. Use dots of black for eyes. Tint cheeks with lipstick.
Hair: Pencil outline of hair on head. Use painted hair on brunette angels, mixing white enamel with burnt sienna and burnt umber to desired shade. Use textured hair on blond angels: cover hair outline with cement; dip head in Cream of Wheat. Dry and repeat. Paint white or yellow according to individual directions.
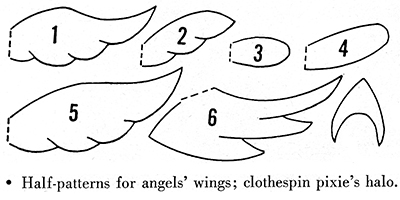
Painted Wings: On tracing paper, copy and identify all wing patterns; cut. For each wing unit, cut an oblong of thin cardboard a little larger than required. Enamel both sides to match angel's body. Dry thoroughly. Trace pattern onto painted surface with pencil; cut. Crease wing unit lightly along middle. Fasten to body with cement placed along crease. Hold in place until cement begins to set.
Complete angels by cementing arms to body and finished head to "neck."
BOTTLE-TOP ANGELS: Use tops from nail polish, polish remover, cuticle remover preparations; size ½" to 1¼" high. Remove brushes and clean tops with absorbent cotton soaked in polish remover.
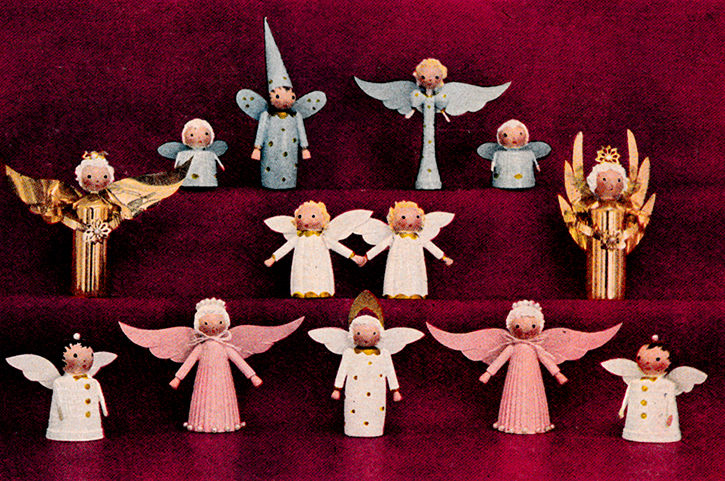
Pink Angels: Use matchstick arms with tops angled, No. 1 wing pattern, Cream of Wheat hair. Following General Directions, paint all parts; paint hair white. Assemble. Tie a tiny bow of pink thread around neck. String pearls, tie into a circle, cement to hair as halo. Cement single pearls around bottom of robe.
White Angels (middle row, center, in photograph): Use matchstick arms with angled tops, No. 2 wing pattern, Cream of Wheat hair. Paint all parts, coloring hair yellow. Assemble. Add scalloped trim around neck and bottom of robe with gold paint; add gold cuff at edge of sleeve. Pair of angels may be joined as illustrated by cementing hands together.
Blue Angels (ends of top row in photograph): Use toothpick arms, No. 3 wing pattern, Cream of Wheat hair. Paint all parts, using baby blue for body, arms, wings; paint hair white. Assemble. Paint gold polka dots on robe as illustrated.
THIMBLE CHERUBS (ends of bottom row in photograph): Use white plastic thimbles, toothpick arms, No. 2 wing pattern, painted brown hair. Paint all parts, making body, arms, and wings white. Assemble. Cement a spangle halo Hat to head; center with a pearl. Paint or paste a tiny bow tie of gold paper beneath chin. Paint gold buttons down front of robe.
CLOTHESPIN PIXIES (center of bottom row; center left of top row): With coping saw, cut off round head and prongs of clothespins, thus reducing to a tapered cylinder 1¼" long. Sand smooth, making sure broad end is flat so figure will stand well.
Blue Pixie: Use matchstick arms, No. 4 wing pattern, painted hair. Make a pointed hat. about 1½" high, from a quarter circle of paper rolled to form a cone which fits head. Paint all parts; paint body, arms, wings, and hat, blue. Assemble. Add collar, cuffs, and polka dots of gold paint.
White Pixie: Use matchstick arms. No. 2 wing pattern, Cream of Wheat hair. Paint all parts, making hair white. Assemble. From pattern below, cut a pointed halo of doubled gold paper; cement to head. Add collar, cuffs, and polka dots of gold paint.
GOLF TEE ANGEL: File point of tee flat to receive head. Use No. 1 wing pattern, Cream of Wheat hair. Paint body and wings blue, hair yellow. For sleeves and arms, use two drop pearls. With pliers, open and straighten wire loops at ends of pearls. Bend tiny new loops at ends to simulate hands. Paint pearls blue; wire, flesh color. Cement near top of tee; hold in place until cement starts to set.
Assemble. Add gold collar, cuffs, and polka dots.
LIPSTICK CASE ANGELS: Wash lipstick cases thoroughly; file tops flat.
Follow General Directions for preparing heads. Use Cream of Wheat hair; while still damp, imbeded upright spangle halos as illustrated. Paint hair white.
Make wings and arms of two sheets of gold paper cemented together. Use No. 5 wing pattern for one figure, No. 6 for other. For arms, cut ¼" wide, 3" long strips of doubled gold paper. Cement at center to center backs of figures; bring ends around and cement to bodies in front to simulate folded hands. Add a pearl-centered spangle where "hands" meet. Cement wings and heads in place. Add pearl centers to halos.

| Pattern Categories Browse the categories to help you find the patterns you're looking for. |
||


