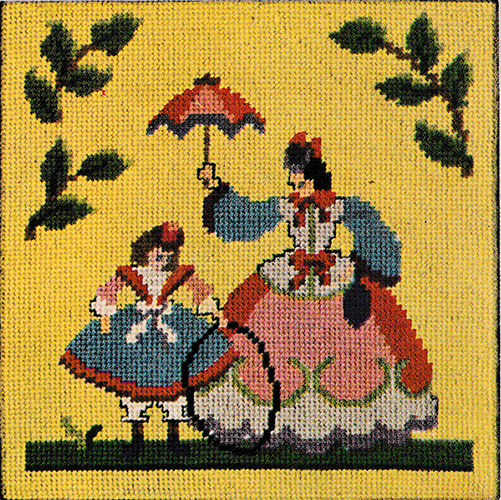
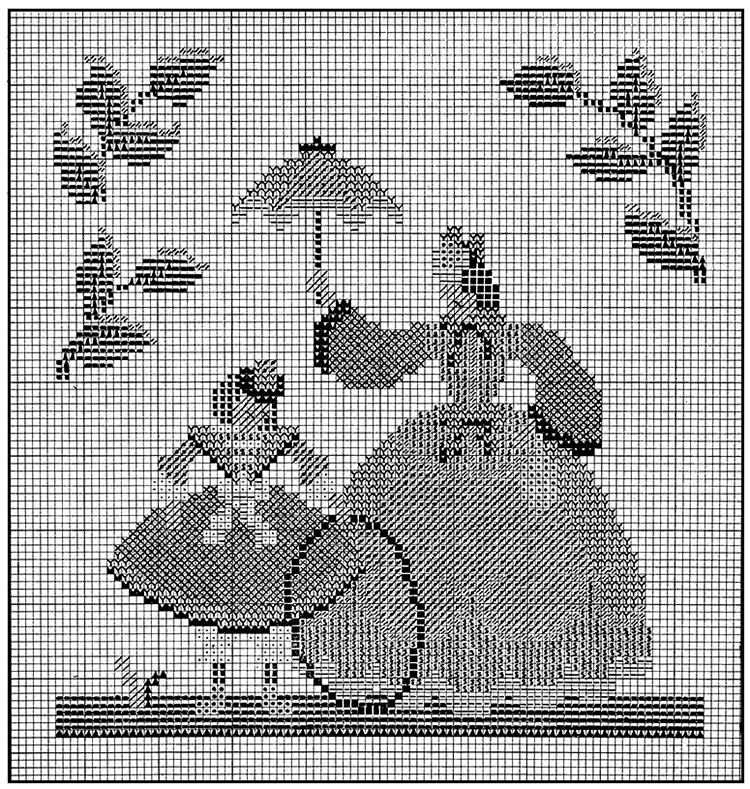
Taking a Walk Needlepoint Chart

Duet in Needlepoint
Needlepoint pictures, both traditional in feeling, fit the same size frame. “Peace on Earth,” like all favorite Yuletide decorations, can make an appearance every year; the hoop skirted strollers might occupy the frame at other seasons. Both embroidered pieces are 10¼” square.
Peaceful holiday scene embroidered in warm, rich colors might hang from Thanksgiving to New Year’s. White frame harmonizes with fireplace, or frame to match your décor may be used.
Quaint needlepoint picture, “Taking a Walk,” done in sunny, spring-like pastels might replace the holiday scene for the rest of the year.
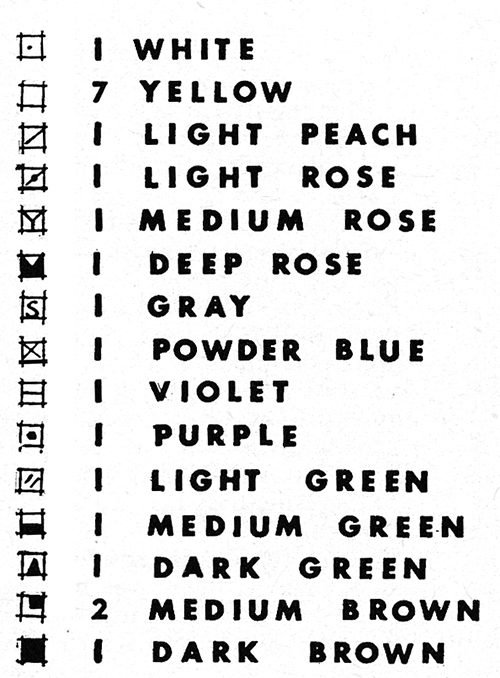
Materials: Ten-mesh-to-the-inch canvas, 14” square. (To enlarge or reduce size of picture, choose larger or smaller mesh canvas.) 12½ yd. skeins of tapestry wool in amounts given with color key. Tapestry needle. Bias tape or heavy paper to bind canvas. Picture frame, rabbet measure 10¼” square, ⅛” thick cardboard, ¼” smaller than rabbet of frame.
Directions: Bind edges of canvas with bias tape or heavy paper. Mark horizontal and vertical center lines on canvas as guides for centering designs. Charts include background area. Start design at upper right-hand corner of canvas. Following chart, work design, then background. Use either continental or diagonal stitch. Cut working strands of wool about 18” long – wool cut too long will wear thin in working.
Keep wool from twisting to avoid thin places in work. Fasten wool by going through stitches on back, then clipping ends close to canvas. To prevent work from getting crooked, be careful not to jerk wool tight – hold thumb on yarn until you have pulled it through canvas; then life thumb, pull wool gently into place.
Blocking: Cover an old table, bread board or drawing board with brown paper and mark on this the size of canvas, being sure that corners are square. Place needlepoint, right side down, over guide and fasten with thumbtacks ¾” apart along edge of canvas. Wet thoroughly with cold water; let dry. If work is badly warped, dry and restretch. Wet again, and dry.
Framing: Stretch canvas over cardboard backing, keeping lines of needlepoint straight. Hold in place with straight pins pushed into edge of cardboard. Begin pinning at centers of sides and at corners. Continue stretching and pinning until there is a border of pins about ¼” apart. Frame with or without glass.


| Pattern Categories Browse the categories to help you find the patterns you're looking for. |
||


