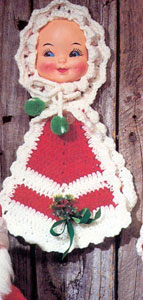
Mrs Claus Pot Holder

Mrs. Claus
Materials
Red 4-ply knitting worsted
White 4-ply knitting worsted
Size F or 5 aluminum hook
4" dimpled doll mask
1 white button
2, 1" green or white pom-poms (green shown)
Optional: #2 green velvet ribbon and holly sprig
Hat
Row 1: With red, ch 6, sl st to form ring. Ch 1, 12 sc in ring, join. Ch 3, turn.
Row 2: 1 dc in same st, 2 dc in each sc around, sl st in top of ch 3 (24 dc); ch 3, turn.
Row 3: 1 dc in same st, 1 dc in next dc, 2 dc in next dc, 2 dc in each dc to last dc, 1 dc in last dc, sl st in top of ch 3 (48 dc); ch 3, turn.
Row 4: Skip next dc, 1 dc in next dc, *ch 1, skip next dc, 1 dc in next dc; repeat from * around, ch 1, join. Fasten off.
Row 5: Using white, sl st to any ch 1 space, ch 4, 1 dc in same space, *ch 1, 2 dc in next ch 1 space; repeat from * around, ch 1, sl st in 3rd ch of ch 4.
Row 6: Sl st to ch 1 space, ch 3, (1 dc, 1 trc, 2 dc) in same ch 1 space (shell made), sc in next ch 1 space, * (2 dc, 1 trc, 2 dc) in next ch 1 space, 1 sc in next ch 1 space; repeat from * around (12 shells total). Fasten off in top st of beginning ch 3. Work ends in.
Inside of Hat
Row 1: Join red in ch 1 space of 4th round, ch 4, skip 1 st, 1 dc in next st, *skip 1 st, 1 dc in next st; repeat from * around, ch 1, sl st in 3rd ch of ch 4. Fasten off.
Row 2: Join white in top of ch 3, ch 1,1 sc in next ch 1 space, (2 dc, 1 trc, 2 dc) in next ch 1 space, repeat around, join. Fasten off.
Drawstring
With white, ch 110 for drawstring. Lace through in front of sc and in back of the shell. Attach a 1" pom-pom on ends, tie. (Optional: Use a #2 green ribbon instead of chain. Tie it in a bow after attaching 2 green pom-poms to ends of ribbon.) Insert mask. Tie drawstring tightly under her chin. Sew a button under the bow.
Pot Holders (Make Two)
Row 1: With red, ch 11,1 dc in 4th ch, 1 dc in next 3 ch's, ch 1, skip 1 ch, 1 dc in each of next 4 ch's, ch 3, turn.
Row 2: 1 dc in next 3 dc, (1 dc, ch 1,1 dc) in next ch 1 space, 1 dc in next 3 dc, 1 dc in top of turning ch, ch 3, turn.
Rows 3-7: Same as last row. Each row will have 2 additional sts. Row 7 will have 20 sts.
Row 8: Join white in top of last dc. Ch 3, 1 dc in next 9 dc, (1 dc, ch 1, 1 dc) in ch 1 space, 1 dc in next 8 dc. 1 dc in top of ch 3, ch 3, turn.
Row 9: Repeat last row.
Row 10: Join red, ch 3, 1 dc to ch 1 space, (1 dc, ch 1, 1 dc) in ch 1 space, 1 dc in next 10 dc, 1 dc in top of ch 3, ch 3 and turn.
Row 11: 1 dc in next 11 dc, (1 dc, ch 1, 1 dc) in ch 1 space, 1 dc in next 11 dc, 1 dc in top of ch 3, ch 3 and turn.
Rows 12 & 13: Join white and repeat row 10 with 2 dc added to each row, ending with 1 dc in top of ch 3.
Edging
Start the border along the side. Attach white in top of last dc. Working alongside, ch 1, 3 sc in space, 1 sc in bottom of dc made. 1 sc in next space, (1 sc in bottom of next dc, 1 sc in dc space, 1 sc in top of dc space). Repeat across to last space at top, 3 sc in last space. Work across top of pot holder, 1 sc in each dc to next corner, 3 sc in corner space. Do this same as other side. 1 sc in each dc across bottom, sl st in 1st sc.
Sl st in next 2 sc, ch 1, (1 dc, 2 trc, 1 dc) in next st, 1 sc in next sc, (1 dc, 2 trc, 1 dc) between next 2 sc, *skip 1 sc, sc in next sc, skip 1 sc, (1 dc, 2 trc, 1 dc) in next sc. Repeat from * to end of side. Repeat across top to corner, complete corner as last corner, work side same as last side to bottom of holder (do not skip ch's at corner), work bottom same as sides, sl st at bottom of ch 3. Fasten off.
Finishing
Attach pot holders by buttoning onto button. If desired, tie sprig of holly onto front pot holder with a piece of #2 green ribbon.
Other great patterns from Doll Delights in Crochet:
Pattern © 1981 by Plaid Enterprises, Inc. Reproduced with permission from Plaid. PurpleKittyYarns.com is not endorsed by Plaid.
| Pattern Categories Browse the categories to help you find the patterns you're looking for. |
||


