 |
Red Heart Super Saver
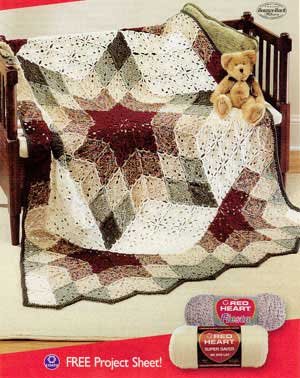
Prairie Star Afghan LW1295
Advanced experience & patience required.
Afghan measures approximately 54" x 77".
Red Heart® Super Saver®: 6 Ounces 378 Claret CA, 11 ounces 303 Painted Desert Print CB, 5 ounces 633 Dark Sage CE, 15 ounces 316 Soft White CF.
Red Heart® Fiesta®: 14 Ounces 6013 Wheat CC, 7 ounces 6631 Light Sage CD.
Crochet Hook: U.S. Size 1-9 [5.5mm].
Yarn needle.
GAUGE: Motif measures 4 1/4" x 6 3/4" before joining. CHECK YOUR GAUGE. Use any size hook to obtain the gauge.
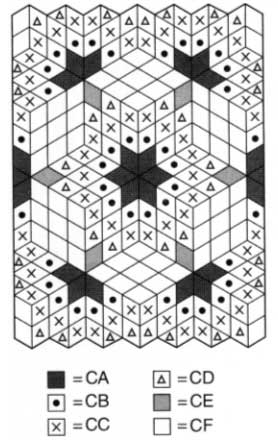
NOTE: AFTER THE FIRST MOTIF, ALL OTHERS ARE JOINED WHILE WORKING RND3.
NOTE: Work and join center six CA motifs first, then work outward following diagram.
FIRST MOTIF: With CA, ch 4; join with a sl st to form a ring. Rnd 1: Ch 1, [sc, hdc, dc, tr, ch 3, tr, dc, hdc] twice all in ring; join with a sl st to first sc. Rnd 2: Ch 5, dc in sc, * dc in next 3 sts, (3 dc, ch 4,3 dc) all in ch-3 sp, dc in next 3 sts **, (dc, ch 2, dc) all in next sc; rep from * to **; join to 3rd ch of ch-5.
Rnd 3 (See Note): Ch 3, * (dc, ch 3, dc) all in ch2 sp, dc in next 2 dc, ch 1, skip next dc, dc in next 3 dc, ch 1, skip next dc, (3 dc, ch 5, 3 dc) all in ch-4 sp, ch 1, skip next dc, dc in next 3 dc, ch 1, skip next dc **, dc in next 2 dc; rep from * to **; dc in last dc; join to top of ch-3. Fasten off.
2ND MOTIF: With CA, work Rnds 1 and 2 same as for first motif. Rnd 3: Ch 3, dc in ch-2 sp; ch 1, with wrong sides together sc in ch-3 sp on first motif, ch 1, dc in same ch-2 sp on 2nd motif, dc in next 2 dc; sc in next ch-1 sp, skip next dc on motif in progress - join made; dc in next 3 dc, join, 3 dc in ch-4 sp, ch 2, sc in ch-5 sp on first motif, ch 2, 3 dc in same ch-4 sp on 2nd motif; complete same as first motif - 1 side joined.
NOTE: Check motif placement carefully. Some motifs will be joined beginning at a ch-5 sp. Some motifs will join a ch-3 sp to a ch-5 sp.
Following diagram, join all motifs in this manner: sc in a corresponding sp of a completed motif (the sc replaces one chain stitch on the motif in progress). Where 3, 4, or 6 points come together, join at points by sc into the sc of a previous joining.
HALF MOTIF: Ch 4; join with a sl st to form a ring. Row 1 (Right Side): Ch 1, (sc, hdc, dc, tr, ch 3, tr, dc, hdc, sc) all in ring; do not join; turn. Row 2: Ch 3, dc in first 4 sts, (3 dc, ch 4, 3 dc) all in ch-3 sp, dc in next 3 sts, 2 dc in last sc; turn. Row 3-Joining Row: Ch 3, sc in ch-sp on completed motif, ch 1, dc in first 3 dc, join, dc in next 3 dc, join, 3 dc in ch-4 sp, ch 2, sc in sc of previous joining, ch 2, 3 dc in same ch-4 sp, join to next motif, dc in next 3 dc, join, dc in next 2 dc, dc in top of ch-3, ch 1, sc in ch-sp on completed motif, ch 3, sl st in top of ch-3 of Row 2. Fasten off.
EDGING-Rnd 1: With right side facing, attach CE in any st; ch 1, work 1 rnd sc evenly around, increasing at outer points and decreasing at inner points to keep work flat; join to first sc. Rnd 2: Ch 3, work 1 rnd dc, increasing and decreasing at points as before to keep work flat; join to top of ch-3. Fasten off. Weave in ends.
ABBREVIATIONS: ch = chain; dc = double crochet; hdc = half double crochet: mm = millimeters; rep = repeat: sc: = single crochet
Pattern © by Coats & Clark Inc. Reproduced with permission from Coats & Clark Inc. PurpleKittyYarns.com is not endorsed by Coats & Clark Inc. It is not permissible to contract production of projects made from designs published by Coats & Clark to a third party for sale or distribution.
Other free crochet afghan patterns:
Crochet Afghan Patterns
Afghan Patterns
Baby Blanket Patterns
Princess Crown and Scepter WR1918
RED HEART® "Super Saver®": 1 skein 324 Bright Yellow, or desired color.
Susan Bates® Knitting Knobby, Art 14075 or Small French Knitter, Art 14102
Susan Bates® 2-inch Steel Yarn Needle, Art 14081
2-12" pipe cleaners, any color for crown 1-12" pipe cleaners, any color for scepter
1 10" wooden dowel, 3/16 inch diameter
Assorted beads and ribbons for decoration
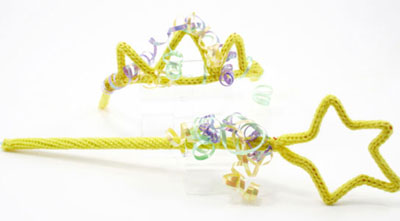
CROWN
Leave at least a 12" tail at the beginning.
Bend the wire ends of the pipe cleaner under by wrapping the end around the pointed end of the tool included with the Knitting Knobby.
Work until tube measures about 1 inch. Insert pipe cleaner into tube, being careful not to push the pipe cleaner end beyond the end of the tube. Continue working until the pipe cleaner is totally covered by the knit tube. Bind off per instructions leaving a 12" tail.
Repeat with second pipe cleaner. Find the center of the tube and bend. This will be the point of the crown. Make two more triangle shapes on either side of the center point. Using an extra piece of yarn and the yarn needle, attach the points to the first tube.
You can use the tails to secure the ends of the points.
Tie knots in the ends of the tails on the first tube.
SCEPTER
Leave at least a 12" tail at the beginning.
Work until tube measures about 1 inch. Insert wooden dowel into tube, being careful not to push the dowel end beyond the end of the tube. Continue working until the dowel is totally covered by the knit tube. Bind off per instructions leaving a 12" tail.
For Star: Leave at least a 12" tail at the beginning.
Bend the wire ends of the pipe cleaner under by wrapping the end around the pointed end of the tool included with the Knitting Knobby.
Work until tube measures about 1 inch. Insert pipe cleaner into tube, being careful not to push the pipe cleaner end beyond the end of the tube. Continue working until the pipe cleaner is totally covered by the knit tube. Bind off per instructions leaving a 12" tail.
Bend the tube into 5 points to make a star and close the star by securing the 2 ends together.
Sew star securely to the end of the dowel.
Pattern © by Coats & Clark Inc. Reproduced with permission from Coats & Clark Inc. PurpleKittyYarns.com is not endorsed by Coats & Clark Inc. It is not permissible to contract production of projects made from designs published by Coats & Clark to a third party for sale or distribution.
Pumpkin Bag LW2787
Perfect for filling with treats as youngsters go door to door, this clever crocheted pumpkin bag will also serve as a bowl for candy when at home. Facial features are crocheted separately and sewn in place.
Skill Level: EASY
Designed by Darla Sims.
Bag measures 5" tall x 7" diameter at top.
Red Heart® Super Saver®: 2 skeins 254 Pumpkin A, 1 skein 312 Black B.
Crochet Hook: 5.5mm [US I-9].
Stitch marker, yarn needle.
GAUGE: 6 sts and 6 rows = 2". CHECK YOUR GAUGE. Use any size hook to obtain the gauge.
NOTE: Hold 2 strands together for bag.
Special Stitch
Decrease single crochet (sc2tog) = [Draw up a loop in next st] twice, yarn over and draw through all 3 loops on hook.

Round 1: Using A, ch 2; 8 sc in 2nd ch from hook. Do not join, work in continuous rounds (sprials). Place a marker for beginning of round. Move marker up as each round is completed - 8 sc.
Round 2: 2 sc in each sc around - 16 sc.
Round 3: [Sc in next sc, 2 sc in next sc] 8 times - 24 sc.
Round 4: [Sc in next 2 sc, 2 sc in next sc] 8 times - 32 sc.
Round 5: [Sc in next 3 sc, 2 sc in next sc] 8 times - 40 sc.
Round 6: [Sc in next 4 sc, 2 sc in next sc] 8 times - 48 sc.
Round 7: [Sc in next 5 sc, 2 sc in next sc] 8 times - 56 sc.
Rounds 8 - 10: Sc in each sc around.
Round 11: [Sc in next 6 sc, 2 sc in next sc] 8 times - 64 sc.
Rounds 12 - 20: Sc in each sc around.
Round 21: [Sc in next 6 sc, sc2tog] 8 times - 56 sc.
Round 22: Sc in each sc around.
Round 23: [Sc in next 5 sc, sc2tog] 8 times - 48 sc.
Round 24: Sc in each sc around; join with slip st in first sc.
Fasten off.
Handle
Using 2 strands of A, ch 50.
Row 1: Sc in 2nd ch from hook and in each ch to last ch; 5 sc in last ch; working in free loops of beginning ch, sc to beginning sc; 4 sc in same st as first sc. Join with slip st in first sc. Fasten off.
Eyes (Make 2)
Using single strand of B, ch 4.
Row 1: Sc in 2nd ch from hook and in next 2 chs; turn - 3 sc.
Row 2: Ch 1, sc in first sc, sc2tog; turn - 2 sc.
Row 3: Ch 1, sc2tog; turn - 1 sc.
Row 4: Ch 1, sc in next sc.
Fasten off.
Mouth
Using single strand of B, ch 19.
Row 1: Slip st in 2nd ch from hook and in next ch, sc in next 2 chs, hdc in next 2 chs, dc in next 2 chs, [2 dc in next ch] twice, dc in next 2 chs, hdc in next 2 chs, sc in next 2 chs, slip st in last 2 chs. Fasten off.
Finishing
Weave in ends. Using single strand of B, work blanket stitch around top of bag. Sew on handle. Using single strand of A and blanket stitch, sew on eyes, nose and mouth.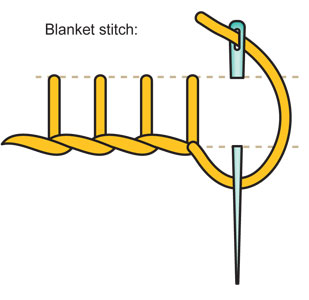
ABBREVIATIONS: A, B, C = Color A, Color B, Color C etc; ch = chain; dc = double crochet; hdc = half double crochet; mm = millimeters; sc = single crochet; st(s) = stitch (es); [ ] = work directions in brackets the number of times specified.
Pattern © by Coats & Clark Inc. Reproduced with permission from Coats & Clark Inc. PurpleKittyYarns.com is not endorsed by Coats & Clark Inc. It is not permissible to contract production of projects made from designs published by Coats & Clark to a third party for sale or distribution.
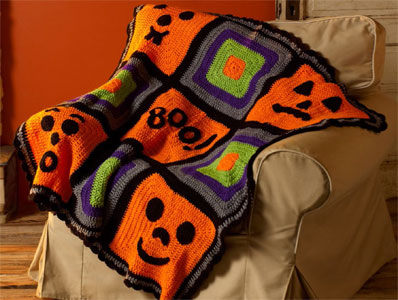
Pumpkin Face Throw LW3747
Skill Level: EASY
Designed by Michele Wilcox
What you will need:
Red Heart® Super Saver®: 2 skeins each 312 Black A and 254 Pumpkin B; 1 skein each of 400 Grey Heather C, 356 Amethyst D and 672 Spring Green E
Susan Bates® Crochet hook: 5.5mm [US I-9]
Yarn needle; scissors
Gauge: 16 sts = 5" (12.7 cm); 6 rows = 4" (10 cm). CHECK YOUR GAUGE. Use any size hook to obtain your gauge.
If you're decorating for Halloween, make sure you have this crochet throw to complete your decor! The funny pumpkin faces are combined with the "BOO!" center square to give everyone happy memories of this fun season.
Throw measures 49" x 49"
THROW
Pumpkin Square (make 5)
With B, ch 4, join with slip st in first ch.
Round 1: Ch 3 (counts as first dc throughout), 11 dc in ring, join with slip st in top of beginning ch-3—12 dc.
Round 2: Ch 3, *[(2 dc, 1 tr) in next dc, (1 tr, 2 dc) in next dc] (corner), dc in next dc, repeat from * twice, (2 dc, 1 tr) in next dc, (1 tr, 2 dc) in next dc, join with slip st in top of beginning ch-3.
Round 3: Ch 3, dc in next 2 dc, *corner in next 2 tr, dc in next 5 dc, repeat from * twice, corner, dc in next 2 dc, join with slip st in top of beginning ch-3.
Round 4: Ch 3, dc in next 4 dc, *corner in next 2 tr, dc in next 9 dc, repeat from * twice, corner in next 2 tr, dc in next 4 dc, join with slip st in top of beginning ch-3.
Round 5: Ch 3, dc in each dc across to corner tr, *corner in next 2 tr, dc in each dc across to corner tr, repeat from * twice, corner in next 2 tr, dc in each remaining dc across, join with slip st in top of beginning ch-3.
Rounds 6-9: Repeat Round 5. Fasten off at end of last round.
Round 10: Join A in same st as last round join, repeat round 5. Fasten off.
Stripes Squares (make 4)
Rounds 1 & 2: With B, repeat rounds 1 and 2 of Pumpkin Square. Fasten off at end of last round.
Rounds 3-5: Join E in same st as last round join, repeat rounds 3-5 of Pumpkin Square. Fasten off at end of last round.
Rounds 6 & 7: Join D in same st as last round join, repeat round 5 of Pumpkin Square. Fasten off at end of last round.
Rounds 8 & 9: Join C in same st as last round join, repeat round 5 of Pumpkin Square. Fasten off at end of last round.
Round 10: Repeat round 10 of Pumpkin Square.
Pumpkin face #1
Eye (make 2)
Round 1: With A, ch 2, 6 sc in 2nd ch from hook—6 sc.
Round 2: 2 sc in each sc around—12 sc.
Round 3: [Sc in next sc, 2 sc in next sc] around—18 sc. Leaving long end, fasten off.
Nose
With A, ch 2.
Rounds 1 & 2: Repeat rounds 1 & 2 of Eyes— 12 sc. Leaving long end, fasten off.
Mouth
With A, ch 12, join with slip st in first ch.
Round 1: Ch 2 (counts as first hdc), 23 hdc in ring, join with slip st in top of beginning ch-2. Leaving long end, fasten off.
Eyebrow (make 2)
With A, ch 7.
Row 1: Sc in 2nd ch from hook and in next ch, 2 sc in each of next 2 chs, sc in last 2 chs. Leaving long end, fasten off.
Pumpkin Face #2
Eye (make 2)
With A, ch 2.
Round 1: 6 sc in 2nd ch from hook.
Round 2: [3 sc in next sc, sc in next sc] 3 times—12 sc.
Round 3: Sc in next sc, [3 sc in next sc, sc next 3 sc] twice, 3 sc in next sc, sc in next 2 sc, join with slip st in first sc. Leaving long end, fasten off.
Nose (make 1)
Rounds 1-3: Repeat Rounds 1-3 of Pumpkin Face #2 Eye.
Mouth
With A, ch 5.
Row 1: Sc in 2nd ch from hook and each remaining ch across, ch 1, turn—4 sc.
Row 2: Sc in each sc across, ch 1, turn.
Row 3: Sc in each sc across, ch 5, turn.
Row 4: Sc in 2nd ch from hook and in next 3 chs, ch 1, turn—4 sc.
Row 5: Sc in each sc across, ch 1, turn.
Row 6: Sc in each sc across, ch 1, do not turn, work 6 sc across top of teeth, ch 4, turn.
Row 7: Slip st in 2nd ch from hook and in next 2 chs, sc in next 6 sc, ch 4, turn.
Row 8: Slip st in 2nd ch from hook and in next 2 chs, slip st in next sc. Leaving long end, fasten off.
Pumpkin Face #3
Eye (make 2)
With A, ch 6.
Row 1: Sc in 2nd ch from hook, hdc in next st, dc in next 2 sts, tr in last st, ch 1, turn.
Row 2: Sc in next 5 sts, 3 sc in tip, working on opposite side of starting ch, sc in next 5 chs, ch 1,turn.
Row 3: Sc in next 6 sc, 3 sc in next sc, sc in remaining 6 sc. Leaving long end, fasten off.
Nose
Rows 1 & 2: Repeat Rows 1 & 2 of Pumpkin Face #3 Eye. Leaving long end, fasten off at end of last row.
Mouth
With A, ch 25.
Row 1: Dc in 4th ch from hook, dc in next 2 chs, [3 dc in next ch, dc in next ch, dc3tog, dc in next ch] 3 times, dc in last ch. Leaving long end, fasten off.
Pumpkin Face #4
Eye (make 2)
With A, ch 6.
Round 1: Sc in 2nd ch from hook and in next 3 chs, 3 sc in last ch, working on opposite side of ch, work sc in next 3 chs, 2 sc in last ch—12 sc.
Round 2: 2 sc in next sc, sc in next 3 sc, 2 sc in next 3 sc, sc in next 3 sc, 2 sc in next 2 sc—18 sc.
Round 3: [Sc in next 2 sc, 2 sc in next sc] around—24 sc. Leaving long end, fasten off.
Nose
With A, ch 4, join with slip st in first ch.
Row 1: Ch 3, 9 dc in ring, ch 1, turn—10 dc.
Row 2: 2 sc in next dc, sc in next 8 dc, 2 sc in last dc. Leaving long end, fasten off.
Mouth
With A, ch 21.
Row 1: Sc in 2nd ch from hook and in next 2 chs, hdc in next 3 chs, dc in next 8 chs, hdc in next 3 chs, sc in remaining 3 chs. Leaving long end, fasten off.
BOO! (letters for center square)
Letter B
With A, ch 13.
Row 1: Sc in 2nd ch from hook and in each remaining ch across, ch 9, turn.
Row 2: Skip next 5 sc, sc in next sc, ch 9, skip next 5 sc, sc in last sc, ch 1, turn.
Row 3: Sc in next sc, sc in next 9 chs, slip st in next sc, sc in next 9 chs, slip st in top of last st. Leaving long end, fasten off.
Letter O (make 2)
With A, ch 25, join with slip st in first ch.
Round 1: Ch 1, sc in same ch as joining and each remaining ch around, join with slip st in first sc. Leaving long end, fasten off.
! (Top)
With A, ch 14.
Row 1: Hdc in 3rd ch from hook and in next 7 chs, sc in last 4 chs. Leaving long end, fasten off.
! (Bottom)
With A, ch 2.
Round 1: 6 sc in 2nd ch from hook, join with slip st in first sc. Leaving long end, fasten off.
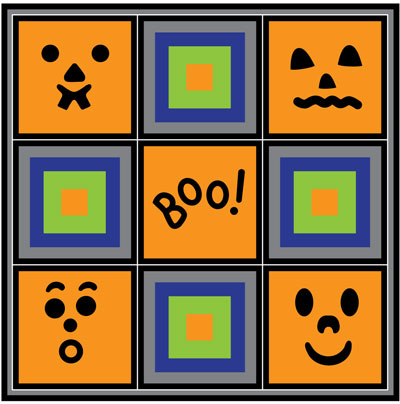
ASSEMBLY
Using long ends, sew Faces to Squares as shown in diagram.
Sew Squares together through back loops only of Round 10 of Squares.
Border
Round 1: Join C with slip st in any dc on outside edge of throw, ch 3, dc in each st around, working 5 dc between 2 outside corner tr, join with slip st in first st. Fasten off and weave in ends.
Round 2: Join A with sc in any dc on Round 1, *skip next dc, 5 dc in next dc, skip next dc, sc in next dc, repeat from * around, join with slip st in first sc. Fasten off and weave in ends.
ABBREVIATIONS
ch = chain; cm = centimeters; dc = double crochet; hdc = half double crochet; mm = millimeters; sc = single crochet; st(s) = stitch(es); tr = treble crochet; [ ] = work directions in brackets the number of times specified; * or ** = repeat whatever follows the * or ** as indicated.
Pattern © by Coats & Clark Inc. Reproduced with permission from Coats & Clark Inc. PurpleKittyYarns.com is not endorsed by Coats & Clark Inc. It is not permissible to contract production of projects made from designs published by Coats & Clark to a third party for sale or distribution.
Puppy Pirate Hat LW2817
Yo ho, yo ho! Your puppy will be singing "A pirate's life for me" when you crochet him a pirate's hat complete with skull and cross bones.
Designed by Nancy Anderson.
Skill Level: EASY
Red Heart® Super Saver®: 1 skein each 312 Black A and 316 Soft White B.
Crochet Hooks: 4mm [US G-6] and 3.5mm [US E-4] (for applique). Stitch markers. Yarn needle.
GAUGE: With larger hook, 18 sts = 4"; 20 rows sc = 4". Gauge is not overly important for this project since the hat is designed to sit on top of the head. CHECK YOUR GAUGE. Use any size hook to obtain the gauge.
Finished Size
Directions are given for size Small. Changes for Medium/ Large are in parentheses.
Small: 6" wide x 3" tall.
Medium/Large: 7½" wide x 3½ tall.
NOTES: Hidden ear openings allow this hat to be worn by perky-eared dogs as well as flat-eared dogs. Some adjustments for individual dog may be needed and can be made by either decreasing or increasing the number of starting chains in the crown piece or increasing or decreasing overall hat width. The latter can be achieved by adding or subtracting an even number of starting ch sts and sc sts, which comprise the sides of the hat brim.
Work in back bumps of chains: Turn foundation ch over to the wrong side, insert hook in the bump formed at the back of the ch and proceed with the st as usual.

HAT
Hat Brim (make 2)
With larger hook and A, ch 21 (31).
Row 1: Working in back bumps only, sc in 2nd ch from hook and in each ch across, turn - 20 (30) sc.
NOTE: On opposite side of foundation ch, mark placement of crown by placing a marker in 6th (11th) ch from each end of foundation ch.
Row 2: Ch 1, sc in first 5 (10) sts, place marker, hdc in next 3 sts, [dc in next st, 2 dc in next st] twice, hdc in next 3 sts, sc in next st, place marker, sc in last 4 (9) sts, turn - 32 (42) sts.
Row 3: Ch 1, sc in first 5 (10) sts, hdc in next 12 sts, sc in last 5 (10) sts, turn - 22 (32) sts.
Row 4: Ch 1, sc in first 5 (10) sts, hdc in next st, 2 hdc in next st, hdc in next 2 sts, dc in next st, 2 dc in each of next 2 sts, dc in next st, hdc in next 2 sts, 2 hdc in next st, hdc in next st, sc in last 5 (10) sts, turn - 26 (36) sts.
Row 5: Ch 2 (does not count as a st), hdc in first st, sc in next 4 (9) sts, 2 hdc in next st, hdc in next 3 sts, 2 hdc in next st, hdc in next 2 sts, 2 hdc in each of next 2 sts, hdc in next 2 sts, 2 hdc in next st, hdc in next 3 sts, 2 hdc in next st, sc in next 4 (9) sts, hdc in last st, turn - 32 (42) sts. Fasten off size Small, leaving a long sewing length.
Size Medium/Large only
Row 6: Ch 2, hdc in first st, sc in next 9 sts, hdc in next 22 sts, sc in next 9 sts, hdc in last st, turn - 42 sts. Row 7: Ch 2, hdc in first st, sc in next 9 sts, hdc in st, 2 hdc in next st, hdc in next 5 sts, 2 hdc in next st, hdc in next 6 sts, 2 hdc in next st, hdc in next 5 sts, 2 hdc in next st, hdc in next st, sc in next 9 sts, hdc in last st - 46 sts. Fasten off, leaving a long sewing length.
Hat Crown/Gusset
Row 1: With right side facing and larger hook, join A with a slip st in back loop of first marked ch on opposite side of foundation ch, working in back loops of ch sts only, ch 1, sc in same st and in next 8 ch sts, turn leaving remaining sts unworked - 9 sts.
Row 2-4: Ch 1, sc in each st across, turn. Fasten off size Small, leaving a long sewing length.
Size Medium/Large only
Row 5: Ch 1, sc in each st across. Fasten off, leaving a long sewing length.
ASSEMBLY
With yarn needle and sewing length, working in inside loops of sts, whipstitch last row of Crown/Gussett to corresponding marked sts of foundation ch on second Hat Brim. Weave in ends.
APPLIQUE
Size Small only
Skull
With smaller hook and B, ch 3.
Row 1: 2 sc in 2nd ch from hook, sc in next st, turn - 3 sc.
Row 2: Ch 1, sc in first sc, 2 sc in next sc, sc in last sc, turn - 4 sc.
Row 3: Ch 1, 2 sc in first sc, sc in next 2 sc, 2 sc last sc, turn - 6 sc.
Row 4: Ch 1, skip first sc, sc in next 3 sts, skip next sc, sc in last sc, turn - 4 sc.
Fasten off, leaving a sewing length.
Cross Bones (make 2)
With smaller hook and B, ch 2.
First End: 4 sc in 2nd ch from hook; join with slip st in first sc, ch 9.
Second End: 4 sc in 2nd ch from hook; join with slip st in first sc. Fasten off, leaving a sewing length.
Size Medium/Large only Skull
With smaller hook and B, ch 3.
Row 1: 2 sc in 2nd ch from hook, sc in next st, turn - 3 sc.
Row 2: Ch 1, 2 sc in first sc, sc in next sc, 2 sc in last sc, turn - 5 sc.
Row 3: Ch 1, sc in each sc across, turn.
Row 4: Ch 1, sc in first sc, [2 sc in next sc, sc in next sc] twice, turn - 7 sc.
Row 5: Ch 1, sc in each sc across, turn.
Row 6: Ch 1, skip first st, sc in next 4 sc, sc2tog over last 2 sts, turn - 5 sts.
Row 7: Ch 1, skip first st, sc in next 2 sc, sc2tog over next 2 sts, slip st in last st.
Fasten off, leaving a sewing length.
Cross Bones (make 2)
With smaller hook and B, ch 2.
First End: 4 sc in 2nd ch from hook; join with slip st in first sc, ch 11.
Second End: 4 sc in 2nd ch from hook; join with slip st in first sc. Fasten off, leaving a sewing length.
Ear Loop: With larger hook, join A with slip st in corner at base of Row 1 of Crown/Gusset, ch 10 (16) or desired length to fit over ear, skip side edge of Crown/Gusset, slip st in corner on opposite side of Crown/Gusset where last row is joined to other Brim (Ear Loop made). Fasten off.
Tie: With larger hook, join A to center of Ear Loop just formed, ch 33 (50) or desired length for Tie. Fasten off. Repeat Ear Loop and Tie on opposite side of Crown/Gusset.
FINISHING
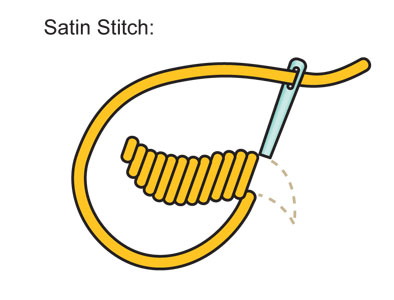
Lay out Cross Bones in an "X" configuration on front of hat as pictured and with yarn needle and sewing length, whipstitch bones in place. With yarn needle and A, satin st 2 eyes and a triangular shaped nose as pictured on Skull. Whipstitch skull onto hat as pictured.
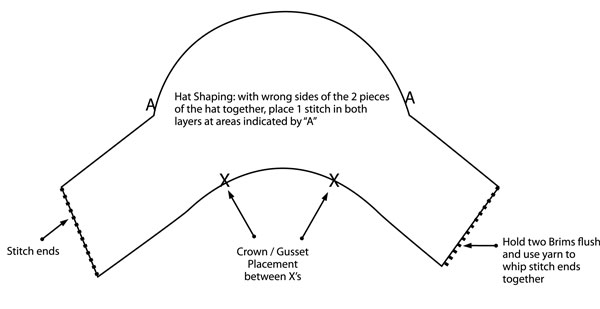
Place 2 Brim pieces together with wrong sides facing. With yarn needle and A, matching sts, whipstitch Brim pieces together across short edges. Brim shape is maintained by making a stitch through both parts in 2 different locations on the top edge of the brim, (do not sew entire brim closed). Hold hat together at the top. Tack the 2 layers together as indicated by the letter "A" on the schematic, using a single stitch. Weave in ends.
Tie to dog's head using ties, being careful not to tie the piece too tightly. The chain loop is designed to hold the hat straight on the head and can be used to poke ears through as needed.
Pattern © by Coats & Clark Inc. Reproduced with permission from Coats & Clark Inc. PurpleKittyYarns.com is not endorsed by Coats & Clark Inc. It is not permissible to contract production of projects made from designs published by Coats & Clark to a third party for sale or distribution.
Purple People Eater Hat LW2323
Designed by Michele Wilcox.
Skill: EASY
Hat measures 20" around at widest; 10 ½" across when flattened and measured across top of teeth.
RED HEART® "Super Saver": 1 skein each 356 Amethyst A, 316 Soft White B, 672 Spring Green C and 312 Black D.
Crochet Hook: 5.5mm [US I-9].
Yarn needle, polyester fiberfill.
GAUGE: Rounds 1-6 = 3 ½" across at widest. CHECK YOUR GAUGE. Use any size hook to obtain the gauge.

HAT
Round 1 (Right Side): With A ch 2; 6 sc in 2nd ch from hook, do not join and do not turn—6 sc.
Round 2: Work 2 sc in each sc around—12 sc.
Round 3: [Sc in next sc, 2 sc in next sc] 6 times—18 sc.
Round 4: [Sc in next 2 sc, 2 sc in next sc] 6 times—24 sc.
Round 5: [Sc in next 3 sc, 2 sc in next sc] 6 times—30 sc.
Round 6: [Sc in next 4 sc, 2 sc in next sc] 6 times—36 sc.
Round 7: [Sc in next 5 sc, 2 sc in next sc] 6 times—42 sc.
Round 8: Sc in each sc around.
Round 9: [Sc in next 6 sc, 2 sc in next sc] 6 times—48 sc.
Round 10: Sc in each sc around.
Round 11: [Sc in next 7 sc, 2 sc in next sc] 6 times—54 sc.
Round 12: Sc in each sc around.
Round 13: [Sc in next 8 sc, 2 sc in next sc] 6 times—60 sc.
Round 14: [Sc in next 9 sc, 2 sc in next sc] 6 times—66 sc.
Rounds 15-25: Sc in each sc around. Fasten off A.
Teeth
Round 26: Join B with slip st in first sc, ch 1, sc in each sc around.
Round 27: Slip st in next sc, *ch 5, sc in 2nd ch from hook, hdc in next ch, dc in next ch, tr in last ch (tooth made), skip next 3 sc of Round 26, slip st in next sc; repeat from * around, slip st in last sc. Fasten off B.
Horn
Round 1 (Right Side): With C ch 2; 6 sc in 2nd ch from hook, do not join—6 sc.
Round 2: [Sc in next 2 sc, 2 sc in next sc] twice—8 sc.
Round 3: [Sc in next 3 sc, 2 sc in next sc] twice—10 sc.
Round 4: Sc in each sc around.
Round 5: [Sc in next 4 sc, 2 sc in next sc] twice—12 sc.
Round 6: Sc in each sc around.
Round 7: [Sc in next 3 sc, 2 sc in next sc] 3 times—15 sc.
Round 8: Sc in each sc around.
Round 9: [Sc in next 4 sc, 2 sc in next sc] 3 times—18 sc.
Round 10: Sc in each sc around.
Round 11: [Sc in next 2 sc, 2 sc in next sc] 6 times—24 sc.
Round 12: Sc in each sc around.
Round 13: [Sc in next 3 sc, 2 sc in next sc] 6 times—30 sc.
Rounds 14-16: Sc in each sc around. Fasten off C, leaving a long tail for sewing horn to hat.
Eye
Rounds 1-3: With B, work Rounds 1-3 of Hat—18 sc.
Rounds 4-6: Sc in each sc around. Fasten off B, leaving a long tail for sewing eye to hat.
Pupil
Round 1: With D, work Round 1 of Hat; join with slip st in first sc—6 sc. Fasten off D, leaving a long tail for sewing pupil to eye.
Eyelid
Row 1: With A, ch 2, 6 sc in 2nd ch from hook, turn—6 sc.
Row 2: Ch 1, 2 sc in each sc across, turn—12 sc.
Row 3: Ch 1, sc in each sc across. Fasten off A, leaving a long tail for sewing eyelid to hat.
Eyelashes
Cut twelve 6" strands of D. Fold one strand in half. Using crochet hook, draw the folded end of strand through first sc of Row 3 of eyelid. Draw ends of strand through fold and pull gently but firmly to tighten. Repeat this process to attach an eyelash to each sc of Row 3. Brush and trim eyelashes as desired.
ASSEMBLY
Stuff horn and sew to top of hat, slightly to one side. Sew pupil to center of eye. Sew eye to front of hat. Sew eyelid above eye, slightly overlapping top of eye. Weave in any remaining ends.
ABBREVIATIONS: A, B, C, D = color A, B, C, D; ch = chain; dc = double crochet; hdc = half double crochet; sc = single crochet; slip st = slip stitch; st = stitch; tr = treble crochet; * = repeat whatever follows the * as indicated; [ ] = work directions in brackets the number of times specified.
Pattern © by Coats & Clark Inc. Reproduced with permission from Coats & Clark Inc. PurpleKittyYarns.com is not endorsed by Coats & Clark Inc. It is not permissible to contract production of projects made from designs published by Coats & Clark to a third party for sale or distribution.
Quick and Easy Valentines
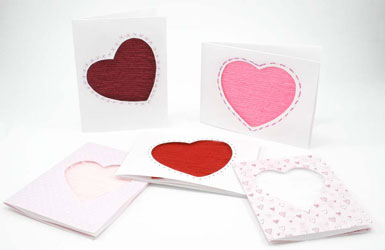
Skill Level: BEGINNER
Designed by Elizabeth Hill.
Cards can be any size, depending on your choice of paper.
RED HEART® "Super Saver®": 2 Ounces in colors of your choice.
Recommended colors: 724 Baby Pink; 722 Pretty 'n Pink; 319 Cherry Red; 905 Magenta; 311 White; 376 Burgundy; 786 Candy Print.
Construction paper, scrapbook paper, or stationery blanks; scissors; white craft glue, double-sided tape or glue sticks; cookie cutters in heart shapes.
Instructions:
1. Fold construction paper in half, and then fold in half again to make quarter size card.
2. Center heart cookie cutter in the center of the card front. Trace lightly with a pencil. Cut along pencil line and remove the heart shape.
3. While the card is folded, lightly trace around the inside of the cut heart pattern on the sheet of paper directly below the cut-out design. This will serve as a pattern for attaching yarn to the card.
4. Cut lengths of yarn long enough (without stretching) to cover the lightly drawn heart design. Open up card so that the design will be flat on a hard surface. Cover design area with the adhesive of choice. Put yarn strips over adhesive adjusting yarn to completely cover design. Allow to dry. Trim yarn ends if necessary. Once dry, refold card. Yarn will show through the heart design on the front of the card.
5. Optional: Embellish paper border of the heart design with markers, specialty hole punches, rick rack, or sequins.
6. Add your own special Valentine message on the front and inside of the card.
Pattern © by Coats & Clark Inc. Reproduced with permission from Coats & Clark Inc. PurpleKittyYarns.com is not endorsed by Coats & Clark Inc. It is not permissible to contract production of projects made from designs published by Coats & Clark to a third party for sale or distribution.
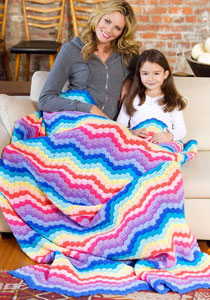
Rainbow Waves Throw LW2121
Skill Level: EASY
Throw measures 59" x 85"
RED HEART® "Super Saver®": 1 skein each 885 Delft Blue A, 381 Light Blue B, 530 Orchid C, 579 Pale Plum D, 718 Shocking Pink E, 373 Petal Pink F, 256 Carrot G, 327 Lt Coral H, 322 Pale Yellow I, 505 Aruba Sea J, and 512 Turqua K.
Crochet Hook: 5 mm [US H-8].
Yarn needle.
GAUGE: 6 blocks = 7"; 8 rows = 4 ¼" in pattern. CHECK YOUR GAUGE. Use any size hook to obtain the gauge.
NOTE: To change color at the end of the 2nd row of a color: work last dc of the row in top of the ch-3 until 2 loops remain on the hook, cut color in use leaving a 4" strand, with next color to be used yo and draw through 2 loops remaining on hook; continue with new color.
Pattern Stitch
Row 1 (Right Side): Dc in 4th ch from hook, dc in next 2 ch, * [skip next 2 ch, slip st in next ch, ch 3, dc in next 3 ch] 3 times, [ch 3, slip st in next ch, skip next 2 ch, dc in next 3 ch] 3 times; repeat from * to last ch; dc in last ch; turn.
Note: Now work all dc and slip sts into the back loop only of dc and ch on every row.
Row 2: Ch 3, skip first dc, * [dc in next 3 dc, skip slip st, skip 2 ch of ch-3, slip st in next ch, ch 3] 3 times, [dc in next 3 dc, ch 3, slip st in next ch, skip next 2 ch, skip slip st] 3 times; repeat from * to last 4 sts; dc in next 3 dc, dc in top of ch-3; turn.
Repeat Row 2 for pattern.
THROW
With A, ch 295. Work Rows 1 and 2 in pattern st, changing to B in last st of Row 2 - 8 chevrons. Then repeat Row 2 for pattern and work 2 rows each in the following color sequence: [B, C, D, E, F, G, H, I, J, K, A] 7 times. Fasten off. Weave in ends.
ABBREVIATIONS: ch = chain; dc = double crochet; mm = millimeters; st(s) = stitch(es); yo = yarn over; * = repeat whatever follows the * as indicated; [ ] = work directions in brackets the number of times specified.
Pattern © by Coats & Clark Inc. Reproduced with permission from Coats & Clark Inc. PurpleKittyYarns.com is not endorsed by Coats & Clark Inc. It is not permissible to contract production of projects made from designs published by Coats & Clark to a third party for sale or distribution.
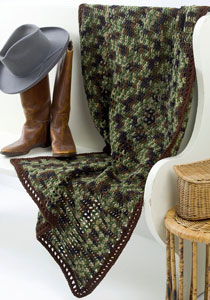
Relaxed Guy Throw WR1810
Skill Level: Easy
Finished size 36" x 60"
RED HEART® "Super Saver®": 5 skeins 971 Camouflage A and 1 skein 365 Coffee B.
Crochet Hook: 6.5mm [US K-10.5].
Yarn needle.
THROW
With A, ch 87.
Row 1: Dc in 4th ch from hook and in next 11 ch, *[ch 1, skip 1 ch, dc in next ch] 3 times, dc in next 12 ch; repeat from * 3 times more, turn – 85 sts.
Row 2: Ch 3 (counts as dc), skip first dc, dc in next 12 dc, *[ch 1, skip ch-1 space, dc in next dc] 3 times, dc in next 12 dc; repeat from * 3 times more, turn.
Repeat Row 2 until Throw measures 58" from beginning.
Fasten off.
FINISHING
Border
Round 1: With right side facing, join B at any corner, *3 sc in corner st, sc evenly to next corner; repeat from * around, adjusting st count so there are an odd number of sts between each corner st, join with slip st to first sc, slip st to center corner st.
Round 2: Ch 4 (counts as dc and ch-1), [dc, ch 1] 2 times in corner st, *[skip next sc, dc in next sc, ch 1] to corner st, [dc, ch 1] 3 times in corner st; repeat from * around, work between [ ] along last side to first corner, slip st to 3rd ch of beginning ch-3.
Round 3: Ch 1, [sc in each dc and ch-1 space] around, working 3 sc in each corner dc, join with slip st to first sc. Fasten off.
Weave in ends.
ABBREVIATIONS: A = Color A; B = Color B; ch = chain; dc = double crochet; mm = millimeters; sc = single crochet; st(s) = stitch(es); [ ] = work directions in brackets the number of times specified; * = repeat whatever follows the * as indicated.
Pattern © by Coats & Clark Inc. Reproduced with permission from Coats & Clark Inc. PurpleKittyYarns.com is not endorsed by Coats & Clark Inc. It is not permissible to contract production of projects made from designs published by Coats & Clark to a third party for sale or distribution.
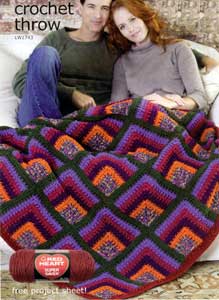
Rich Mitered Crochet Throw LW1743
Skill Level: Easy
Designed by Marianne Forrestal.
RED HEART® "Super Saver™": 1 skein each 315 Artist's Print A, 256 Carrot B, 776 Dark Orchid C, 905 Magenta D, 358 Lavender E and 332 Ranch Red G, 2 skeins 406 Medium Thyme F.
Crochet Hook: 5.5 mm (US I-9)
Yarn needle.
GAUGE: Rows 1-5 = 3". Finished square = 9". CHECK YOUR GAUGE. Use any size hook to obtain the gauge given.
Throw measures 48" x 57".
SQUARE (Make 30)
With A, ch 4.
Row 1: Work 4 dc in 4th ch from hook, turn.
Row 2: Ch 2 (counts as first st throughout), skip first dc, Fpdc around next dc, [2 hdc, ch 1, 2 hdc] in next dc, Fpdc around next dc, hdc in last dc, turn.
Row 3: With A, ch 3 (counts as first st throughout), skip first st, dc in next 3 sts, [2 dc, ch 1, 2 dc] in ch-1 space, dc in next 4 sts, turn.
Row 4: Ch 2, skip first st, Fpdc around next dc, [hdc in next dc, Fpdc around next dc] twice, [2 hdc, ch 1, 2 hdc] in ch-1 space, [Fpdc around next dc, hdc in next dc] 3 times, turn.
Row 5: Ch 3, skip first st, dc in next 7 sts, [2 dc, ch 1, 2 dc] in ch-1 space, dc in next 8 sts, turn.
Row 6: Change to B, ch 2, skip first st, Fpdc around next dc, [hdc in next dc, Fpdc around next dc] 4 times, [2 hdc, ch 1, 2 hdc] in ch-1 space, [Fpdc around next dc, hdc in next dc] 5 times, turn.
Row 7: Ch 3, skip first st, dc in next 11 sts, [2 dc, ch 1, 2 dc] in ch-1 space, dc in next 12 sts, turn.
Row 8: Change to C, ch 2, skip first st, Fpdc around next dc, [hdc in next dc, Fpdc around next dc] 6 times, [2 hdc, ch 1, 2 hdc] in ch-1 space, [Fpdc around next dc, hdc in next dc] 7 times, turn.
Row 9: Ch 3, skip first st, dc in next 15 sts, [2 dc, ch 1, 2 dc] in ch-1 space, dc in next 16 sts, turn.
Row 10: Change to D, ch 2, skip first st, Fpdc around next dc, [hdc in next dc, Fpdc around next dc] 8 times, [2 hdc, ch 1, 2 hdc] in ch-1 space, [Fpdc around next dc, hdc in next dc] 9 times, turn.
Row 11: Ch 3, skip first st, dc in next 19 sts, [2 dc, ch 1, 2 dc] in ch-1 space, dc in next 20 sts, turn.
Row 12: Change to E, ch 2, skip first st, Fpdc around next dc, [hdc in next dc, Fpdc around next dc] 10 times, [2 hdc, ch 1, 2 hdc] in ch-1 space, [Fpdc around next dc, hdc in next dc] 11 times, turn.
Row 13: Ch 3, skip first st, dc in next 23 sts, [2 dc, ch 1, 2 dc] in ch-1 space, dc in next 24 sts, turn.
Row 14: Change to F, ch 2, skip first st, Fpdc around next dc, [hdc in next dc, Fpdc around next dc] 12 times, [2 hdc, ch 1, 2 hdc] in ch-1 space, [Fpdc around next dc, hdc in next dc] 13 times, turn.
Row 15: Ch 3, skip first st, dc in next 27 sts, [dc, ch 1, dc) in ch-1 space, dc in next 28 sts. Fasten off.
FINISHING
With Squares facing in same direction, arrange Squares into 6 rows of 5 Squares each. Sew Squares together.
Border
Rnd 1: With right side facing, join G with slip st in top right corner st, ch 3, [2 dc, ch 1, 2 dc] in same st, work 123 dc evenly across top edge, [2 dc, ch 1, 2 dc] in top left corner, work 149 dc evenly across left side, [2 dc, ch 1, 2 dc] in bottom left corner, work 123 dc evenly across bottom edge, [2 dc, ch 1, 2 dc] in bottom right corner, work 149 dc evenly across right side, slip st to top of beginning ch to join.
Rnd 2: Ch 2, Fpdc around next dc, [2 hdc, ch 1, 2 hdc] in ch-1 space, Fpdc around next dc, [hdc in next dc, Fpdc around next dc] 63 times, [2 hdc, ch 1, 2 hdc] in ch-1 space, Fpdc around next dc, [hdc in next dc, Fpdc around next dc] 76 times, [2 hdc, ch 1, 2 hdc] in ch-1 space, Fpdc around next dc, [hdc in next dc, Fpdc around next dc] 63 times, [2 hdc, ch 1, 2 hdc] in ch-1 space, Fpdc around next dc, [hdc in next dc, Fpdc around next dc] 75 times, slip st to top of beginning ch to join.
Rnd 3: Ch 3, dc in next 3 sts, [2 dc, ch 1, 2 dc] in ch-1 space, *dc in each st to next ch-1 space, [2 dc, ch 1, 2 dc] in ch-1 space; repeat from * twice more, dc in each st to beginning of rnd, slip st to top of beginning ch to join.
Fasten off. Weave in ends.
ABBREVIATIONS: A = Color A; B = Color B; C= Color C; ch = chain; D = Color D; dc = double crochet; E = Color E; F = Color F; G = Color G; hdc = half double crochet; Fpdc = Front post double crochet; mm = millimeters; rnd = round; sc = single crochet; st(s) = stitch(es); [ ] = work directions in brackets the number of times specified; * = repeat whatever follows the * as indicated.
Pattern © by Coats & Clark Inc. Reproduced with permission from Coats & Clark Inc. PurpleKittyYarns.com is not endorsed by Coats & Clark Inc. It is not permissible to contract production of projects made from designs published by Coats & Clark to a third party for sale or distribution.
| Pattern Categories Browse the categories to help you find the patterns you're looking for. |
||
    
|
|
|


Navigation

All contents © 2003-2026 Purple Kitty LLC. All rights reserved.
Privacy Policy | FAQ | About Me