 |
Red Heart Super Saver
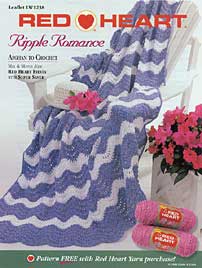
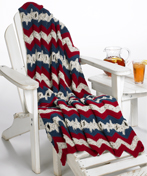
Ripple Romance Afghan LW1238
Skill level: Beginner
Red Heart Fiesta makes this crocheted ripple afghan extra special.
Afghan measures approximately 49 1/2" x 67".
SUPPLIES
RED HEART® Worsted Weight Yarns: This model made in Red Heart® Fiesta® yarn, 73% acrylic, 27% nylon, Art. E704 (6 oz skeins) and Red Heart® Super Saver® yarn, 100% acrylic, Art E300 (8 and 6 oz skeins).
Amount: Fiesta: 34 Ounces No. 6347 Light Periwinkle CA; and Super Saver: 14 Ounces No. 311 White CB.
Crochet Hook: U.S. Size J-10 [6 mm].
GAUGE: In pat - One rep of 17 sts = 4 1/2"; 8 rows = 4 1/4". CHECK YOUR GAUGE. Use any size crochet hook to obtain the gauge given.
NOTE: Check your gauge by working a swatch over a multiple of 17 sts: ch 18 or 35 and work in pat over 17 or 34 sts.
With CA ch 188.
Foundation Row (Wrong Side): Sc in 2nd ch from hook and in each ch across; turn - 187 sc.
Row 1 (Right side): Ch 3, 4 dc in first sc, * skip next sc, [dc in next sc, skip next sc] 7 times **, [5 dc in next sc] twice; rep from * to last sc, end at **; 5 dc in last sc; turn.
Row 2: Ch 1, sc in each st across and in top of ch-3; turn.
Rep Rows 1 and 2 for pat working 8 more rows with CA, then *** 4 rows CB, 8 rows CA, 4 rows CB, 6 rows CA, 4 rows CB, 6 rows CA, 4 rows CB, 8 rows CA, 4 rows CB, 10 rows CA. Rep from *** once more - 126 rows. Fasten off. Weave in ends.
Edging: With right side facing, attach CA and work 1 row sc evenly across each long edge of afghan. Fasten off.
ABBREVIATIONS: CA, CB, etc = Color A, Color B, etc; ch = chain; dc = double crochet; mm = millimeters; pat = pattern; rep = repeat; sc = single crochet; st(s) = stitch(es); * or ** = repeat whatever follows the * or ** as indicated; [ ] = work directions given in brackets the number of times specified.
Designed by Michele Thompson.
Pattern © by Coats & Clark Inc. Reproduced with permission from Coats & Clark Inc. PurpleKittyYarns.com is not endorsed by Coats & Clark Inc. It is not permissible to contract production of projects made from designs published by Coats & Clark to a third party for sale or distribution.
Other free crochet afghan patterns:
Ripple Throwback LW2156
Skill Level: EASY
Designed by Marianne Forrestal
Throw measures 45" x 58".
RED HEART® "Super Saver®": 3 Balls 661 Frosty Green A; 1 Ball each 256 Carrot B, 406 Medium Thyme C and 334 Buff D.
RED HEART® "Fiesta®": 1 Ball each 6635 Coffee E and 6250 Cornmeal F.
Crochet Hook: 6mm [US J-10].
Yarn needle.
GAUGE: 1 pattern repeat from point to point = 3"; 4 rows = 3". CHECK YOUR GAUGE. Use any size hook to obtain the gauge.
NOTE: When changing color, work last st of old color until 2 loops are left on hook, drop old color, yo with new color and complete stitch.

Color Sequence
Work 4 rows with A, 1 row with B, 2 rows with E, 1 row with B, 4 rows with A, 1 row with C, 2 rows with F, 1 row with C, 4 rows with A, 1 row with D, 2 rows with E, 1 row with D, 4 rows with A, 1 row with B, 2 rows with F, 1 row with B, 4 rows with A, 1 row with C, 2 rows with E, 1 row with C, 4 rows with A, 1 row with B, 2 rows with F, 1 row with B, 4 rows with A, 1 row with D, 2 rows with E, 1 row with D, 4 rows with A, 1 row with C, 2 rows with F, 1 row with C, 4 rows with A, 1 row with B, 2 rows with E, 1 row with B and 4 rows with A.
THROW
With A, ch 152.
Row 1: Dc in 3rd ch from hook, dc in next 3 ch, [skip next 2 ch, dc in next 4 ch, ch 2, dc in next 4 ch] 14 times, skip next 2 ch, dc in next 3 ch, 2 dc in last ch.
Row 2: Ch 2, turn, dc in same st, [dc in next 3 dc, skip next 2 dc, dc in next 3 dc, (dc, ch 2, dc) in ch-2 space] 14 times, dc in next 3 dc, skip next 2 dc, dc in next 3 dc, 2 dc in last st.
Rows 3-76: Working in Color Sequence, repeat Row 2. Fasten off.
FINISHING
Weave in ends.
ABBREVIATIONS: A, B, etc= color A, B, etc; ch = chain; dc = double crochet; mm = millimeters; st(s) = stitch(es); yo = yarn over; [ ] = work directions in brackets the number of times specified.
Pattern © by Coats & Clark Inc. Reproduced with permission from Coats & Clark Inc. PurpleKittyYarns.com is not endorsed by Coats & Clark Inc. It is not permissible to contract production of projects made from designs published by Coats & Clark to a third party for sale or distribution.
Rosebud Throw WR1947
EXPERIENCED
Designed by Glenda Winkleman. Throw measures 44 ½" x 59 ½".
RED HEART® "Super Saver®": 9 skeins 316 Soft White; 1 skein each 633 Dark Sage, 661 Frosty Green, 374 Country Rose, 372, Rose Pink, 724 Baby Pink.
Afghan Crochet Hook: 6mm [US J-10].
Crochet Hook: 6mm [US J-10].
Yarn needle
GAUGES: 8 sts = 2"; 7 rows = 2" in afghan stitch on Panel B; 11 sts = 3"; 8 rows = 3" in pattern on Panel A. CHECK YOUR GAUGE. Use any size hook to obtain the gauges.
Bobble Stitch
Insert hook in next vertical st, yo, pull yarn through st, keeping loop on hook, [yo, insert hook in same vertical st just worked, yo, pull yarn through st] 3 times, keeping all loops on hook, yo, pull yarn through all 7 loops on hook = 1 bobble st made.

PANEL A (Make 4)
With afghan crochet hook and Soft White, ch 11.
Row 1: Leaving all loops on hook, draw up a loop in 2nd ch from hook and in each ch across - 11 loops; yo and draw through 1 loop, ** yo and draw through 2 loops; repeat from ** across - 1 loop.
Row 2: Leaving all loops on hook, * insert hook under vertical bar and draw up a loop; repeat from * across - 11 loops; yo and draw through 1 loop, ** yo and draw through 2 loops; repeat from ** across - 1 loop.
Rows 3-147: Work in afghan st and bobbles following Stitch Guide for Panel A.
Row 148: Ch 1, skip first vertical bar, slip st in each vertical bar and bobble st across. Fasten off.
Panel A Border
With crochet hook, join Soft White in upper right corner.
Rnd 1: Ch 3, ** dc in each st across to next corner, ch 2, dc in next row end, * 2 dc in next row end, [dc in next row end] 4 times; repeat from * to last row end; 2 dc in last row end, ch 2; repeat from **; join with a slip st to top of ch-3 - 178 sts across each long edge between corner spaces.
Rnd 2: Ch 1, sc in same st as joining, * ch 1, skip next dc, sc in next dc; repeat from * to last dc before corner; ch 1, skip next dc, (sc, ch 2, 2 sc) all in corner ch-2 space, sc in next dc; repeat from * to next corner; (sc, ch 2, sc) all in corner ch-2 space **, sc in next dc; repeat from * around, end at **; join to first sc - 181 sts across each long edge between corner spaces. Fasten off.
PANEL B (Make 3)
With afghan crochet hook and Soft White, ch 25.
Row 1: Repeat Row 1 of Panel A.
Rows 2-180: Repeat Row 2 of Panel A.
Row 181: Ch 1, skip first vertical bar, slip st in each vertical bar across. Fasten off.
Panel B Border
With crochet hook, join Soft White in upper right corner.
Rnd 1: Ch 3, * dc in each st across to next corner, ch 2, dc in each row end down length to next corner, ch 2; repeat from * around; join to top of ch-3 - 181 sts across each long edge between corner spaces. Fasten off.
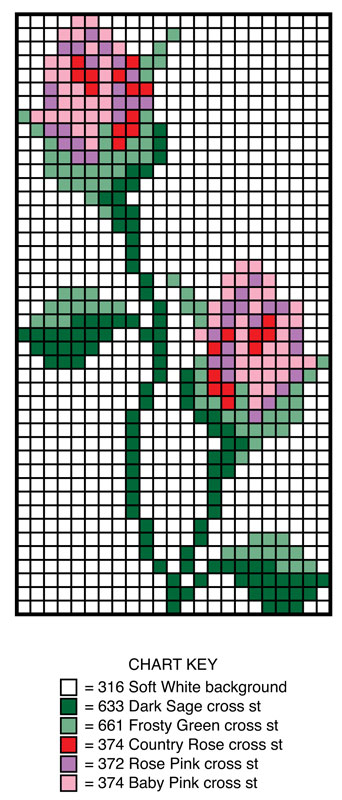
EMBROIDERY
Follow chart to cross stitch design onto each Panel B.
ASSEMBLY
With right sides facing and tops of 2 Panels aligned, with Soft White, slip st Panels together working in back loop of sts across long side, matching sts from corner to corner. Alternate Panel A and Panel B.
THROW BORDER
With right side facing and crochet hook, join Soft White in upper right hand corner sc.
Rnd 1: Ch 1, sc in each sc, dc and each ch-1 space around and work 3 sc in each corner ch-2 space; join to first sc.
Rnd 2: Ch 3, dc in next sc, (ch 3, slip st) in top of dc just made, * dc in next 2 sc, (ch 3, slip st) in top of last dc made; repeat from * to last sc; dc in last sc; join. Fasten off. Weave in ends.

ABBREVIATIONS: ch = chain; dc = double crochet; mm = millimeters; rnd = round; sc = single crochet; st(s) = stitch(es); yo = yarn over; * or ** = repeat whatever follows the * or ** as indicated; [ ] = work directions in brackets the number of times specified.
Pattern © by Coats & Clark Inc. Reproduced with permission from Coats & Clark Inc. PurpleKittyYarns.com is not endorsed by Coats & Clark Inc. It is not permissible to contract production of projects made from designs published by Coats & Clark to a third party for sale or distribution.
Scary Skull Bag LW2816
Little ghosts and goblins will have fun collecting treats with a skull-shaped bag crocheted just for them. Use it indoors for a haunting decoration to hold candy or other treats.
Skill Level: EASY
Designed by Michele Wilcox.
Bag measures 11" long excluding handles.
Red Heart® Super Saver®: 1 skein each 316 Soft White A and 312 Black B.
Crochet Hook: Size G-6 [4mm].
Yarn needle, small amount of polyfill stuffing.
GAUGE: 5 sts and 4 rows in pattern = 1½". CHECK YOUR GAUGE. Use any size hook to obtain the gauge given.
Special Stitches
sc2tog: [Insert hook in next st, yo, draw yarn through st] twice, yo, draw yarn through 3 loops on hook.

BAG
Side (make 2)
With A, starting at bottom, ch 13.
Row 1: Sc in 2nd ch from hook, 2 sc in next ch, *sc in next ch, 2 sc in next ch; repeat from * across; turn - 18 sc.
Row 2: Ch 1, *sc in next 2 sc, 2 sc in next sc; repeat from * across; turn - 24 sc.
Rows 3-5: Ch 1, sc in each sc across; turn.
Row 6: Ch 3 (counts as dc here and throughout), skip first sc, dc in each sc across; turn - 24 dc.
Row 7: Ch 1, sc in each dc across; turn.
Rows 8-13: Repeat rows 6-7 (3 times).
Row 14: Repeat row 6.
Row 15: Ch 1, starting in first dc, *sc in next dc, 2 sc in next dc; repeat from * across; turn - 36 sc.
Rows 16-25: Repeats rows 6-7 (5 times). Row 26: Repeat row 6.
Row 27: Ch 1, starting in first dc, [sc2tog over next 2 dc] 6 times, sc in next 12 dc, [sc2tog over next 2 dc] 6 times; turn - 24 sc.
Rows 28-29: Repeat rows 6-7. Do not turn at end of last row. Do not fasten off.
Edging: Ch 1, sc evenly around, working 40 sc across side edge, 12 sc across bottom edge, 40 sc across opposite side edge, and 24 sc across top edge, join with a slip st in first sc - 116 sc. Fasten off.
Mouth: With B, back st a straight line across the center 12 sts of row 9 for mouth; make 4 vertical straight sts evenly spaced across mouth.
Nose
With A, ch 2.
Row 1: 3 sc in 2nd ch from hook; turn - 3 sc.
Row 2: Ch 1, sc in each sc across; turn.
Row 3: Ch 1, sc in next sc, 2 sc in next sc, sc in last sc; turn - 4 sc.
Rows 4-8: Ch 1, sc in each sc across; turn.
Row 9: Ch 1, sc in next sc, 2 sc in each of next 2 sc, sc in last 2 sc; turn - 6 sc.
Row 10: Slip st in first 2 sc, sc in next 2 sc; turn leaving remaining sts unworked.
Rows 11-12: Ch 1, sc in each sc across; turn.
Row 13: Ch 1, sc2tog over first 2 sc - 1 st. Fasten off leaving a sewing length. Stuff nose lightly. With yarn needle and sewing length, sew nose in place above mouth.
Nostril (make 2)
With B, ch 3.
Rnd 1: 8 hdc in 3rd ch from hook (ch-2 counts as first hdc); join with a slip st in top of beginning ch-3 - 9 hdc.
Eye (make 2)
With B, ch 3.
Rnd 1: Repeat round 1 of nostril. Do not fasten off. Rnd 2: Ch 1, 2 sc in first st, 2 sc in each st around; join with a slip st in first sc - 18 sc.
FINISHING
With wrong sides of 2 sides of bag facing, working through double thickness in back loops only of edging, join A, in top left-hand corner, ch 1, sc across left side edge, bottom edge and right side edge. Fasten off.
Handle (make 2): With A, ch 51.
Row 1: Sc in 2nd ch from hook and each ch across; turn - 50 sc.
Row 2: Ch 3, skip first sc, dc in each sc across; turn - 50 dc.
Row 3: Ch 1, sc in each dc across. Fasten off leaving a sewing length. Sew ends of one handle to front and back of bag as pictured.
ABBREVIATIONS: Ch = chain; sc = single crochet; dc = double crochet; st = stitch; tog = together; hdc = half double crochet.
Pattern © by Coats & Clark Inc. Reproduced with permission from Coats & Clark Inc. PurpleKittyYarns.com is not endorsed by Coats & Clark Inc. It is not permissible to contract production of projects made from designs published by Coats & Clark to a third party for sale or distribution.
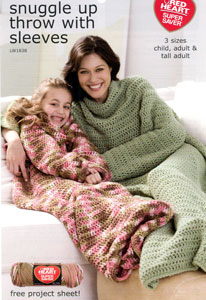
Snuggle Up Throw with Sleeves LW1838
Skill Level: Easy
Designed by Marianne Forrestal.
Directions are for Child; changes for Adult and Tall Adult are in parentheses.
RED HEART® "Super Saver™'': 7 skeins 0972 Pink Camo for Small; 7 (9) skeins 661 Frosty Green for Medium (Large).
Crochet Hook: 8mm (US L-11).
Stitch holder.
Yarn needle.
GAUGE: 11 dc = 5"; 6 rows = 4". CHECK YOUR GAUGE. Use any size hook to obtain the specified gauge.
Throw measures 45 (55, 65)" wide x 55 (65, 75)" long.
Sleeve Length measures 16 (20, 23)".
THROW
Body
Ch 101 (123, 145).
Row 1 (RS): Dc in 4th ch from hook and in each ch across - 99 (121, 143) sts.
Rows 2-63 (75, 87): Ch 3 (counts as dc here and throughout), turn, dc in each dc across - 99 (121, 143) sts.
Divide For Armholes
Right Side
Row 64 (76, 88) (WS): Ch 3, turn, dc in next 23 (27, 32) sts, leave remaining sts unworked.
Rows 65 (77, 89)-69 (83, 97): Ch 3, turn, dc in each dc across - 24 (28, 33) sts.
Do not fasten off. Secure last st with stitch holder.
Back
Row 64 (76, 88) (WS): Skip next 11 (13, 15) sts, join yarn in next st, ch 3, dc in next 28 (38, 46) dc, leave remaining sts unworked.
Rows 65 (77, 89)-69 (83, 97): Ch 3, turn, dc in each dc across - 29 (39, 47) sts. Fasten off.
Left Side
Row 64 (76, 88) (WS): Skip next 11 (13, 15) sts, join yarn in next st, ch 3, dc in next 23 (27, 32) dc.
Rows 65 (77, 89)-69 (83, 97): Ch 3, turn, dc in each dc across - 24 (28, 33) sts. Fasten off.
Join for Front
Row 70 (84, 98): With right side facing, beginning with st on stitch holder, ch 3, turn, dc in next 23 (27, 32) dc of Right Side, ch 11 (13, 15), dc in next 29 (39, 47) sts of Back, ch 11 (13, 15), dc in next 24 (28,33) dc.
Row 71 (85, 99): Ch 3, turn, dc in next 23 (27, 32) dc, dc in next 11 (13, 15) ch, dc in next 29 (39, 47) dc, dc in next 11 (13, 15) ch, dc in next 24 (28, 33) dc - 99 (121, 143) sts.
Rows 72 (86, 100)-81 (97, 113): Ch 3, turn, dc in each dc across. Fasten off.
Border
With right side facing and working along long edge, join yarn and sc 120 (144, 168) sts evenly spaced along side edge. Fasten off.
Repeat along opposite long edge. Do not fasten off, turn to work along short edge, 3 sc in first st, dc in each dc across to last st, 3 sc in last st, turn to work along long edge, dc in each dc across, turn to work along opposite short edge, 3 sc in first st, dc in each dc to last st, 3 sc in last st, turn to work along remaining long edge, dc in each de, slip st to first st to join. Fasten off.
SLEEVES
Round 1: With right side facing, join yarn to 6th (7th, 8th) st of skipped 11 (13, 15) dc at underarm, ch 3 (counts as first dc here and throughout), dc in next 5 (6, 7) sts, 11 (13, 15) dc evenly along edge of next 7 (9, 11) rows, dc in opposite side next 11 (13, 15) ch, 11 (13, 15) dc evenly along edge of next 7 (9, 11) rows, dc in 5 (6, 7) dc, slip st to top of beginning ch to join - 44 (52, 60) dc.
Rounds 2-8 (10, 12): Ch 3, turn, dc in each dc around, slip st to top of beginning ch to join.
Round 9 (11, 13): Ch 3, turn, dc in first 5 (4, 3) dc, [dc2tog, dc in next 3 dc] 6 (8, 10) times, dc2tog, dc in last 6 (5, 4) dc, slip st to top of beginning ch - 37 (43, 49) sts.
Rounds 10 (12, 14)-15 (19, 23): Ch 3, turn, dc in each dc around, slip st to top of beginning ch.
Round 16 (20, 24): Ch 3, turn, dc in next 4 (2, 0) dc, [dc2tog, dc in next 3 sts] 5 (7, 9), dc2tog, dc in last 5 (3, 1) dc, slip st to top of beginning ch - 31 (35, 39) sts.
Rounds 17 (21, 25)-24 (30, 34): Ch 3, turn, dc in each dc around, slip st to top of beginning ch.
Round 25 (31, 35): Ch 1", turn, sc in each dc around, slip st in first sc. Fasten off.
Repeat for second Sleeve.
FINISHING
Weave in ends.
ABBREVIATIONS: ch = chain; dc = double crochet dc2tog = double crochet 2 sts together; mm = millimeters; sc = single crochet; st(s) = stitch(es); [ ] = work directions in brackets the number of times specified.
Pattern © by Coats & Clark Inc. Reproduced with permission from Coats & Clark Inc. PurpleKittyYarns.com is not endorsed by Coats & Clark Inc. It is not permissible to contract production of projects made from designs published by Coats & Clark to a third party for sale or distribution.
Special Olympics Easy Knit Scarf

Skill Level: EASY
Designed by Samantha Leaver.
Scarf measures: 7" x 60".
RED HEART® "Super Saver®": 1 skein each 512 Turqua A and 886 Blue B. (Please note: this scarf pattern was designed the first year of the Special Olympics Scarf Project and utilizes the colors for the 2009 Scarf Project. If you'd like to make scarves for the current year, please check at the Special Olympics Scarf Project website for current year colors.)
Knitting Needles: 5.5mm [US 9].
Yarn needle.
GAUGE: 16 sts = 4"; 28 rows = 4" in St st. CHECK YOUR GAUGE. Use any size needle to obtain the gauge.
SCARF
With A, cast on 27 sts. Knit 1 row even.
Begin Pattern
Rows 1 and 3 (right side): Knit.
Row 2: Purl.
Row 4: * K3, yo, k2tog, k1, k2tog, yo; repeat from * to last 3 sts, k3.
Repeat Rows 1 - 4 until piece measures 30" from beginning. Cut A, join B and repeat Rows 1 - 4 until scarf measures 60" from beginning, end by working Row 3 of pattern. Knit 1 row even. Bind off.
FINISHING
Weave in yarn ends.
ABBREVIATIONS: A, B = color A, B; k = knit; mm = millimeters; st(s) = stitch(es); tog = together; yo = yarn over; * or ** = repeat whatever follows the * or ** as indicated.
Pattern © by Coats & Clark Inc. Reproduced with permission from Coats & Clark Inc. PurpleKittyYarns.com is not endorsed by Coats & Clark Inc. It is not permissible to contract production of projects made from designs published by Coats & Clark to a third party for sale or distribution.
Spider Webby Bag LW2355
Skill Level: INTERMEDIATE
Designed by Ellen Gormley.
Bag measures 12" x 12.5" x 5.5" deep at base.
RED HEART® "Super Saver": 1 skein each 672 Spring Green A, 528 Medium Purple B and 312 Black C.
Crochet Hook: 5mm [US H-8]
Stitch markers, yarn needle.
GAUGE: 13 sts = 4"; 16 rounds = 4". CHECK YOUR GAUGE. Use any size hook to obtain the gauge.
Special Abbreviations
V-Stitch = (Tr, ch 2, tr) all in same st.
Surface slip stitch = Make a slip knot but do not place it on hook. Hold slip knot on wrong side of fabric. Insert hook into fabric from right side to wrong side; place slip knot on hook and pull yarn to right side, leaving knot on wrong side. Insert hook from right side to wrong side thru any desired st or space, yo and draw a loop to right side. To end a line of surface slip sts, pull up a loop on the right side of fabric; remove hook from loop. Insert hook from wrong side to right side and into dropped loop; pull loop to wrong side. Cut yarn tail; place tail thru loop and pull taut.
Rev V-st (reverse V-st) = *Yo twice, insert hook into next st, yarn over and draw up a loop, (yarn over and draw through 2 loops on hook) twice**; skip 2 sts, repeat from * to ** once more, yarn over and draw through all 3 loops on hook.
NOTES
Sides are worked with overlay rounds over background rounds. Every fourth round, B is worked into the back loop only of the C round and into both loops of the B round to anchor the overlay to the background. When working background and overlay rounds, drop the unused color until it is needed again.

BAG
Base
With A, ch 18.
Round 1: 3 sc in 2nd ch from hook, sc in each of next 15 chs, 3 sc in next ch, turn; working down the underside of the foundation chs, sc in each of next 15 chs, join with slip st in top of beginning sc—36 sc.
Round 2: Ch 1, *2 sc in each of next 3 sts, sc in each of next 15 sts; repeat from * 1 more time; join with slip st in first sc—42 sc.
Round 3: Ch 1, *(sc in next st, 2 sc in next st) 3 times, sc in each of next 15 sts; repeat from * 1 more time; join with slip st in first sc—48 sc.
Round 4: Ch 1, *(sc in each of next 2 sts, 2 sc in next st) 3 times, sc in each of next 15 sts; repeat from * 1 more time; join with slip st in first sc—54 sc.
Round 5: Ch 1, *(sc in each of next 3 sts, 2 sc in next st) 3 times, sc in each of next 15 sts; repeat from * 1 more time; join with slip st in first sc—60 sc.
Round 6: Ch 1, *(sc in each of next 4 sts, 2 sc in next st) 3 times, sc in each of next 15 sts; repeat from * 1 more time; join with slip st in first sc—66 sc.
Round 7: Ch 1, *(sc in each of next 5 sts, 2 sc in next st) 3 times, sc in each of next 15 sts; repeat from * 1 more time; join with slip st in first sc—72 sc.
Round 8: Ch 1, *(sc in each of next 6 sts, 2 sc in next st) 3 times, sc in each of next 15 sts; repeat from * 1 more time; join with slip st in first sc—78 sc.
Round 9: Ch 1, *(sc in each of next 7 sts, 2 sc in next st) 3 times, sc in each of next 15 sts; repeat from * 1 more time; join with slip st in first sc—84 sc.
Round 10: Ch 1, *(sc in each of next 8 sts, 2 sc in next st) 3 times, sc in each of next 15 sts; repeat from * 1 more time; join with slip st in first sc—90 sc. Fasten off.
Sides
Round 1 background: Join B with sc in back loop only where previously fastened off, sc in each st around; join with slip st in first sc. Drop B.
Round 1 overlay: All sts on this round are worked in Round 10 of the Base. Join C with slip st in front unused loop of first st of Round 10 of Base, ch 4, skip 2 sts, tr in front loop only of next st (counts as Rev V-st), ch 4; *skip 1 st, Rev V-st, ch 4; repeat from * around; join with slip st in top of beginning ch-4—18 ch-4 spaces, 18 Rev V-sts. Drop C.
Rounds 2-3 background: With B, sc in both loops of each st around; join with slip st in first sc—90 sc.
Round 4 background: With B, ch 1, sc in each of next 2 sts; *sc in back loop only of tr2tog of overlay round and into both loops of next background st, sc in each of next 4 sts of background round; repeat from * around, ending last repeat sc in each of last 2 sts of background round; join with slip st in first sc—90 sc. Drop B.
Round 4 overlay: All sts on this round are worked in sts of the previous overlay round. With C, ch 6 (counts as tr and ch 2), tr in front loop of same st, skip ch-4 space, ch 1, *V-stitch in front loop only, ch 1, skip ch-4 space; repeat from * 16 more times; join with slip st in 4th ch of beginning ch-6—18 V-sts. Drop C.
Rounds 5-7 background: With B, ch 1, sc in each st around; join with slip st in first sc—90 sc.
Round 8 background: With B, ch 1, sc in back loop of first tr of overlay round and into first st in of background round, sc in next 2 sts of background round, sc in back loop only of next tr on overlay round and into both loops of next st of background round, sc in next st of background round**, sc in back loop of next tr of overlay round and into next st of background round, sc in next 2 sts of background round; repeat from * around, ending at **; join with slip st in first sc. Drop B.
Round 8 overlay: All sts on this round are worked in sts of the previous overlay round. Ch 4, skip 2 ch, tr in front loop only of next st (counts as Rev V-st), ch 4; *skip 1 st, Rev V-st, ch 4; repeat from * around; join with slip st in top of beginning ch-4. Drop C.
Round 9 background: With B, sc in both loops of each background st around; join with slip st in first sc—90 sc.
Repeat rounds 2-9 (background and overlay) 4 more times, then work rounds 2-8 once more, ending with Round 8 background—48 background rounds and 12 overlay rounds.
Straps (make 2)
Lay bag flat. There should be 9 "V's" across side of bag. In the last overlay round, place marker for strap in the first leg of the 2nd V and in the first leg of the 8th V.
Round 1 (right side): Join C with sc in front loop only of the first marked V, sc in each of next 2 chs, sc in last tr—4 sc.
Round 2 (wrong side): Ch 1, turn; working through both loops on round 1 and corresponding stitches of last background round of bag, sc in each of next 4 sts—4 sc.
Rounds 3-64: Ch 1, turn; sc in each of next 4 sts.
Round 65 (right side): Ch 1, turn; working through both loops of round 64 and corresponding sts of last background round of bag at next marker, sc in each of next 4 sts—4 sc.
Round 66: Ch 1, turn; working in last overlay round, sc in tr, sc in each of next 2 ch, sc in next tr—4 sc. Fasten off.
Strap Edging
Round 1: With C and right side facing, place one sc in side of each of 66 rounds. Fasten off. Repeat for opposite side of same strap and both side edges of opposite strap.
SPIDER
Body
With C, ch 4, slip st to form a ring.
Round 1: Ch 1, 6 sc in ring; join with A in first sc —6 sc.
Round 2: Ch 1, 2 sc in each of next 6 sc; join with slip st in first sc—12 sc.
Round 3: Ch 1, *sc in next st, 2 sc in next st; repeat from * 5 more times; join with slip st in first sc —18 sc.
Round 4: Ch 1, *sc in next 2 sts, 2 sc in next st; repeat from * around; join with slip st in first sc—24 sc.
Round 5: Ch 1, *sc in next 5 sts, 2 sc in next st; repeat from * around; join with slip st in first sc—28 sc. Fasten off.
With C, surface slip st around body between Rounds 4 and 5. Fasten off.
Head
With A, ch 4, slip st to form ring.
Round 1: Ch 1, 6 sc in ring; join with slip st in first sc—6 sc.
Round 2: Ch 1, 2 sc in each st; join with slip st in first sc —12 sc. Fasten off.
With A and yarn needle, sew body and head onto bag.
Legs
With hook and A, surface slip st 4 legs on each side of body.
Weave in ends.
ABBREVIATIONS: A, B, C = Color A, B, C; ch = chain; mm = millimeters; sc = single crochet; slip st = slip stitch; st(s) = stitch(es); tr = treble crochet; yo = yarn over hook; * or ** = repeat whatever follows the * or ** as indicated.
Pattern © by Coats & Clark Inc. Reproduced with permission from Coats & Clark Inc. PurpleKittyYarns.com is not endorsed by Coats & Clark Inc. It is not permissible to contract production of projects made from designs published by Coats & Clark to a third party for sale or distribution.
Spirit of America Afghan LW1303
Skill Level: Intermediate
Throw measures 50" wide x 68" long.
Red Heart® Super Saver®, or any worsted weight acrylic yarn. Version 1: 25 Ounces No. 316 Soft White CA, 14 ounces No. 382 Country Blue CB, and 27 ounces No. 387 Soft Navy CC
Celebrate Your Spirit
Though yarn amounts may vary with alternate color versions, we wanted to show you some possibilities for making a patriotic throw.
Version 2: Red CA, White CB, Blue CC. Work as written.
Version 3: White CA, Red CB, Blue CC. Work as written EXCEPT work stars with CA.
Version 4: Red CA, Blue CB, White CC. Work pat section Rows 1-4 with CA, Row 5 with CB, Rows 6-9 with CC, Row 10 with CB, Rows 11-14 with CA, sc section with CB and stars with CC.
Crochet Hook: U.S. Sizes H-8 [5mm] and J-10 [6mm]. Yarn needle.
GAUGES: 13 sts = 4"; 17 rows = 4" in sc with smaller hook; 13 sts = 4"; 14 rows = 6" in pat with larger hook. CHECK YOUR GAUGE. Use any size hook to obtain the gauges given.

THROW: With CA and larger hook, ch 219.
Foundation Row (Wrong Side): Sc in 2nd ch from hook and in each ch across; turn - 218 sc.
Row 1 (Right Side): Ch 1, sc in first sc, 3 dc in next sc, skip next 2 sc, * sc in next sc, 3 dc in next sc, skip next 2 sc; rep from * to last 2 sc; sc in next sc, dc in last sc; turn.
Row 2: Ch 1, sc in first dc, * 3 dc in next sc, skip next 2 dc, sc in next de; rep from * to last sc; dc in last sc; turn.
Rows 3 and 4: Rep Row 2, changing to CB and smaller hook in last st of Row 4. Drop CA.
Row 5: With CB and smaller hook, ch 1, sc in each st across. Fasten off CB.
Row 6: With right side facing, insert larger hook in first sc of last row and draw CA through; rep Row 1 across.
Rows 7-11: Rep Rows 2-6
Rows 12-14: Rep Rows 2-4 EXCEPT change to CC and smaller hook in last st of Row 14. Cut CA.
Row 15: With CC and smaller hook, ch 1, sc in each st across; turn.
Rows 16-46: Rep Row 15 EXCEPT change to CA in last st of Row 46.
Rep Rows 1-46 for pat twice more, then rep Rows 114 once more EXCEPT change to CB and smaller hook in last st of Row 14 .
EDGING-Rnd 1 (Right Side): Ch 1,3 sc in first sc, sc evenly around, working 3 sc in each corner; join with a sl st to first sc.
Rnd 2: Ch 4, ** (dc, [ch 1, dc] twice) all in corner sc, ch 1, skip next sc, * dc in next sc, ch 1, skip next sc; rep from * to next corner; rep from ** around, adjusting as necessary at corners and end of rnd; join to 3rd ch of ch-4; TURN.
Rnd 3: Change to larger hook; ch 1, * sc in next sp, 3 dc in next dc, skip next sp; rep from * around, adjusting if necessary at end of rnd; join to first sc. Fasten off. Weave in ends.
STAR-Make 27: With larger hook and CB, ch 5; join with a sl st to form a ring.
Rnd 1: Ch 2, holding back last lp on hook, 2 dc in ring, yo and draw through all 3 lps on hook - beg cluster (cl) made; [ch 4; holding back last lp on hook, 3 dc in ring, yo and draw through all 4 lps on hook - cl made] 4 times, ch 4; join with a sl st to top of beg cl - 5 cl.
Rnd 2: Ch 1, * sc in cl, ch 7, sc in 4th ch from hook, hdc in next ch, dc in next ch, tr in last ch; rep from * around; join to first sc.
Rnd 3: * Working in rem lps of ch, sc in next 4 lps, 2 sc in ch-3 sp, ch 1, sl st in top and side lps of last sc made, 2 sc in same sp, sc in next 4 sts * *, sl st in next sc; rep from * around, end at **; join. Fasten off leaving a long end for sewing.
FINISHING: Arrange 9 stars evenly spaced down each of the three single crochet sections and sew in place.
ABBREVIATIONS: beg = beginning; ch = chain; dc = double crochet; hdc = half double crochet; mm = millimeters; pat = pattern; rep = repeat; sc = single crochet; sl st = slip stitch; sp = space; st = stitch; tr = treble crochet; * or ** = repeat whatever follows the * or ** as indicated; [ ] = work directions given in brackets the number of times specified.
Pattern © by Coats & Clark Inc. Reproduced with permission from Coats & Clark Inc. PurpleKittyYarns.com is not endorsed by Coats & Clark Inc. It is not permissible to contract production of projects made from designs published by Coats & Clark to a third party for sale or distribution.
Other free crochet afghan patterns:
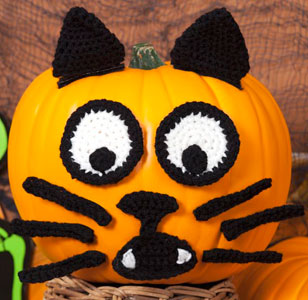
Spooky Cat Pumpkin LW2839
This scary cat is a scream! Crochet these appliques and simply attach to your pumpkin. It's a great alternative to using a knife to cut out the shapes.
Skill Level: EASY
Designed by Nancy Anderson.
Red Heart® Super Saver®: 1 skein each 312 Black A and 316 Soft White B.
Crochet Hooks: 3.75mm [US F-5] and 3.5mm [US E-4].
Stitch markers.
Yarn needle.
Self-stick hook-and-loop fasteners, double sided tape or glue dots for attaching to pumpkin.
GAUGE: With larger hook, 8 sts and 9 rows sc = 2"; Cat's eye = 2¾" in diameter. CHECK YOUR GAUGE. Use any size hook to obtain the gauge given.
Special Stitches
sc2tog: [Insert hook in next st, yo, draw yarn through st] twice, yo and draw through all 3 loops on hook.
NOTE: Use these appliques on a whole pumpkin. Yarn appliques are not for use near candle flames or lit bulbs.
Work in back bumps of chains: Turn foundation ch over to the wrong side, insert hook in the bump formed at the back of the ch and proceed with the st as usual.
APPLIQUES
Eyes (make 2)
With larger hook and B, make an adjustable loop.
Round 1: Work 6 sc in loop; join with a slip st in first sc - 6 sc.
Round 2: Ch 1, 2 sc in first 5 st, 3 sc in last st; join with a slip st in first sc - 13 sc.
Round 3: Ch 1, starting in first st, [sc in next st, 2 sc in next st] 6 times, sc in last st; join with a slip st in first sc - 19 sc.
Round 4: Ch 1, starting in first st, [sc in next 2 sts, 2 sc in next st] 6 times, sc in last st; join with a slip st in first sc - 25 sc. Fasten off B, join A.
Round 5: With A, ch 1, [sc in next 3 sts, 2 sc in next st] 6 times, sc in last st; join with a slip st in first sc - 25 sc.
Pupil (make 2)
With larger hook and B, make an adjustable loop.
Round 1: Work 6 sc in loop; join with a slip st in first sc - 6 sc. Fasten off, leaving a sewing length.
With yarn needle and sewing length, whipstitch pupils to Eyes as pictured. Weave in ends.
Nose
Starting with the crocheted line that connects the nose to the mouth, leaving a sewing length, with larger hook and A, leaving a sewing length, ch 4.
Row 1: Working in the back bumps, sc in 2nd ch from hook and in each ch across, turn to work across row-end st - 3 sc.
Row 2: Ch 1, work 3 sc in row-end st, turn - 3 sc.
Row 3: Ch 1, 2 sc in first st, sc in next st, 2 sc in last st, turn - 5 sc.
Row 4: Ch 1, starting in first st, [2 sc in st, sc in next st] twice, 2 sc in last st, turn - 8 sc.
Row 5: Ch 1, 2 sc in first st, sc in next 6 sts, 2 sc in last st - 10 sc. Fasten off.
Mouth
Starting at bottom edge, with larger hook and A, ch 12.
Row 1: Working in the back bumps, sc in 2nd ch from hook and in each ch across, turn - 11 sc.
Row 2: Ch 1, skip first st, sc in next 8 sts, skip next & slip st in last st, turn - 9 sts.
Row 3: Ch 1, skip first st, sc in next 8 sts, skip next & slip st in last st, turn - 7 sts.
Row 4: Ch 1, skip first st, sc in next 8 sts, skip next & slip st in last st, turn - 5 sts.
Row 5: Ch 1, skip first st, sc in next 8 sts, skip next & slip st in last st, turn - 3 sts.
Edging: Ch 1, sc evenly around, working 3 sc across side edge, 2 sc in next corner, sc in each st across bottom edge, 2 sc in corner st, work 3 sc evenly spaced across side edge, 2 sc in corner st, sc in each st across top edge; join with a slip st in first sc. Fasten off.
With yarn needle and sewing length, whipstitch Nose to center top of Mouth as pictured.
Teeth
With yarn needle and B, make pointed teeth by inserting needle close to the outside edge of the mouth as pictured, insert needle back into mouth piece about ⅜" in from edge. Work another straight st at an angle to the first to form triangular shape. Work another straight st in the middle to fill in tooth.
Ear (make 2)
Starting at bottom, with larger hook and A, ch 10.
Row 1: Working in the back bumps, sc in 2nd ch from hook and in each ch across, turn - 9 sc.
Row 2: Ch 1, sc in each st across, turn.
Work now progresses in rounds.
Round 3: Ch 1, working in back loops only, sc in each st across, rotate, sc in each row-end sts across side edge, rotate, working along opposite side of foundation ch, sc in each ch across side edge; join with a slip st in first sc - 22 sc.
Round 4: Work in a spiral now and throughout remainder of Ear, sc in each st around - 22 sc. Mark first st of round and move marker up as work progresses.
Round 5: [Sc in next 9 sts, sc2tog over next 2 sts] twice - 20 sts.
Round 6: [Sc in next 8 sts, sc2tog over next 2 sts] twice - 18 sts.
Round 7: [Sc in next 7 sts, sc2tog over next 2 sts] twice - 16 sts.
Round 8: Sc in each st around - 16 sc.
Round 9: [Sc in next 6 sts, sc2tog over next 2 sts] twice - 14 sts.
Round 10: [Sc in next 5 sts, sc2tog over next 2 sts] twice - 12 sts.
Round 11: [Sc in next 4 sts, sc2tog over next 2 sts] twice - 10 sts.
Round 12: [Sc in next 3 sts, sc2tog over next 2 sts] twice - 8 sts.
Round 13: [Sc2tog over next 2 sts] around - 4 sts. Fasten off, leaving a sewing length. With yarn needle, weave sewing length though sts in last round, gather tightly and secure. Weave in ends.
Whiskers (make 6)
With larger hook and A, ch 13.
Row 1: Working in the back bumps, sc in 2nd ch from hook and each ch across, turn - 12 sc.
Row 2: Ch 1, sc in each st across. Fasten off.
FINISHING
Weave in ends. Attach self-stick hook-and-loop fastener (or other adhesive) to back of motifs. Arrange and stick to pumpkin.
ABBREVIATIONS: A, B = Color A, B; ch = chain; dc = double crochet; hdc = half double crochet; mm = millimeters; sc = single crochet; st(s) = stitch(es); [ ] = work directions in brackets the number of times specified.
Pattern © by Coats & Clark Inc. Reproduced with permission from Coats & Clark Inc. PurpleKittyYarns.com is not endorsed by Coats & Clark Inc. It is not permissible to contract production of projects made from designs published by Coats & Clark to a third party for sale or distribution.
Stars and Stripes Ripple Afghan WR1003
Skill Level: Experienced
Designed by Leigh K. Nestor.
Afghan measures approximately 45" wide x 60" long.
RED HEART® "Super Saver®": 18 Ounces No. 4313 Aran Fleck CA, 16 ounces No. 376 Burgundy CB, and 14 ounces No. 380 Windsor Blue CC.
Crochet Hook: 6mm [US J-10].
Yarn needle.
GAUGES: 12 sts = 4"; 12 rows = 4" in pat; star = 3½" point to point. CHECK YOUR GAUGE: Use any size hook to obtain the gauges.
SPECIAL STITCHES:
3 dccl: [yo and draw up a lp, yo and draw through 2 lps] 3 times all in same st, yo and draw through all 4 lps on hook.
3 trcl: [yo] twice, draw up a lp in next tr, [yo and draw through 2 lps] twice, [yo] twice, draw up a lp in next sl st between points, [yo and draw through 2 lps] twice, [yo] twice, draw up a lp in next tr, [yo and draw through 2 lps] twice, yo and draw through all 4 lps on hook.
NOTES: Afghan is made in horizontal panels that are sewn together. Each panel begins with the center star row. Always mark the last point made (for joining process). Always join full stars in the 5th (marked) point then the 4th point (the point before the marked point) of previous star. The star row is worked as follows: beg ½ star, 17 full stars (9A, 8B), end ½ star. Sew in all loose ends.
INSTRUCTIONS:
STAR ROW: Beg ½ Star: With CA, ch 4, (6 dc, 3 tr) all in 4th ch from hook, turn sideways, sl st in next 2 bars of last tr, sl st in next 3 ch, [ch 4, sc in 2nd ch from hook, dc in next ch, tr in last ch, skip next 2 sts of star center, sl st in next st] twice - 2 points. Mark the last point made. Fasten off.
FULL STAR A: With CA, ch 4, 14 dc in 4th ch from hook; join with a sl st in top of beg ch - 15 sts.
First Point: Ch 4, sl st to tip of marked point of previous star, skip sl st and one ch; sc in next ch, dc in next ch, tr in last ch, skip 2 sts of center, sl st in next st - point made.
2nd Point: Ch 4, sl st to tip of point before marked point of previous star (this is the rem point on beg 1/2 star or 4th point of a full star), skip sl st and one ch, make point.
3rd-5th Points: [Ch 4, skip first ch, make point] 3 times.
Fasten off.
FULL STAR B: With CA, ch 4, 14 dc in 4th ch from hook; join with a sl st in top of ch - 15 sts.
First Point: Ch 4, skip first ch, make point.
2nd Point: Ch 4, sl st to tip of marked point of previous star, skip sl st and one ch, make point.
3rd Point: Ch 4, sl st to tip of point before marked point of previous star, skip sl st and one ch, make point.
4th and 5th Points: Work same as for first point. Fasten off.
Continue to alternate A and B stars until there are 17 full stars completed and joined and one beg ½ star.
End ½ Star: Ch 5, (2 tr, 7 dc) all in 5th ch from hook, turn sideways, sl st in bar of last dc and in each ch of beg ch-4 and in next 3 sts of center.
First Point: Ch 4, sl st to tip of marked point of previous star, skip sl st and one ch, make point.
2nd Point: Ch 4, sl st to tip of point before marked point of previous star, skip sl st and one ch, make point. Fasten off.
Lower Stripe of Panel-Row 1: With right side facing, join CC in top of ch-4 of End ½ Star; ch 1, sc in same st, sc in next 2 tr, slip sl st, sc in next 3 sts of point, sc in sl st between points, sc in next 3 sts of next star point, skip sl st between points, * sc in next 3 sts of point, sc in sl st between points **, sc in next 2 sts, 3 trcl, dc in next st, sc in next st, 3 sc in tip of point; sc in next 2 sts, 3 trcl, dc in next st, sc in next st, sc in sl st between points, sc in next 3 sts, skip sl st between points **; rep from * to last point (Beg ½ Star), end at **; sc in next 3 sts of ½ star point, skip sl st, sc in last 3 tr; turn.
Rows 2-4: Ch 1, 2 sc in first st, sc in next 8 sts, * skip next 2 sts **, sc in next 9 sts, 3 sc in next st, sc in next 9 sts; rep from * to last 9 sts, end at **; sc in next 8 sts, 2 sc in last st; turn. Fasten off at end of Row 4.
Upper Stripe of Panel-Row 1: With right side facing, join CC in base of tr in point of Beg ½ Star; ch 1, sc in same st, sc in next 2 sts of point, * sc in sl st between points, sc in next st, dc in next st, 3 trcl, dc in next st, sc in next st, 3 sc in tip of point, sc in next st, dc in next st, 3 trcl, dc in next st, sc in next st, sc in sl st between points, sc in next 3 sts **, skip sl st between points, sc in next 3 sts of point; rep from * to last point (End ½ Star), end at **; turn.
Rows 2-4: Ch 1, sc in first st, skip next st, sc in next 8 sts, * 3 sc in next st **, sc in next 9 sts, skip next 2 sts, sc in next 9 sts; rep from * to last 10 sts, end at **; sc in next 8 sts, skip next st, sc in last st; turn. Change to CB at end of Row 4.
Rows 5-9: With CB rep Row 2. Change to CA at the end of Row 9.
Rows 10-11: With CA, rep Row 2.
Row 12: Ch 1, sc in first 2 sts, * 3 dccl in next st, [sc in next 3 sts, 3 dccl in next st] 4 times **, sc in next 4 sts; rep from * to last 2 sts, end at **; sc in last 2 sts; turn.
Rows 13-14: Rep Row 2. Change to CB at the end of Row 14.
Rows 15-19: With CB, rep Row 2. Fasten off at the end of Row 19.
Panel 1 (bottom panel) completed. Make 5 panels total.
To Join Panels: Sew lower stripe of Panel 2 to upper stripe of Panel 1. Rep for rem panels. Additional stripes are added at lower end of afghan for finishing.
Additional Stripes-Row 1: With right side facing, join CB in first st of Lower Stripe of Panel 1 at bottom of afghan; rep Lower Stripe Row 2
Rows 2-5: Rep Lower Stripe Row 2. Change to CA at the end of Row 5.
Rows 6-7: With CA, rep Row 2 as before.
Row 8: Ch 1, sc in first 2 sts, * [dccl in next st, sc in next 4 sts] 3 times, dccl in next st **, sc in next 5 sts; rep from * to last 2 sts, end at **; sc in last 2 sts; turn. Rows 9-10: Rep Row 2 as before. Change to CB at the end of Row 10.
Rows 11-15: With CB, rep Row 2 as before. Fasten off at the end of Row 15.
ABBREVIATIONS: approx = approximately; beg = beginning; CA, CB, CC = Color A, Color B, Color C; ch = chain; cl = cluster; dc = double crochet; hdc = half double crochet; lp(s) = loop(s); mm = millimeters; pat = pattern; rem = remaining; rep = repeat; rnd = round; sc = single crochet; sl = slip; sl st = slip stitch; sp(s) = space(s); st(s) = stitch(es); tog = together; tr = treble crochet; yo = yarn over; [ ] = work directions in brackets the number of times specified; * or ** = repeat whatever follows the * or ** as indicated.
Pattern © by Coats & Clark Inc. Reproduced with permission from Coats & Clark Inc. PurpleKittyYarns.com is not endorsed by Coats & Clark Inc. It is not permissible to contract production of projects made from designs published by Coats & Clark to a third party for sale or distribution.
| Pattern Categories Browse the categories to help you find the patterns you're looking for. |
||
    
|
|
|


Navigation

All contents © 2003-2026 Purple Kitty LLC. All rights reserved.
Privacy Policy | FAQ | About Me