Red Heart Soft Yarn
Heart Strings Napkin Tie LW2291
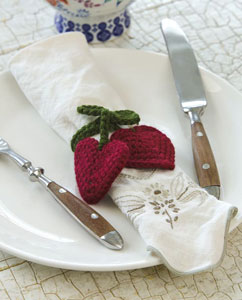
Get ready for your next dinner party or special family get together! Use your crochet skills to make these easy hearts on a string napkin ties.
Skill Level: EASY
Designed by Linda Cyr.
Napkin Ring is 6" around. Hearts measure 2½" across at widest part x 2" long.
RED HEART® "Soft Yarn": 1 Ball each 4608 Wine A and 9523 Dark Leaf B.
Crochet Hook: 5mm [US H-8].
Split-ring stitch marker, yarn needle.
GAUGE: 17 sts = 4"; 16 rows = 4" in sc. CHECK YOUR GAUGE. Use any size hook to obtain the gauge.
HEART (Make 2)
With A, ch 11.
Round 1: 3 Sc in 2nd ch from hook, sc in next 3 ch, skip next 2 ch, sc in next 3 ch, 3 sc in last ch; pivot to work in unused loops of beginning ch, sc in next 3 ch, (sc, ch 2, sc) all in ch-2 space, sc in last 3 ch - 20 sc. Do not join but work in continuous rounds. Mark first st of round and move up each round.
Round 2: [2 Sc in next sc] 3 times, sc in next 2 sc, skip next 2 sc, sc in next 2 sc, [2 sc in next sc] 3 times, sc in next 4 sc, (sc, ch 2, sc) all in ch-2 space, sc in last 4 sc - 26 sc.
Round 3: [2 Sc in next sc, sc in next sc] 3 times, sc in next sc, skip next 2 sc, sc in next 2 sc, [2 sc in next sc, sc in next sc] 3 times, sc in next 4 sc, (sc, ch 2, sc) all in ch-2 space, sc in last 5 sc; slip st in next sc - 32 sc. Fasten off. Weave in ends.
RING
With B, ch 25, join with a slip st in first ch to form a ring taking care that ch is not twisted.
Round 1: Ch 1, sc in each ch around; join with a slip st in first sc - 25 sc. Fasten off.
TIE
With B, ch 40. Fasten off.
Finishing
Make Tie chain into a bow; sew to middle of Ring. Attach a Heart to each end of Tie. Weave in all ends.
ABBREVIATIONS: A, B = Color A, B; ch = chain; mm = millimeters; sc = single crochet; st(s) = stitch(es); [ ] = work directions in brackets the number of times specified.
Pattern © by Coats & Clark Inc. Reproduced with permission from Coats & Clark Inc. PurpleKittyYarns.com is not endorsed by Coats & Clark Inc. It is not permissible to contract production of projects made from designs published by Coats & Clark to a third party for sale or distribution.
Falling Leaves Afghan WTV1602
Approximate Time to Make: 40 hours
Afghan measures 54" x 60".
RED HEART® "Soft Yarn™", Art. E728, 5 oz / 256 yard balls: 2 balls each No. 1882 Toast CA, 4608 Wine CB, 4422 Tangerine CC, 9114 Honey CD, 9522 Leaf CE, 9344 Chocolate CF.
Knitting Needles: 5.5mm [US 9].
Crochet Hook: 5.5 mm [US I-9].
Yarn needle, stitch marker
GAUGE: 16 sts = 4"; 24 rows = 4". CHECK YOUR GAUGE. Use any size needles to obtain the gauge given.
Special Abbreviation: SKP = Sl 1, K1, psso.
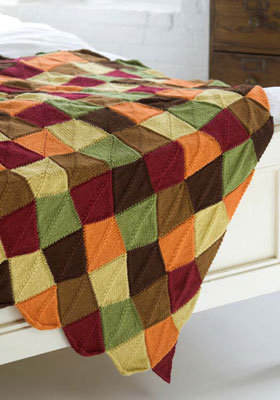
Whole Leaf (Make 170) - 28 each of 4 colors and 29 each of 2 colors OR mix colors as desired.
Cast on 30 sts.
Row 1 (Right Side): K 13, SKP, place marker on needle, K to end - 29 sts. Row 2: K 1, P to 2 sts before marker, P2tog, sl marker, P to last st, K - 28 sts. Row 3: K to 2 sts before marker, SKP, sl marker, K to end - 27 sts.
Rep Rows 2 and 3, dec 1 st each row, until 4 sts remain; drop marker.
Next Row: K 1, SKP, K 1. Next Row: P3tog. Fasten off, leaving 12" tail for sewing.
Half Leaf for Right Side (Make 10 in colors of choice)
Cast on 15 sts.
Row 1 (Right Side): K to last 3 sts, SKP, K 1.
Row 2: K 1, P to last st, K.
Rep Rows 1 and 2 until 2 sts rem.
Next Row: P2tog.
Fasten off.
Half Leaf for Left Side (Make 10 in colors of choice)
Cast on 15 sts.
Row 1 (Right Side): K across.
Row 2: K 1, P to last 3 sts, P2tog, K1.
Rep Rows 1 and 2 until 3 sts rem.
Next Row: P3tog.
Fasten off.
FINISHING: Position leaves in 10 strips of 17, with a leaf pointing up and the next leaf pointing down, alternating across with various colors. Sew strips together. Sew half leaves into spaces at sides. Weave in ends.
Edging (Optional): With I hook and color of choice, sc across each end.
ABBREVIATIONS: A, B, C, etc = Colors A, B, C, etc.; MC = main color; ch = chain; dc = double crochet; hdc = half double crochet; lp = loop; mm = millimeters; rep = repeat; rnd = round; sc = single crochet; sl = slip; sp = space; st(s) = stitch (es); tr = treble crochet; * or ** = repeat whatever follows the * or ** as indicated; [ ] = work directions in brackets the number of times specified.
Pattern © by Coats & Clark Inc. Reproduced with permission from Coats & Clark Inc. PurpleKittyYarns.com is not endorsed by Coats & Clark Inc. It is not permissible to contract production of projects made from designs published by Coats & Clark to a third party for sale or distribution.
Crochet Autumn Leaves Afghan WR1039
Skill Level: Intermediate
Afghan measures 48" x 70".
RED HEART® "Fiesta™": 6 skeins 6350 Horizon MC.
RED HEART® "Soft Yarn": 3 skeins 1882 Toast A; 1 skein each 4422 Tangerine B, 9522 Leaf C, 4412 Grass Green D, and 9275 Paprika E.
Crochet Hook: 6mm [US J-10].
Yarn needle.
GAUGE: 16 sts = 4"; 6 rows = 4" in panel pattern. CHECK YOUR GAUGE. Use any size hook to obtain the gauge.
To change color: Work last st with color in use until there are 2 loops left on hook, drop color in use, draw next color through 2 loops and continue with new color.
NOTE: Afghan is worked from side to side beginning at the right hand edge.
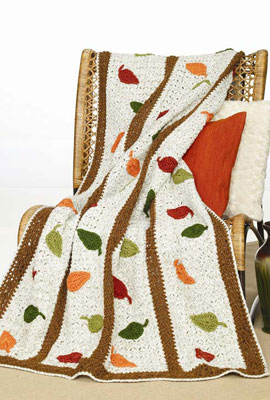
With A, ch 251.
Border-Row 1 (Wrong Side): Dc in 4th ch from hook, dc in next ch, * ch 1, skip next ch, dc in next ch; repeat from * to last ch; dc in last ch; turn - 123 ch-1 sps.
Row 2 (Right Side): Ch 3, skip first dc, dc in next dc, * skip next ch-1 sp, skip next dc, dc in next ch-1 sp, ch 3, 3 dc over the last dc made, skip next dc, skip next ch-1 sp, dc in next dc; repeat from * to last st; dc in top of ch-3; turn.
Row 3: Ch 3, skip first dc, dc in next dc, * ch 2, sc in top of next ch-3, ch 2, dc in next dc; repeat from * to last st; dc in top of ch-3; turn.
Row 4: Ch 3, skip first dc, dc in next dc, * ch 1, [dc in next ch-2 sp, ch 1] twice, dc in next dc; repeat from * to last st; dc in top of ch-3 changing to MC. Fasten off A.
** Panel-Row 1 (Wrong Side): With MC, ch 1, sc in first 2 dc, * ch 1, skip ch-1 sp, sc in dc; repeat from * to last st; sc in top of ch-3; turn.
Row 2 (Right Side): Ch 3, 2 dc in first sc, * skip next 3 sts (the sc, ch-1 sp, and sc), work (sc, ch 3, 2 dc) all in next ch-1 sp; repeat from * to last 2 sc; skip next sc, sc in last sc; turn.
Rows 3-16: Ch 3, 2 dc in first sc, * (sc, ch 3, 2 dc) all over next ch-3; repeat from * to last st; sc in top
of ch-3; turn.
Row 17: Ch 3, * (sc, ch 1, hdc, dc) all over next ch- 3; repeat from * to last 3 sts; skip next dc, sc in next dc and top of ch-3; turn.
Row 18: Ch 1, sc in first 2 sc, * ch 1, skip next dc, sc in hdc, ch 1, skip ch-1 sp, sc in next sc; repeat from * to last st; sc in top of ch-3 changing to A. Fasten off MC.
Border-Row 1: With A, ch 3, skip first sc, dc in next sc, * ch 1, dc in next sc; repeat from * to last sc; dc in last sc; turn.
Rows 2-4: Repeat Rows 2-4 of Border. **
Repeat from ** to ** 3 more times - 4 panels and 5 border sections. Fasten off A.
Top and Bottom Borders-Row 1: With right side facing, attach A at corner; ch 1, work 2 sc in row end(s), [ch 1, skip a sp equal to one sc, sc in row end] 90 times evenly across to next corner, work one more sc at corner; turn. Note: Work evenly to keep work flat and to have a multiple of 3 ch-1 spaces across the edge.
Row 2: Ch 3, skip first sc, dc in next sc, * ch 1, dc in next sc; repeat from * to last sc; dc in last sc; turn.
Rows 3-5: Repeat Rows 2-4 of Border. Fasten off. Repeat same at opposite edge.
Edging: Rnd 1: TOP EDGE: With right side facing, attach A at corner of top edge; ch 1, (sc, ch 2, sc) all in corner, ch 1, * skip next st, sc in ch-1 sp, ch 1; repeat from * to next corner; (sc, ch 1, sc) all in corner; SIDE EDGE: [ch 1, sc] 4 times across edge of top border, ch 1, sc between next 2 dc at start of side border, ** ch 1, skip next st, sc in ch-1 sp; repeat from ** to next corner; ch 1; repeat from * around; join with a slip st in first sc. Fasten off.
Rnd 2: With right side facing, attach MC in ch-2 sp at any corner; ch 1, ** (sc, ch 2, sc) all in ch-2 sp, ch 1, * skip next sc, sc in next ch-1 sp, ch 1; repeat from * to next corner; repeat from ** around; join. Fasten off. Weave in ends.
LEAVES (Make 13 for each Panel): With B, C, D, and E make leaves as follows choosing colors for each panel:
Rnd 1: With color chosen, ch 11, work 4 tr in 5th ch from hook, dc in next 2 ch, hdc in next 2 ch, sc in next ch, work (sc, ch 2, sc) in last ch, working along opposite side of ch, sc in next ch, hdc in next 2 ch, dc in next 2 ch, 4 tr in same ch as beg tr; join with a slip st in top of ch-4.
Rnd 2: Ch 1, sc in joining, 2 sc in each of next 4 tr, sc in next 6 sts, (sc, ch 2, slip st in 2nd ch from hook, sc) all in next ch-2 sp, sc in next 6 sts, 2 sc in each of next 4 tr, sc in joining; ch 7 for stem, slip st in 2nd ch from hook and in next 5 ch, slip st in first sc. Fasten off.
Sew 13 leaves to each panel of random colors as shown.
ABBREVIATIONS: A, B, C, etc = Colors A, B, C, etc.; MC = main color; ch = chain; dc = double crochet; hdc = half double crochet; lp = loop; mm = millimeters; rep = repeat; rnd = round; sc = single crochet; sl = slip; sp = space; st(s) = stitch (es); tr = treble crochet; * or ** = repeat whatever follows the * or ** as indicated; [ ] = work directions in brackets the number of times specified.
Pattern © by Coats & Clark Inc. Reproduced with permission from Coats & Clark Inc. PurpleKittyYarns.com is not endorsed by Coats & Clark Inc. It is not permissible to contract production of projects made from designs published by Coats & Clark to a third party for sale or distribution.
Flower Accents Throw LW2173
INTERMEDIATE
Designed by Ann Regis
Throw measures 55" x 55".
RED HEART® "Soft Yarn": 5 Balls 4614 Black A; 2 Balls each 2515 Turquoise B, 9770 Rose Blush C, 9520 Seafoam D; 1 Ball 4600 White E.
Crochet Hook: 6.5mm [US K-10].
Stitch marker, yarn needle.
GAUGE: Flower Square = 4 ½" by 4 ½". CHECK YOUR GAUGE. Use any size hook to obtain the gauge.
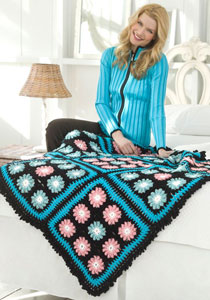
THROW
Flower Square
Make 44 using C and 37 using D in Round 2.
With E, ch 5, join with slip st to form ring.
Round 1: Ch 3, work 11 dc in ring, join with slip st to top of first ch-3. Fasten off.
Round 2: Working in between each dc of Round 1, join C or D in between any 2 dc, ch 4, work 2 tr in same space, remove hook from loop and insert hook from front to back in top of first ch-4, then into open loop and pull loop through - begin cluster made, ch 2, *work 3 tr in next space between dc, remove hook from loop and insert hook from front to back in top of first tr, then into open loop and pull loop through - cluster made, ch 2; repeat from * around, join with slip st to top of first ch-4 - 12 clusters. Fasten off.
Block
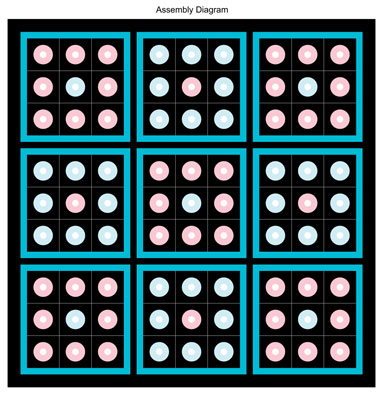
Following Assembly Diagram, arrange 9 Flower Squares into a Block.
First Flower Square
Work Round 3 around first Flower Square.
Round 3: Join A in any ch-2 space, ch 3, work 3 dc in same space, ch 2, work 4 dc in same space, *[3 dc in next ch-2 space] twice, (4 dc, ch 2, 4 dc) in next ch-2 space for corner; repeat from* around, slip st to top of first ch-3. Fasten off.
Joining Flower Squares On One Side
Work Round 3 along one side of working Flower Square, work 4 dc in second corner ch-2 space, ch 1, slip st in corresponding corner ch-2 space on previous Flower Square, ch 1, 4 dc in same corner space on working Flower Square, slip st between corner 4-dc and first 3-dc on previous Flower Square, [3-dc in next ch-2 space on working Flower Square, slip st in between 3-dc groups of previous Flower Square] twice, slip st between corner 4-dc and 3-dc on previous Flower Square, 4 dc in next corner ch-2 space of working Flower Square, ch 1, slip st in corresponding corner ch-2 space on previous Flower Square, ch 1, 4 dc in same corner space on working Flower Square, continue to work Round 3 as for First Flower Square around remaining 2 sides.
Joining Flower Squares On Two Sides
Work Round 3 along one side of working Flower Square, *work 4 dc in second corner ch-2 space, ch 1, slip st in corresponding corner ch-2 space on previous Flower Square, ch 1, 4 dc in same corner space on working Flower Square, slip st between corner 4-dc and first 3-dc on previous Flower Square, [3-dc in next ch-2 space on working Flower Square, slip st in between 3-dc groups of previous Flower Square] twice, slip st between corner 4-dc and 3-dc on previous Flower Square, 4 dc in next corner ch-2 space of working Flower Square, ch 1, slip st in corresponding corner ch-2 space on previous Flower Square, ch 1, 4 dc in same corner space on working Flower Square; repeat from * to join second side, continue to work Round 3 as for First Flower Square around remaining side.
Make 9 Blocks of 9 joined Flower Squares.
BLOCK BORDERS
First Block
Round 1: Join B to any corner ch-2 space of Block, ch 4, [[*dc in between first 2 dc of 4-dc group, [ch 1, skip 2 dc and work dc in between 2 dc] 6 times, ch 1, work dc in between 2 joined Flower Squares, ch 1; repeat from * across side edge of Block to corner ch-2 space, (dc, ch 1, dc) in corner space, ch 1]] around, dc in corner space, ch 1, slip st to 3rd ch of first ch-4.
Round 2: Ch 4, [dc in ch-1 space, ch 1] around, working (dc, ch 1, dc) in each corner ch-1 space, dc in final corner space, ch 1, slip st to 3rd ch of first ch-4. Fasten off.
Round 3: Join A in any corner ch-1 space and repeat Round 2.
Joining Blocks On One Side
Work Round 3 across one side to corner space, (dc, ch 1) in corner space, slip st in corresponding corner of previous Block, ch 1, dc in same space to complete corner, [slip st in next ch-1 space of previous Block, ch 1, work dc in working Block, ch 1] across one side, work Round 3 as for First Block around remaining two sides.
Joining Blocks On Two Sides
Work Round 3 across one side to corner space, *(dc, ch 1) in corner space, slip st in corresponding corner of previous Block, ch 1, dc in same space to complete corner, [slip st in next ch-1 space of previous Block, ch 1, work dc in working Block, ch 1] across one side; repeat from * across second side, work Round 3 as for First Block around remaining side.
THROW BORDER
Work Round 3 of BLOCK BORDER around entire Throw.
Frill Round: *Ch 10, sc in same ch-1 space, ch 10, sc in next ch-1 space; repeat from* around entire piece. Fasten off.
FINISHING
Weave in ends.
ABBREVIATIONS: A, B, etc= color A, B, etc; ch = chain; ch-space = chain-space; dc = double crochet; mm = millimeters; sc = single crochet; st(s) = stitch(es); tr = triple or treble crochet; * = repeat whatever follows the * as indicated; [[ ]] or [ ] = work directions in brackets the number of times specified.
Pattern © by Coats & Clark Inc. Reproduced with permission from Coats & Clark Inc. PurpleKittyYarns.com is not endorsed by Coats & Clark Inc. It is not permissible to contract production of projects made from designs published by Coats & Clark to a third party for sale or distribution.
Flower Tiles Afghan WR1879
INTERMEDIATE
Designed by Mary Jane Protus.
Afghan measures 41" wide x 56" long.
RED HEART® "Soft Yarn™": 2 Balls 4601 Off White A; 4 Balls 9344 Chocolate B; 3 Balls each 4608 Wine C, 9522 Leaf D, 9518 Teal E and 9275 Paprika F.
Crochet Hook: 6.5mm (US K-10 ½).
GAUGE: Motif = 7" square. CHECK YOUR GAUGE. Use any size hook to obtain gauge.
SPECIAL ABBREVIATIONS:
pc (popcorn stitch): Work 4 dc in same sc, drop loop from hook, insert hook in the top of first st, pull dropped loop through st.
dtr (double-treble): Yo 3 times, insert hook in specified st, yo and pull up a loop, [yo and pull through 2 loops on hook] 4 times.
NOTE: To join yarn with a dc- With slip knot on hook, yo, insert hook in st, yo and pull up a loop, [yo and pull through 2 loops] twice.

AFGHAN: Work 35 Motifs—9 Motifs each with C, D and E and 8 Motifs with F. Instructions are for C Motif. (Changes for D, E and F are in parentheses).
MOTIF: With B ch 4; join with a slip st to form a ring.
Rnd 1(RS): Ch 1, work 8 sc into ring; join with a slip st in first sc; fasten off.
Rnd 2: Join A with a dc in any st; pc in same st, ch 3, * pc in next sc, ch 3; repeat from * 6 times; join with a slip st in first pc; fasten off - 8 pc.
Rnd 3: Join C (D, E, F) in any ch-3 sp, ch 5, 3 dc in same space, * 3 dc in next ch-3 sp, (3 dc, ch 2, 3 dc) in next sp—corner made, repeat from * twice, 3 dc in next ch-3 space, 2 dc in beginning ch-2 sp, join with a slip st in third ch of beginning ch-5 - 9 dc on each side.
Rnd 4: Slip st in ch-2 space, ch 5, (dc, ch 1, dc) in same space, ch 1, sk next dc, [dc in next dc, ch 1, sk next dc] 4 times, * (dc, ch 1, dc, ch 2, dc, ch 1, dc) in next ch-2 space, ch 1, sk next dc, [dc in next dc, ch 1, sk next dc] 4 times; repeat from * around, dc, ch 1 in beginning ch-2 space, join with a slip st in third ch of beginning ch-5.
Rnd 5: Slip st in ch-2 space, ch 3, (dc, ch 2, 2 dc) in same space, 2 dc in each ch-1 space to corner ch-2 space, * (2 dc, ch 2, 2 dc) in corner ch-2 space, 2 dc in each ch-1 space across to corner, repeat from * around, join with a slip st in third ch of beginning ch-3; fasten off - 18 dc on each side.
Rnd 6: Join A in any corner ch-2 space, ch 1, * (sc, ch 2, sc) in ch-2 space, sc in each of next 5 dc, * dtr in middle dc of 3- dc group in Row 3, sk next dc on Row 5, sc in each of next 2 dc on Row 5, (tr, ch 1, tr) into same middle dc of 3-dc group in Row 3, sk next 2 dc on Row 5, sc in each of next 2 dc on Row 5, dtr into same middle dc of 3-dc group in Row 3, sk next dc on Row 5, sc in each of next 5 dc on Row 5; repeat from * around, join with a slip st in first sc.
Rnd 7: Slip st in ch-2 space, ch 3, (2 dc, ch 2, 3 dc) in same ch-2 space, * [sk 3 sc, 3 dc in next sc, sk 2 sc, 3 dc in dtr, sk 2 sc and tr, 3 dc in ch-1 space between 2 tr, sk 2 sc, 3 dc in dtr, sk 2 sc, 3 dc in next sc, sk 3 sc **, (3 dc, ch 2, 3 dc) in ch-2 space] 3 times; repeat from * to ** one more time, join with a slip st in third ch of beginning ch-3; fasten off.
Rnd 8: Join B with a slip st in any corner ch-2 space, ch 1, * (sc, ch 2, sc) in ch-2 space, ch 1, sk next dc, sc in next dc, ch 1, sk next dc, [sc in space between 3-dc groups, ch 1, sk next dc, sc in next sc, ch 1, sk next dc] 6 times; repeat from * around, join with a slip st in first sc; fasten off.
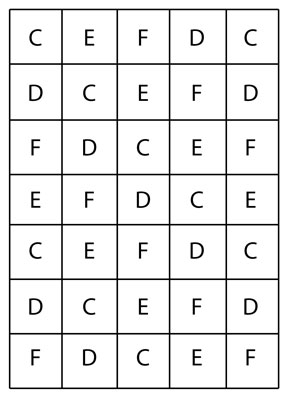
ASSEMBLY: Motifs are joined using B on WS, using Assembly Diagram as guide.
Vertical Seams: Using B, begin at lower right edge of afghan chart, with RS of Motifs to be joined facing, join yarn with a slip st through both Motifs in corner ch-2 space, ch 1, sc in same space, * [ch 1, sc in next ch-1 space of both Motifs] 14 times, ch 1, sc in ch-2 space, ch 1, do not fasten off, holding next 2 Motifs with RS facing, sc in corner ch-2 space, repeat from * across all Motifs in row; fasten off. Continue to join all Motifs in vertical rows as shown in diagram.
Horizontal Seams: Join horizontal seams in same manner.
BORDER: Rnd 1: Join B with a slip st in ch-2 space of any corner, ch 1, (sc, ch 2, sc) in ch-2 corner space, ch 1, [sc in next ch-1 space, ch 1] 12 times, * sc in ch-2 space, ch 1, sc in ch-2 space of next Motif, ch 1, [sc in next ch-1 space, ch 1] 12 times **; repeat from * to ** to corner ch-2 space, (sc, ch 2, sc) in ch-2 corner space; repeat around, join with a slip st in first sc; fasten off.
Rnd 2: Join A in any corner ch-2 space, ch 1, * (sc, ch 3, sc) in ch-2 space, ch 3, [sc in next ch-1 space, ch 3] across to next ch-2 space, repeat from * across to next corner ch-2 space, repeat around, join with a slip st in first sc, slip st in ch-2 sp.
Rnd 3: Ch 1, * (sc, ch 2, sc) in corner ch-2 space, ch 1, [sc in ch-3 space, ch 1] across to next corner ch-2 space, repeat from * around, join with a slip st in first sc.
Rnd 4: Slip st in ch-2 space, ch 1, sc in next sc, ch 3, * sc in corner ch-2 space, ch 3, [sc in sc, ch 3] across to corner ch-2 space, repeat from * around, join with a slip st in first sc; fasten off.
ABBREVIATIONS: A, B, C, D, E = color A, B, C, D, E; ch = chain; dc = double crochet; hdc = half double crochet; mm = millimeters; pat = pattern; rem = remaining; RS = right side; sc = single crochet; sk = skip; st(s) = stitch(es); tr = treble crochet; WS = wrong side; yo = yarn over; * or ** = repeat whatever follows the * or ** as indicated; [ ] = work directions in brackets the number of times indicated.
Pattern © by Coats & Clark Inc. Reproduced with permission from Coats & Clark Inc. PurpleKittyYarns.com is not endorsed by Coats & Clark Inc. It is not permissible to contract production of projects made from designs published by Coats & Clark to a third party for sale or distribution.
Other free crochet afghan patterns:
Crochet Granny Classic LW1538
Skill Level: Beginner
Designed by Mary Jane Protus.
Afghan measures approximately 54 ½" x 65".
RED HEART® "Soft Yarn™": 1 Ball each No. 4601 Off White CA, No. 2541 Blue Sky CC, No. 3720 Lavender CF, No. 4422 Tangerine CG, No. 2515 Turquoise CH, No. 4412 Grass Green CI, No. 3729 Grape CJ; and 2 balls each No. 1882 Toast CB, No. 4420 Guacamole CD, No. 4608 Wine CE.
Crochet Hook: 6.5mm [US K-10.5].
GAUGE: 9 rnds = 10 ½" across in pat. CHECK YOUR GAUGE. Use any size hook to obtain the gauge given.
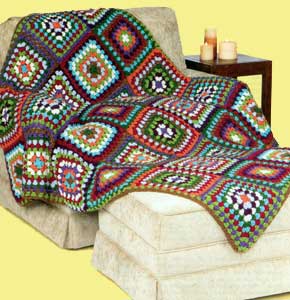
NOTE: AFTER THE FIRST SQUARE, ALL OTHERS ARE JOINED WHILE WORKING RND 9.
BASIC SQUARE: Ch 5; join with a sl st to form a ring.
Rnd 1: Ch 3, 2 dc in ring, ch 2, [3 dc in ring, ch 2] 3 times; join with a sl st to top of ch-3. Fasten off.
Rnd 2: Join next color in any ch-2 sp; ch 3, (2 dc, ch 2, 3 dc) all in sp, ch 1; * (3 dc, ch 2, 3 dc) all in ch-2 sp - corner made; ch 1; rep from * around; join to top of ch-3. Fasten off.
Rnd 3: Join next color in any ch-2 sp; ch 3, (2 dc, ch 2, 3 dc) all in sp, * ch 1, 3 dc in next ch-1 sp, ch 1 **, work corner in next ch-2 sp; rep from * around, end at **; join. Fasten off.
Rnds 4-9 (See Note above): Join next color in any ch-2 sp; ch 3, (2 dc, ch 2, 3 dc) all in sp, ch 1, * 3 dc in next ch-1 sp, ch 1; rep from * to next corner **; work corner in next ch-2 sp, ch 1; rep from * around, end at **; join. Fasten off. Weave in ends.
To Join on One Side-Rnd 9: Join next color in any ch-2 sp; ch 3, 2 dc in sp; ch 1, holding wrong sides together, sc in corner sp of completed square, ch 1; 3 dc in same sp, sc in next ch-1 sp of completed square, * 3 dc in next ch-1 sp, sc in next ch-1 sp of completed square; rep from * to next corner; 3 dc in ch-2 sp, ch 1, sc in corner sp of completed square, ch 1, 3 dc in same ch-2 sp, ch 1; complete rnd as for First square.
Join subsequent squares in the same manner as above, joining 1 or 2 sides as required; join to corner of previously joined squares by working sc in sc of previous joining.
Work 30 Basic Squares, 5 each in the following 6 color sequences, joining while working Rnd 9 and following the diagram for placement:
SQUARE 1: CB, CH, CG, CF, CA, CE, CD, CC, CJ.
SQUARE 2: CA, CD, CG, CF, CJ, CE, CB, CH, CI.
SQUARE 3: CF, CA, CJ, CD, CI, CB, CC, CE, CG.
SQUARE 4: CG, CC, CJ, CA, CI, CH, CE, CD, CF.
SQUARE 5: CI, CB, CC, CG, CD, CA, CH, CJ, CE.
SQUARE 6: CH, CG, CA, CD, CE, CC, CI, CF, CB.
Edging-Rnd 1: With right side facing, join CD in any ch-2 sp and work as for Rnd 4 around entire afghan.
Rnd 2: With CB, rep Rnd 4; join; sl st to ch-2 sp of corner.
Rnd 3: Ch 1, ** work (sc, ch 2, sc) all in ch-2 sp, ch 3, * sc in next ch-1 sp, ch 3; rep from * to next ch-2 sp of next corner; rep from ** around; join with a sl st in first sc. Fasten off.

ABBREVIATIONS: CA, CB, CC, etc = Colors A, B, C, etc; ch = chain; dc = double crochet; mm = millimeters; rep - repeat; rnd = round; sc = single crochet; sl = slip; sp = space; st(s) = stitch (es); * or ** = repeat whatever follows the * or ** as indicated; [] = work directions in brackets the number of times specified.
Pattern © by Coats & Clark Inc. Reproduced with permission from Coats & Clark Inc. PurpleKittyYarns.com is not endorsed by Coats & Clark Inc. It is not permissible to contract production of projects made from designs published by Coats & Clark to a third party for sale or distribution.
Crochet Scarf, Hat & Wristlets LW1535
Skill Level: Easy
Designed by Michele Thompson.
Scarf measures 5 ½" x 60". Hat and Wristlets directions are for adult size Small; changes for Medium and Large are in parentheses.
RED HEART® "Soft Yarn™": Scarf: 1 Ball each No. 3720 Lavender CA, No. 3729 Grape CB, and No. 4608 Wine CC; Hat: 1 ball each CA, CB, and CC; Wristlets: 1 ball CA and small amounts of CB and CC.
Crochet Hooks: 5.5mm [US I-9] and 11.5mm [US P-16].
Yarn needle; cardboard 1 ½" and 3" for pompoms.
GAUGES: Scarf: 8 sts = 4"; 10 rows = 4" with 3 strands using larger hook in pat. Hat & Wristlets: 15 sts = 4"; 18 rows = 4" with one strand and smaller hook in pat. CHECK YOUR GAUGE. Use any size hook to obtain the gauges.
Hat Circumference: 18 (20, 22)".
Wrist circumference: 7 (7 ½, 8)".
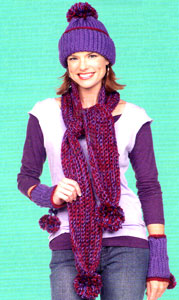
SCARF
With larger hook and one strand each CA, CB, and CC held tog as one, ch 121.
Row 1 (Right Side): Sc in 2nd ch from hook and each ch across; turn - 120 sc.
Row 2: Ch 1, sc in BACK LP ONLY of each sc across; turn.
Rep Row 2 for pat until there are a total of 14 rows - about 7" when slightly stretched. Fasten off.
FINISHING: Make 2 large pompoms: wrap CA, CB, and CC held tog around a 3" cardboard 75 times. Remove from cardboard, tie tightly in middle; clip, then trim ends. Gather ends of scarf, fasten securely. Sew a pompom to each end. Weave in ends.
HAT
With smaller hook and CA, ch 35 (39, 43). Work in pat same as for Scarf over 34 (38, 42) sc until there are a total of 76 (80, 84) rows - about 18 (20, 22)" when slightly stretched. Fasten off.
FINISHING: Sl st seam tog: Holding beg ch edge with wrong side facing, sl st into first ch AND into BACK LP ONLY of last sc row, continue across both edges sl st corresponding ch and back lps tog across. Fasten off.
Crown Shaping: Turn right side out. With right side facing, smaller hook and CA, attach yarn at seam; ch 1, work 76 (80, 84) sc around entire top edge; join with a sl st in first sc.
Next 2 Rnds: Ch 1; * draw up a lp in next 2 sc, yo and draw through 3 lps on hook - sc2tog made; rep from * around; join - 19 (20, 21) sts at end of 2nd rnd.
Next Rnd: Ch 1, * sc2tog; rep from * to last 1 (0, 1) sc; sc in last 1 (0, 1) sc; join - 10 (10, 11) sc.
Next Rnd: Ch 1, * sc2tog; rep from * to last 0 (0, 1) sc; sc in last 0 (0, 1) sc; join - 5 (5, 6) sc. Fasten off, leaving a long tail. Weave yarn through top lps of rem sc, gather tightly, and fasten securely.
Brim Edging: Fold brim up. With CA, attach yarn so right side is facing, join yarn at seam; ch 1, work 76 (80, 84) sc around; join. Fasten off. Join CB and work 1 rnd sc. Fasten off Join CC and work 1 rnd sc. Fasten off.
Make a large pompom same as for scarf. Sew to top of hat. Weave in loose ends.
WRISTLETS (Make 2)
With smaller hook and CA, ch 20 (22, 24). Row 1 (Right Side): Sc in 2nd ch from hook and each ch across; turn - 19 (21, 23) sc.
Row 2: Ch 1, sc in BACK LP ONLY of first 9 (10, 11) sc, ch 1, skip next sc, sc in BACK LP ONLY of next 9 (10, 11) sc; turn.
Row 3: Ch 1, sc in BACK LP of each sc and ch across; turn.
Rep Rows 2 and 3 for pat until there are a total of 30 (32, 34) rows. An eyelet for wrist tie is created by ch-1 sps.
FINISHING: Sl st side seam tog as for back seam of Hat. Turn tight side out.
Top Edging: Work same as for Hat Brim Edging working 28 (30, 32) sc at top edge.
Bottom Edging: Work same as for Hat Brim Edging working 30 (32, 34) sc at bottom edge. Weave in ends.
Tie (Make 2): With smaller hook and CA, ch 85. Fasten off. Beg and ending at side edge, weave tie through ch-1 sps at wrist. Make 4 small pompoms: wrap CA, CB, and CC around a 1 ½" cardboard 30 times; remove from cardboard, tie in center; clip, then trim ends. Sew one pompom on each end of each tie. Weave in ends.
ABBREVIATIONS: CA, CB, CC = Colors A, B, C; ch = chain; lp = loop; mm = millimeters; rep = repeat; rnd = round; sc = single crochet; sl = slip; sp = space; st(s) = stitch(es), yo = yarn over; * or ** = repeat whatever follows the * or ** as indicated; [ ] = work directions in brackets the number of times specified.
Pattern © by Coats & Clark Inc. Reproduced with permission from Coats & Clark Inc. PurpleKittyYarns.com is not endorsed by Coats & Clark Inc. It is not permissible to contract production of projects made from designs published by Coats & Clark to a third party for sale or distribution.
Gotcha Covered #1 Knitted Hats LW1268
Skill level: Beginner
|
YARN QUALITY* |
KNITTING NEEDLES |
GAUGE in St st ON LARGER NEEDLES |
|
|
A |
Fingering Weight |
2.75mm [US 2] & 3.5mm [US 4] |
26 sts = 4"; 35 rows = 4" |
|
B |
Light Sport Weight |
3.5mm [US 4] & 4mm [US 6] |
22 sts = 4"; 30 rows = 4" |
|
C |
Sport Weight |
3.5mm [US 4] & 4mm [US 6] |
20 sts = 4"; 27 rows = 4" |
|
D |
Light Worsted Weight |
4mm [US 6] & 5mm [US 8] |
18 sts = 4"; 24 rows = 4" |
|
E |
Worsted Weight |
4mm [US 6] & 5mm [US 8] |
17 sts = 4"; 23 rows = 4" |
|
F |
Chunky Weight |
5mm [US 8] & 6mm [US 10] |
15 sts = 4"; 20 rows = 4" |
|
G |
Bulky Weight |
6.5mm [US 10.5] & 9mm [US 13] |
9 sts = 4"; 13 rows = 4" |

Amount: One skein each of 2 colors of any yarn quality will make one or more hats.
|
SIZE |
1 |
2 |
3 |
4 |
5 |
6 |
|
TO FIT |
Preemie |
Baby |
Toddler |
Child |
Women |
Men |
|
CIRCUMFERENCE |
12" |
14" |
16" |
18" |
20" |
22" |
|
NOTE: Circle the numbers appropriate to the hat size and yarn quality you are making to help keep track of the pattern. HAT-Cuff: With smaller needles and first color, cast on |
||||||
|
A |
77 |
93 |
105 |
- |
- |
- |
|
B |
65 |
77 |
89 |
97 |
109 |
121 |
|
C |
61 |
69 |
81 |
89 |
101 |
109 |
|
D |
53 |
61 |
73 |
81 |
89 |
97 |
|
E |
49 |
57 |
69 |
77 |
85 |
93 |
|
F |
- |
53 |
61 |
69 |
77 |
81 |
|
G |
- |
33 |
37 |
41 |
45 |
49 |
|
sts. Work in ribbing as follows: Row 1 (Right Side): * K2, P2; rep from * to last st; K1. Row 2: P1, * K2, P2; rep from * across. Rep Rows 1 and 2 for |
||||||
|
A-G |
2 1/2 |
3 |
4 |
5 |
6 |
6 |
|
inches, end Row 1. Crown: Change to larger needles and second color and work in plain St st or stripes, beg K row, until |
||||||
|
A-G |
5 |
6 |
7 |
9 |
10 |
10 |
|
inches from beg, end P row. Shape Top: [K2tog, K |
||||||
|
A |
15 |
19 |
22 |
- |
- |
- |
|
B |
12 |
15 |
18 |
20 |
23 |
26 |
|
C |
11 |
13 |
16 |
18 |
21 |
23 |
|
D |
9 |
11 |
14 |
16 |
18 |
20 |
|
E |
8 |
10 |
13 |
15 |
17 |
19 |
|
F |
- |
9 |
11 |
13 |
15 |
16 |
|
G |
- |
4 |
5 |
6 |
7 |
8 |
|
sts, sl 1, K1, psso, place marker on needle] 4 times, K1. Next Row: P. Next Row: [K2tog, K to 2 sts before marker, sl 1, K1, psso] 4 times, K1. Rep the last 2 rows until the row “[K2tog, K1 OR K2, sl 1, K1, psso] 4 times, K1” has been worked and 13 OR 17 sts rem. Cut yarn, leaving a long end; weave through rem sts, draw up tightly and fasten securely. Sew seam, reversing for cuff turnback. Fold cuff in half to the right side. Optional: Make a pom pom and fasten to top of hat. *Yarn Quality: A = RED HEART® Baby Fingering Traditional and Pompadour. B = RED HEART® Soft Baby; TLC® Baby. C = RED HEART® Sport; Baby Sport Econo. D = RED HEART® Soft; Kids; Baby Teri; Tweed; TLC® Lustre; Heathers. E = RED HEART® Super Saver; Classic; Fiesta; Pounder; Classic Plus; TLC® Essentials. F = RED HEART® Misty. G = RED HEART® Light & Lofty; Baby Clouds. ABBREVIATIONS: beg = beginning; K = knit; P = purl; psso = pass the slipped stitch over; rem = remain(ing); rep = repeat; sl = slip; st = stitch; St st = Stockinette stitch (K1 row; P1 row); tog = together; * = repeat whatever follows the * as indicated; [ ] = work directions given in brackets the number of times specified. |
||||||
Pattern © by Coats & Clark Inc. Reproduced with permission from Coats & Clark Inc. PurpleKittyYarns.com is not endorsed by Coats & Clark Inc. It is not permissible to contract production of projects made from designs published by Coats & Clark to a third party for sale or distribution.
Other free hat patterns:
Ripple Hat & Scarf LW1471
Skill level: Easy
Hat: One size fits most women. Scarf measures approximately 6" x 71".
SUPPLIES
RED HEART® “Soft Yarn”, Art. E728 (5 ounce/256 yard ball): 1 Ball each No. 3720 Lavender CA, No. 2541 Blue Sky CB, and No. 4601 Off White CC.
Crochet Hook: 5.5mm [US I-9]. Yarn needle.
GAUGE: 14 sts (2 repeats) = 31/2"; 6 rows = 4" in pattern. CHECK YOUR GAUGE. Use any size hook to obtain the gauge.
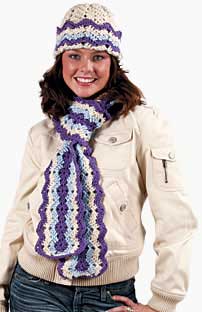
SPECIAL ABBREVIATIONS:
CL2: Yo and draw up a lp in next dc, yo and draw through 2 lps, skip next 2 sc, yo and draw up a lp in next dc, yo and draw through 2 lps, yo and draw through all 3 lps rem on hook.
CL3: Yo and draw up a lp in next st, yo and draw through 2 lps, skip next 3 sts, yo and draw up a lp in next st, yo and draw through 2 lps, yo and draw through all 3 lps rem on hook.
Shell: (2 dc, ch 3, 2 dc) all in st or sp indicated.
SCARF
With CA, ch 281.
Rnd 1 (Right Side): Sc in 2nd ch from hook, * ch 1, skip next 2 ch, shell in next ch, ch 1, skip next 2 ch, sc in next ch **, sc in next ch; rep from * across, end at **; turn to work on opposite side of beg ch; sc in same ch as last sc; rep from * across, end at ** changing to CB in last sc; join with a sl st to first sc – 40 ch-3 sps on each side.
Rnd 2: With CB, ch 1, sc in same sc as joining, sc in ch-1 sp, ** ch 3, dc in next 2 dc, shell in ch-3 sp, dc in next dc, * CL2, dc in next dc, shell in ch-3 sp, dc in next dc; rep from * across first side; dc in next dc, ch 3, sc in ch-1 sp **, sc in next 2 sc, sc in ch-1 sp; rep from ** to ** across next side; sc in last sc changing to CC; join.
Rnd 3: With CC, ch 1, sc in same sc as joining, sc in next sc, sc in ch-3 sp, ** ch 3, skip next 2 dc, dc in next 2 dc, shell in ch-3 sp, dc in next dc, * CL3, dc in next dc, shell in ch-3 sp, dc in next dc; rep from * across first side; dc in next dc, ch 3, skip next 2 dc, sc in ch-3 sp **, sc in next 4 sc, sc in ch-3 sp; rep from ** to ** across next side; sc in last 2 sc changing to CA; join.
Rnd 4: With CA, ch 1, sc in same sc as joining and next 2 sc, 2 sc in ch-3 sp, ** ch 3, skip next 2 dc, dc in next 2 dc, shell in ch-3 sp, dc in next dc, * CL3, dc in next dc, shell in ch-3 sp, dc in next dc; rep from * across first side; dc in next dc, ch 3, skip next 2 dc, 2 sc in ch-3 sp **, sc in next 6 sc, 2 sc in ch-3 sp; rep from ** to ** across next side; sc in last 3 sc; join. Fasten off.
HAT
With CC, ch 4; join with sl st in first ch to form ring.
Rnd 1: Ch 3, 13 dc in ring; join with sl st in top of ch-3 – 14 sts.
Rnd 2: Ch 3, dc in same st as joining, [2 dc in next dc]13 times; join – 28 sts.
Rnd 3: Ch 3, [2 dc in next dc, dc in next dc] 13 times, 2 dc in last dc; join – 42 sts.
Rnd 4: Ch 3, [2 dc in next dc, dc in next dc] 20 times, 2 dc in last dc; join – 63 sts.
Rnd 5: Ch 1, sc in same st as joining, * ch 1, skip next 2 dc, shell in next dc, ch 1, skip next 2 dc, sc in next dc **, sc in next dc; rep from * around, end at **; join in first sc – 9 ch-3 sps.
Rnd 6: Sl st in sp, sl st in next 2 dc, ch 3, * shell in ch-3 sp, dc in next dc, CL2 **, dc in next dc; rep from * around end at ** and working 2nd leg of CL2 in first dc of previous rnd; join in top of ch-3.
Rnd 7: St in next 2 dc, ch 3, * shell in ch-3 sp, dc in next dc, CL3 **, dc in next dc; rep from * around end at ** and working 2nd leg of CL3 in first dc of previous rnd; join.
Rep Rnd 7 four more times. Fasten off.
Brim-Next Rnd: With WRONG SIDE facing (this will be the right side when brim is turned up), attach CA in 2nd dc of shell; ch 3, * shell in ch-3 sp, dc in next dc, CL3 **, dc in next dc; repeat from * around end at ** and working 2nd leg of CL3 in first dc of previous rnd; join. Fasten off.
Rep last rnd 6 more times in following color sequence: [CB, CC, CA] twice. Weave in ends.
ABBREVIATIONS: beg = beginning; CA, CB, CC = Colors A, B, C; ch = chain; dc = double crochet; lp(s) = loop (s); mm = millimeters; pat = pattern; rep = repeat; rnd = round; sc = single crochet; sl st = slip stitch; sp(s) = space (s); st(s) = stitch (es); yo = yarn over; * or ** = repeat whatever follows the * or ** as indicated; [ ] = work directions in brackets the number of times specified.
Designed by Mary Jane Protus.
Pattern © by Coats & Clark Inc. Reproduced with permission from Coats & Clark Inc. PurpleKittyYarns.com is not endorsed by Coats & Clark Inc. It is not permissible to contract production of projects made from designs published by Coats & Clark to a third party for sale or distribution.
Other free crochet hat & scarf patterns:
Gotcha Covered #2 Crochet Hats LW1269
Skill level: Beginner
Crochet striped baby sweater and hat done in TLC Baby yarn will look cute on any baby.
|
YARN QUALITY* |
CROCHET HOOKS | GAUGE in sc rnds ON SMALLER HOOK | |
|
A |
Fingering Weight |
3.25mm [US D-3] & 3.5mm [US E-4] |
21 sts = 4"; 25 rnds = 4" |
|
B |
Light Sport Weight |
3.75mm [US F-5] & 4mm [US G-6] |
18 sts = 4"; 21 rnds = 4" |
|
C |
Sport Weight |
4mm [US G-6] & 5mm [US H-8] |
16 sts = 4"; 18 rnds = 4" |
|
D |
Light Worsted Weight |
5mm [US H-8] & 5.5mm [US I-9] |
14 sts = 4"; 16 rnds = 4" |
|
E |
Worsted Weight |
5.5mm [US I-9] & 6mm [US J-10] |
13 sts = 4"; 14 rnds = 4" |
|
F |
Chunky Weight |
6mm [US J-10] & 6.5mm [US K-101/2] |
11 sts = 4"; 13 rnds = 4" |
|
G |
Bulky Weight |
10mm [US N-15] & 11.5mm [US P-16] |
5 sts = 3"; 8 rnds = 41/4" |

Amount: One skein each of 2 colors of any yarn quality will make one or more hats.
|
SIZE |
1 |
2 |
3 |
4 |
5 |
6 |
|
TO FIT |
Preemie |
Baby |
Toddler |
Child |
Women |
Men |
|
CIRCUMFERENCE |
12" |
14" |
16" |
18" |
20" |
22" |
|
NOTE: Circle the numbers appropriate to the hat size and yarn quality you are making to help keep track of the pattern. HAT-Cuff: With larger hook and first color, chain |
||||||
|
A |
64 |
72 |
84 |
- |
- |
- |
|
B |
52 |
64 |
72 |
80 |
92 |
100 |
|
C |
48 |
56 |
64 |
72 |
80 |
88 |
|
D |
40 |
48 |
56 |
64 |
68 |
76 |
|
E |
40 |
44 |
52 |
56 |
64 |
72 |
|
F |
- |
36 |
44 |
48 |
56 |
60 |
|
G |
- |
24 |
28 |
32 |
32 |
36 |
|
sts; join with a sl st to first ch, being sure ch is not twisted. Rnd 1: Ch 1, sc in same ch as joining and in each ch around; join in the back lp of first sc; turn - the number of sc should be the same as the number of ch. Rnd 2: Ch 1, sc in back lp of each sc around; join in back lp of first sc; turn. Rep Rnd 2 for |
||||||
|
A-F |
2 1/2 |
3 |
4 |
5 |
6 |
6 |
|
inches, do not turn at end of last rnd. Crown: Change to smaller hook and second color. Next Rnd (Right Side): Ch 1, sc in both lps of each sc around; join; do not turn. Rep last rnd with one color or 2 colors for stripes until |
||||||
|
A-F |
5 |
6 |
7 |
9 |
10 |
10 |
|
inches from beg. Shape Top: Ch 1; [draw up a lp in next 2 sc, yo and draw through all 3 lps on hook - dec made; sc in next |
||||||
|
A |
11 |
13 |
16 |
- |
- |
- |
|
B |
8 |
11 |
13 |
15 |
18 |
20 |
|
C |
7 |
9 |
11 |
13 |
15 |
17 |
|
D |
5 |
7 |
9 |
11 |
12 |
14 |
|
E |
5 |
6 |
8 |
9 |
11 |
13 |
|
F |
- |
4 |
6 |
7 |
9 |
10 |
|
G |
- |
1 |
2 |
3 |
3 |
4 |
|
sts, dec, sc in next sc, place marker in last st] 4 times; join to first sc – 8 sts dec. Next Rnd: Ch 1, [dec, sc in each sc to 2 sts before marked st, dec, sc in next sc] 4 times; join. Rep the last rnd until the rnd “Ch 1, [dec, sc in next 0 OR 1 sc, dec, sc in next sc] 4 times” has been worked and 12 OR 16 sts rem. Work 1 rnd even. Cut yarn, leaving a long end; weave through rem sts, draw up tightly and fasten securely. Fold cuff in half to the right side. Optional: Make a pom pom and fasten to top of hat. *Yarn Quality: A = RED HEART® Baby Fingering Traditional and Pompadour. B = RED HEART® Soft Baby; TLC® Baby. C = RED HEART® Sport; Baby Sport Econo. D = RED HEART® Soft; Kids; Baby Teri; Tweed; TLC® Lustre; Heathers. E = RED HEART® Super Saver; Classic; Fiesta; Pounder; Classic Plus; TLC® Essentials. F = RED HEART® Misty. G = RED HEART® Light & Lofty; Baby Clouds. ABBREVIATIONS: beg = beginning; ch = chain; dec = decrease(d); lp = loop; rem = remain(ing); rep = repeat; rnd = round; sc = single crochet; sl = slip; st = stitch; tog = together; yo = yarn over; * = repeat whatever follows the * as indicated; [ ] = work directions given in brackets the number of times specified. |
||||||
Pattern © by Coats & Clark Inc. Reproduced with permission from Coats & Clark Inc. PurpleKittyYarns.com is not endorsed by Coats & Clark Inc. It is not permissible to contract production of projects made from designs published by Coats & Clark to a third party for sale or distribution.
Other free hat patterns:
| Pattern Categories Browse the categories to help you find the patterns you're looking for. |
||


