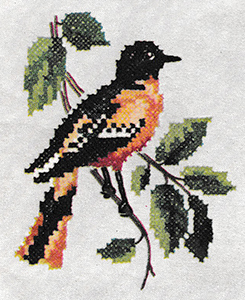
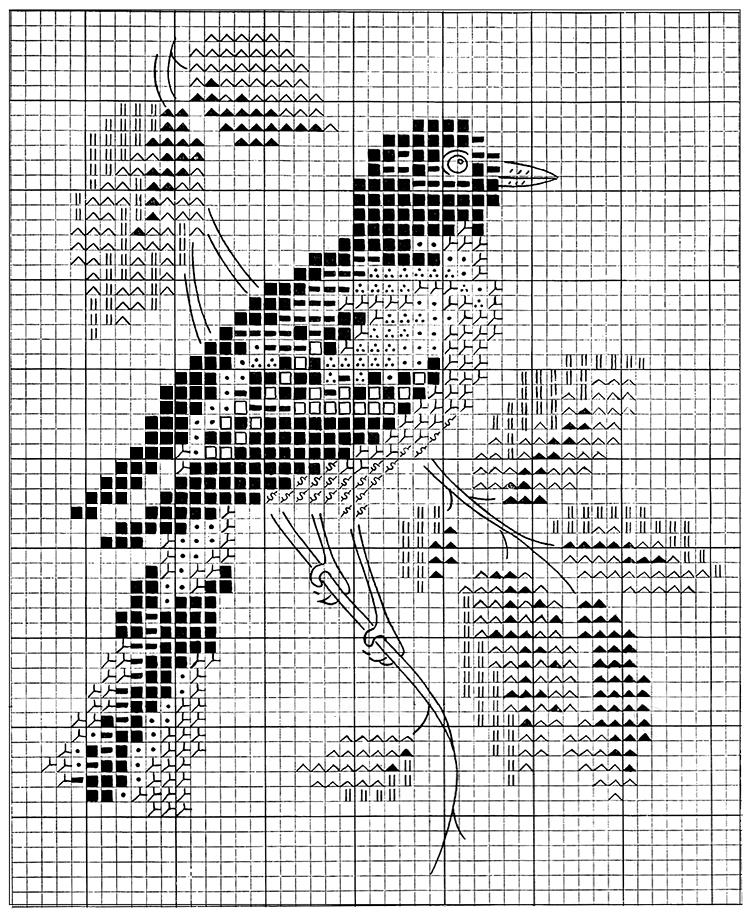
Oriole Chart Pattern

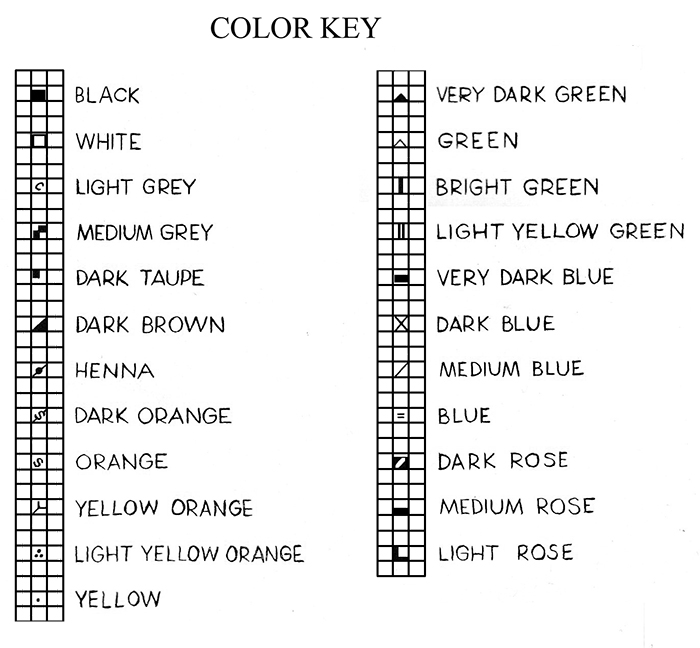
Pattern includes designs for four bird pictures. Design sizes are: Bluebird 7" x 7⅞", Robin 6½" x 8⅝", Oriole 6½" x 8¼", Blue Jay 6¾" x 7⅞". Leaflet includes charts for placing the colors and instructions for embroidery. Pictures are worked in 7-to-inch cross-stitch, satin, French knots, outline, back and single stitches.
MATERIALS REQUIRED: For Background use white, cream or egg shell color, medium weight smooth linen, linen-like cotton or good quality unbleached muslin. The four pictures require ¾ yd. 36" fabric (suitable for either frame treatment shown) using a piece about 13" x 18" for each picture. For Embroidery use six-strand embroidery cotton.
Cross-Stitch: Follow charts for placing colors. Use six-strands of cotton in needle. In working cross-stitch (see detail above) it is very important to have the crosses of the entire piece crossed in the same direction. Keep stitches as even as possible. Be sure all crosses touch. To do this, put needle in same hole as used for adjoining stitch.
Remaining Embroidery: Use six strands of cotton in needle for all work except outlining white portion of Blue Jay's tail and Robin's leg, where two strands are used. The stitches used are satin (inner lines indicate direction of stitches), French knots (one time around needle), outline, back and single stitch. After cross-stitch is finished, complete pictures as follows:
ORIOLE: Eye—black satin stitch; center white French knot. Eyebrow—very dark blue outline stitch. Beak—satin stitch; upper, very dark blue; lower, black. Legs and Feet— black outline stitch. Branch and Twigs—dark brown outline stitch.
To Block Design: Cover a large bread or drawing board with clean brown paper. Mark the size of fabric (13" x 18") on brown paper. If the embroidered piece is soiled, it may be washed, or if only slightly soiled dip in cleaning fluid. Place wet piece (right side up) on board, and pull edges of fabric to meet guide lines drawn on brown paper. Tack all edges of fabric to board, placing thumb tacks close together. Allow piece to remain on the board until thoroughly dry.
Before Framing: Mount embroidered pieces by stretching over pieces of stiff cardboard, cut smaller than frame size. If using oval frame, mounting board must be oval. In stretching, be sure to keep design perfectly straight and properly centered. Drive pins through fabric and edges of cardboard, beginning at centers of top, bottom and sides (widest points of oval), keeping fabric grain straight. Paste edges of fabric down on wrong side. When using oval board, it may be necessary to trim away excess fabric on wrong side to avoid bunching.


| Pattern Categories Browse the categories to help you find the patterns you're looking for. |
||


