Ballet Dancers Cross Stitch Chart

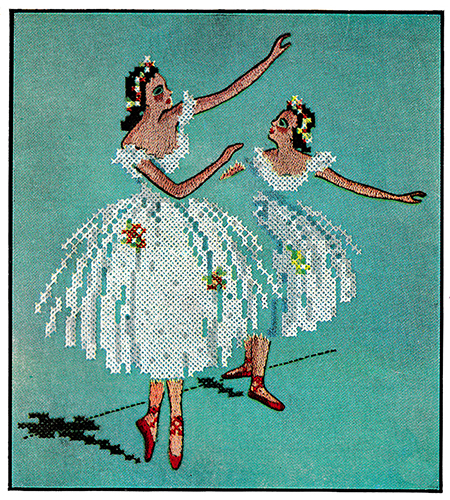
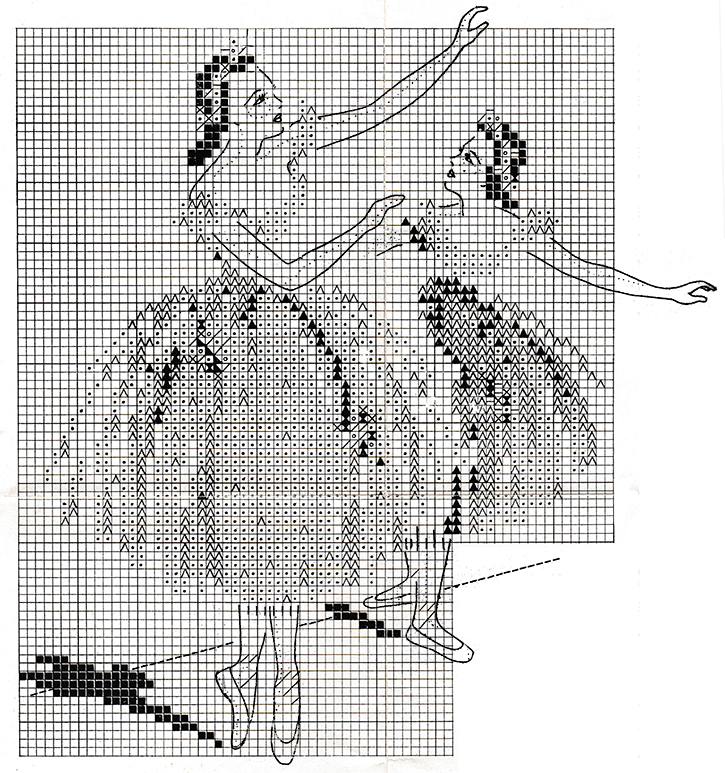
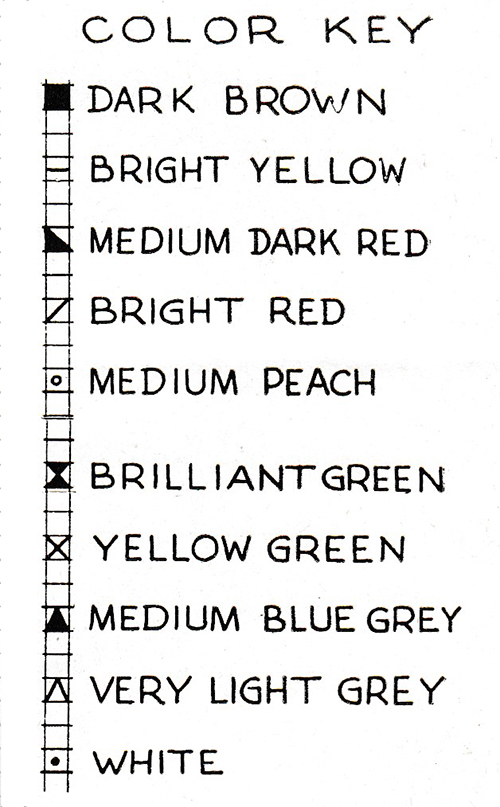
Pattern includes pattern, 11¾" x 12¾" for a picture, combining cross-stitch and embroidery. A chart for placing the colors in the cross-stitch is also included.
MATERIALS REQUIRED: Six-strand cotton should be used for the embroidery, in the following colors and amounts: One skein each of dark brown, bright yellow, medium dark red, bright red, medium peach, peach, light peach, brilliant green, yellow green, medium blue gray, 2 skeins of very light grey and 4 skeins of while. For the background, use a piece of green material 18" x 22". The suitable materials are smooth linen, medium weight linen-like cotton and sateen.
CROSS-STITCH: Follow the chart for placing the colors and use six strands of six-strand cotton in the needle for the work. In working cross-stitch, it is very important to have the crosses of the entire piece crossed in the same direction. Keep the stitches as even as possible and be sure all crosses touch. To do this, put the needle in the same hole as used for the adjoining stitch.
EMBROIDERY: The dotted lines on the pattern merely indicate the separation of colors. Follow the illustration for placing the colors. Work the features first, using one strand of cotton in the needle. Lips are bright red satin-stitch, eyes dark brown outline-stitch with single stitches for the eye lashes. The green shadow around each eye is the background material. Next, work all brown outlines using two strands in the needle. Work the floor line in brown running-stitch. Next fill in the flesh tones and work shoes in Kensington-stitch using four strands in the needle. The first step in working this stitch is to make a row of long and short stitches. Into this row, work a row of long and short stitches like a row of saw teeth. Dovetail the stitches of the subsequent rows into these stitches. It is very necessary to keep an uneven edge after completing each row, so the colors will blend and not end in straight rows. The shoes are bright red with dark red soles. Peach and light peach are used for the flesh tones. Medium peach is used under each eye, to give a rouged effect.
TO BLOCK DESIGN: Cover a large bread or drawing board with clean brown wrapping paper. Mark the size of the material (18" x 22") on the brown paper. If the embroidered piece is badly soiled, it may be washed; if slightly soiled, dip in a cleaning fluid. Place the wet piece (right side up) on the board, pull edges of the material to meet the guide lines drawn on the brown paper. Tack all edges of the material to the board, placing thumb tacks close together. Allow the piece to remain on the board until thoroughly dry.
BEFORE FRAMING: The embroidered piece should be stretched over a piece of stiff cardboard, cut to fit the frame. In stretching the material, be sure to keep the design perfectly straight. Pins driven through the material and into the edge of cardboard will be helpful in keeping the material straight. Paste edge of material down on the wrong side.
SUGGESTION FOR FRAMING: The framed picture illustrated is 14" x 18". The frame is an antique white rococo molding, 2½" wide.


| Pattern Categories Browse the categories to help you find the patterns you're looking for. |
||


