Beagle Chart Pattern

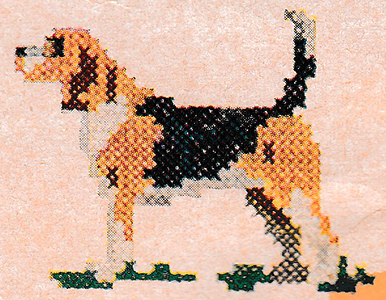
Pattern includes one each of six designs in 7 to the inch crosses for framed pictures, 8" x 10". Collie, 5⅜" x 6⅞"; Cocker Spaniel, 4⅛" x 6⅜"; Beagle, 4¼" x 5½"; Boston Terrier, 4⅛" x 5⅜"; German Shepherd, 5½" x 7⅛" and Boxer, 5⅜" x 6⅛".
MATERIALS REQUIRED: Smooth linen, medium weight linen-like cotton in white or unbleached muslin may be used for the background. For an 8" x 10" picture, use a piece of material about 12" x 14". See framing directions below.
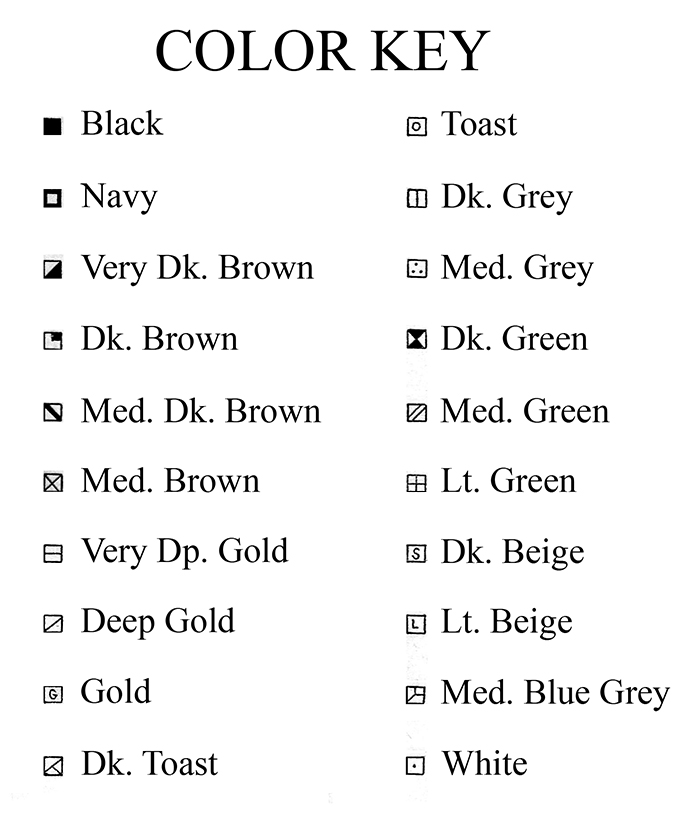
EMBROIDERY COTTONS: Six-strand embroidery cotton should be used for the work. The set of six pictures requires one skein each of very dark brown, dark brown, medium dark brown, medium brown, gold, dark toast, toast, medium grey, dark green, medium green, light green, dark beige, light beige, medium blue grey, and 2 skeins each of navy, very deep gold, deep gold, dark grey and white and 4 skeins of black; a total of 28 skeins. One single dog requires one skein of each color with the following exception: the Cocker Spaniel requires 2 skeins of black and the Boxer, 2 skeins of very deep gold (instead of one skein).
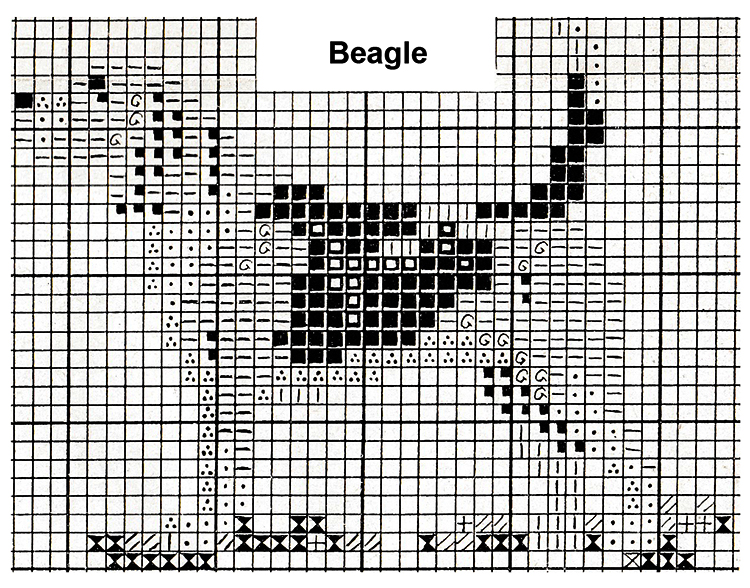
CROSS-STITCH: Follow the chart in the pattern for placing the colors and use six strands of cotton in the needle for all work. It is very important when working cross-stitch to have the crosses of the entire piece crossed in the same direction. Whether one starts at the left and works right, or whether one starts right and works toward the left is optional. Keep the stitches as even as possible. Be sure to make all crosses touch. To do this, put the needle in the same hole as used for the adjoining stitch.
TO BLOCK DESIGN: Cover a large bread or drawing board with clean brown wrapping paper. Mark the size of linen rectangle, 12" x 14" on the brown paper. If the embroidered piece is badly soiled, it may be washed; if slightly soiled, dip in cleaning fluid. Place the wet piece (right side up) on the board, pull edges of linen to meet the guide lines drawn on the brown paper. Tack all edges of linen to the board, placing the thumb tacks close together. Allow the piece to remain on board until thoroughly dry.
BEFORE FRAMING: The embroidered piece should be stretched over a stiff piece of cardboard, cut to fit the frame. In stretching the material, be sure to keep the design perfectly straight. Pins driven through the material and into the edge of cardboard will be helpful in keeping the material straight. Paste edge of material down on the wrong side.
SUGGESTION FOR FRAMING: The frame illustrated is a raw wood frame 1¾" wide, size 8" x 10". The green mat cut to fit the frame has a 6" x 8" opening, thus leaving a 1" margin all around.
NOTE: If desired, the design may be worked in needlepoint.
DESIGN WORKED IN NEEDLEPOINT: The dogs illustrated were worked in cross-stitch, crosses 7 to the inch, on a linen background. If desired, the dogs may be worked in needlepoint on needlepoint canvas, following the charts. The charts are given in squares 10 to the inch which is a popular size for needlepoint canvas.
MATERIALS (CANVAS AND WOOL): Ten mesh to the inch canvas is suitable for one strand of tapestry wool or three strands of crewel wool. Use a piece of canvas 2 inches larger than the finished background size to allow for blocking. When buying wool, match colors to the illustrations. Use white or cream to fill in the background. The approximate amount of wool required may be figured by working one square inch of the background and checking the amount of wool used in relation to the yardage of the skein. One 12½-yard skein of tapestry wool embroiders about 5 square inches of canvas, 10 meshes to the inch, one strand in the needle.
CONTINENTAL NEEDLEPOINT STITCH: Start the design at the upper right hand corner, working each color from, right to left, then fill in the background. To begin work, hold an inch of wool in the back, working over this portion as you do your needlepoint. All other strands of wool may be started and finished by weaving in and out of the wrong side of finished work. Work back and forth, turning work upside down to work back, working from right to left as in details 1 and 2 at right.
BLOCKING: Use a smooth surface board, cover with brown paper and mark the size of canvas on this, squaring the corners. Place needlepoint right side down over the guide, true edges of canvas to the guide lines and fasten with thumb tacks placed ¾” apart along edges. Wet thoroughly with cold water and leave in position until thoroughly dry. Frame.


| Pattern Categories Browse the categories to help you find the patterns you're looking for. |
||


