Red Heart Super Saver
Beginner Fun Knit Projects WR1640
Hat, IPod/Cell Phone Cover, Headband & Purse
Skill Level: Beginner
Hat Size to Fit 14" head; changes for size 16", 18" 20" heads are in parentheses.
Purse measures 7 (8, 9, 10)" high.
Headband measures 4" wide x 13 (15, 17, 19)" long.
IPod/Cell Phone Cover measures 4" wide x 6" high.
RED HEART® "Super Saver®": 1 Skein 972 Pink Camo, 932 Zebra or 672 Spring Green.
RED HEART® "Easy Tweed™": 1 Ball 6665 Coffee.
TLC® "Essentials™": 1 Skein 2981 Jungle.
Knitting Needles: 6mm [US 10].
Yarn needle; optional pom pom maker and embellishments like buttons, beads, elastic, etc.
GAUGES: 14 sts = 4"; 20 rows = 4" in St st; 14 sts = 4"; 26 rows = 4" in Garter st; 16 sts = 4"; 20 rows = 4" in Rib st. CHECK YOUR GAUGE. Use any size needles to obtain the gauges.
NOTE: Three different stitch patterns using the basic stitches in Rib Stitch, Garter Stitch and Stockinette Stitch.
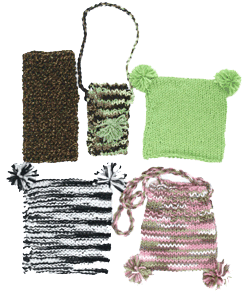
HAT
For all stitch patterns: Cast on 24 (28, 32, 36) sts.
Rib Stitch: Cast on 24 (28, 32, 36) sts.
Row 1 (Right Side): * K2, P2; rep from * across.
Rep Row 1 until 3" from beginning, end wrong side row.
Now work in St st, begin K row, until 11 (13, 15, 17)" from beginning, then work 3" in Rib Stitch Pattern. Bind off in pat.
OR
Garter Stitch: Cast on 24 (28, 32, 36) sts.
Knit each row until 14 (16, 18, 20)" from beginning. Bind off.
OR
Stockinette Stitch: Cast on 24 (28, 32, 36) sts.
Row 1 (Right Side): Knit.
Row 2: Purl.
Rep Rows 1 and 2 until 14 (16, 18, 20)" from beginning, end by working a P row. Bind off.
FINISHING: Fold in half, right sides together. Sew side seams, leaving opening at bottom (where cast-on and bind-off edges meet). Turn right side out and attach pom poms in each corner. Weave in ends.
PURSE
Make same as for hat (any size). Make a Twisted Cord and attach for strap.
HEADBAND
Cast on 16 sts. Work in Rib Stitch, Stockinette Stitch or Garter Stitch until 13 (15, 17, 19)" from beginning. Bind off. Fold in half and sew ends together. Weave in ends.
IPOD/CELL PHONE COVER
Cast on 16 sts. Work in Rib Stitch, Stockinette Stitch or Garter Stitch until 15" from beginning (or desired length). Bind off. Fold up with wrong sides together, leaving 3" for flap. Sew sides, leaving flap free. Weave in ends. Attach Twisted Cord for strap.
TWISTED CORD: Cut 2 strands or 4 strands of yarn (depending on desired thickness of strap), 72" each in length. Bring the cut ends together and tie a knot close to the ends forming a large loop. Secure the knotted end to a stable surface or have a friend hold the end. Slip a pencil into the loop and hold the yarn just below the loop and the pencil. Holding the yarn taut, twirl the pencil, thereby twisting the yarn, until the entire length is tightly twisted and begins to twist back upon itself. Bring the loop end and the knotted end together. Tie with an overhand knot. Trim the ends. Smooth out the kinks so that the cord lies flat and is evenly twisted along its length.
ABBREVIATIONS: K = knit; mm = millimeters; P = purl; rep = repeat; St st = Stockinette stitch (Knit on right side rows; Purl on wrong side rows.); st(s) = stitch (es); * = repeat whatever follows the * as indicated.
Pattern © by Coats & Clark Inc. Reproduced with permission from Coats & Clark Inc. PurpleKittyYarns.com is not endorsed by Coats & Clark Inc. It is not permissible to contract production of projects made from designs published by Coats & Clark to a third party for sale or distribution.
Bewitching Hat LW2324
Skill Level: EASY
Designed by Michele Wilcox.
Hat measures 20" in circumference; 14" tall.
RED HEART® "Super Saver": 1 skein each 312 Black A, 400 Grey Heather B and 356 Amethyst C.
Crochet Hook: 5.5 mm [US I-9]
Yarn Needle
GAUGE: 5 sc = 1 ½"; 5 rounds sc = 1 ½”. CHECK YOUR GAUGE. Use any size hook to obtain the gauge.

HAT
Starting at top of hat with A, ch 2.
Round 1: 6 sc in 2nd ch from hook do not join. Work in a spiral, marking beginning of each round, moving marker up as work progresses - 6 sc.
Round 2: Sc in each sc around.
Round 3: *Sc in next 2 sc, 2 sc in next sc; repeat from * around - 8 sc.
Round 4: *Sc in next 3 sc, 2 sc in next sc; repeat from * around - 10 sc.
Round 5: *Sc in next 4 sc, 2 sc in next sc; repeat from * around - 12 sc.
Round 6: Sc in each sc around.
Round 7: *Sc in next 3 sc, 2 sc in next sc; repeat from * around - 15 sc.
Rounds 8-9: Sc in each sc around.
Round 10: *Sc in next 4 sc, 2 sc in next sc; repeat from * around - 18 sc.
Rounds 11-12: Sc in each sc around.
Round 13: *Sc in next 5 sc, 2 sc in next sc; repeat from * around - 21 sc.
Rounds 14-15: Sc in each sc around.
Round 16: *Sc in next 6 sc, 2 sc in next sc; repeat from * around - 24 sc.
Rounds 17-18: Sc in each sc around.
Round 19: *Sc in next 3 sc, 2 sc in next sc; repeat from * around - 30 sc.
Round 20: Sc in each sc around.
Round 21: *Sc in next 4 sc, 2 sc in next sc; repeat from * around - 36 sc.
Round 22: Sc in each sc around.
Round 23: *Sc in next 5 sc, 2 sc in next sc; repeat from * around - 42 sc.
Round 24: Sc in each sc around.
Round 25: *Sc in next 6 sc, 2 sc in next sc; repeat from * around - 48 sc.
Round 26: Sc in each sc around - 48 sc.
Round 27: *Sc in next 7 sc, 2 sc in next sc; repeat from * around - 54 sc.
Round 28: Sc in each sc around.
Round 29: *Sc in next 8 sc, 2 sc in next sc; repeat from * around - 60 sc.
Round 30: Sc in each sc around.
Round 31: *Sc in next 9 sc, 2 sc in next sc; repeat from * around - 66 sc.
Rounds 32-39: Sc in each sc around. Complete last sc with C, drop A to wrong side.
Rounds 40-43: With C, sc in each sc around. Complete last sc with A. Fasten off C.
Round 44: With A, sc in each sc around.
Round 45: Working this round in flps only, slip st in first sc, ch 3, dc in same st as joining, 2 dc in each sc around, join with slip st in top of beginning ch 3.
Round 46: Ch 3 (counts as dc), dc in each dc around.
Fasten off.
ABBREVIATIONS: A, B, C = color A, B, C; flps = front loops; ch = chain; dc = double crochet; mm = millimeters; sc = single crochet; st(s) = stitch(es); * or ** = repeat whatever follows the * or ** as indicated.
Pattern © by Coats & Clark Inc. Reproduced with permission from Coats & Clark Inc. PurpleKittyYarns.com is not endorsed by Coats & Clark Inc. It is not permissible to contract production of projects made from designs published by Coats & Clark to a third party for sale or distribution.
Block Afghan LW1437
Skill Level: Beginner
Designed by Mary Jane Protus.
Afghan measures approximately 39" wide x 54" long.
RED HEART® "Symphony™", Art N391 (3.5 ounce/310 yard ball): 3 Balls No. 4907 Magenta CA.
RED HEART® "Super Saver™", Art E300 (8 ounce /452 yard solid color or 6 ounce/1348 yard multicolor skein): 18 Ounces No. 0310 Monet CB.
Circular Knitting Needle: 9mm [US 13] - 29".
Yarn needle.
GAUGE: 11 sts = 4"; 16 rows = 4" in pat with CA and CB held together. CHECK YOUR GAUGE. Use any size needle to obtain the gauge.
NOTE: Work with one strand each of CA and CB held together as one throughout.
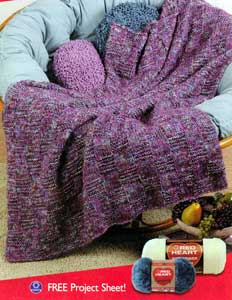
Cast on 107 sts. Do not join but work back in forth in rows as follows:
Row 1 (Right Side): Knit.
Rows 2, 4, 6, 8, 10: K1, P7, * K7, P7; rep from * to last st; K1.
Row 3 AND EVERY RIGHT SIDE ROW: Knit.
Rows 12, 14, 16, 18, 20: K8, * P7, K7; rep from * to last st; K1.
Repeat Rows 1-20 for pat until approximately 54" from beginning, end Row 1 or 11.
On Wrong Side, bind off loosely in K. Fasten off. Weave in ends.
ABBREVIATIONS: CA, CB = Color A, Color B; K = knit; mm = millimeters; P = purl; pat = pattern; rep = repeat; st(s) = stitch (es); * = repeat whatever follows the * as indicated.
Pattern © by Coats & Clark Inc. Reproduced with permission from Coats & Clark Inc. PurpleKittyYarns.com is not endorsed by Coats & Clark Inc. It is not permissible to contract production of projects made from designs published by Coats & Clark to a third party for sale or distribution.
Blushing Grannies WR1713
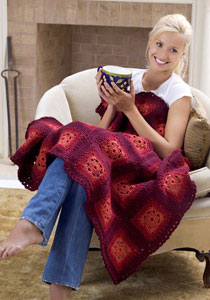
Throw measures 36" x 50".
Skill Level: Easy
RED HEART® "Super Saver®": 1 Skein each 0332 Ranch Red A and 0376 Burgundy B; 2 skeins 0378 Claret C.
Crochet Hook: 5.5mm [US I-9].
Yarn needle.
GAUGE: Rnds 1-3 = 3½" x 3½". Full square = 6¾" x 6¾". CHECK YOUR GAUGE. Use any size hook to obtain the gauge.
SQUARE (Make 35): With A, ch 5; join with slip st in first ch to form a ring.
Rnd 1: Ch 3 (counts as dc), 15 dc in ring; join with slip st in top of ch-3 - 16 sts.
Rnd 2: Ch 1, sc in same ch as joining, * ch 4, skip next dc **, sc in next dc; repeat from * around, end at **; join with slip st in first sc - 8 sc and 8 ch-4 spaces.
Rnd 3: Ch 1, sc in same sc as joining, * 2 sc in next ch-4 space, (2 dc, ch 2, 2 dc) all in next sc, 2 sc in next ch-4 space **, sc in next sc; repeat from * around, end at **; join in first sc - 20 sc, 16 dc and 4 corner ch-2 spaces. Fasten off A.
Rnd 4: Join B in any corner ch-2 space; ch 3 (counts as dc), (dc, ch 2, 2 dc) all in same space as joining, * dc in next 9 sts **, (2 dc, ch 2, 2 dc) all in next ch-2 space; repeat from * around, end at **; join in top of ch-3 - 52 dc and 4 corner ch-2 spaces.
Rnd 5: * Ch 2, skip next dc, (slip st, ch 2, slip st) all in next corner ch-2 space **, [ch 2, skip next dc, slip st in next dc] 6 times; repeat from * around, end at **; [ch 2, skip next dc, slip st in next dc] 5 times, ch 2, skip next dc; join with slip st in joining slip st - 32 slip sts and 32 ch-2 spaces. Fasten off B.
Rnd 6: Join C in any corner ch-2 space; ch 3 (counts as dc), (dc, ch 2, 2 dc) all in same space as joining, * 2 dc in each of next 7 ch-2 spaces **, (2 dc, ch 2, 2 dc) all in next corner ch-2 space; repeat from * around, end at **; join - 72 dc and 4 corner ch-2 spaces.
Rnd 7: Ch 1, sc in same ch as joining, sc in next dc, * (sc, ch 2, sc) all in next corner ch-2 space **, sc in next 18 dc; repeat from * around, end at **; sc in last 16 dc; join - 80 sc and 4 corner ch-2 spaces. Fasten off C, leaving a long end for sewing.
FINISHING: Weave in all loose ends, except long end. Sew squares together through both loops of last round into 5 strips of 7 squares each. Sew strips together.
Edging-Rnd 1: Join C in any sc; ch 1, sc in each sc around all 4 edges of afghan, working 2 sc in each ch-2 space at corners of joined squares and 3 sc in each of 4 corner ch-2 spaces of afghan; join in first sc.
Rnd 2: Ch 1, sc in same sc as joining, ch 3, skip next sc, * sc in next sc, ch 3, skip next sc; repeat from * around; join.
Rnd 3: Ch 1, * 2 sc in next ch-3 space, slip st in next sc; repeat from * around; join. Fasten off. Weave in ends.
ABBREVIATIONS: A, B, C = color A, B, C; ch = chain; dc = double crochet; mm = millimeters; rnd = round; sc = single crochet; st(s) = stitch (es); * or ** = repeat whatever follows the * or ** as indicated; [ ] = work directions in brackets the number of times specified.
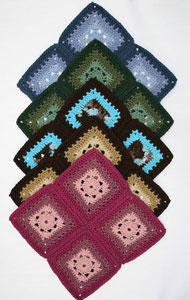
Alternate Color Choices:
Blues - 883 Spa Blue A, 382 Country Blue B, 380 Windsor Blue C
Greens - 631 Lt Sage A, 406 Med Thyme B, 633 Dk Sage C
Turquoise/Brown - 928 Earth & Sky A, 512 Turqua B, 365 Coffee C Browns - 334 Buff A, 336 Warm Brown B, 365 Coffee C
Roses - 372 Rose Pink A, 374 Country Rose B, 905 Magenta C
Pattern © by Coats & Clark Inc. Reproduced with permission from Coats & Clark Inc. PurpleKittyYarns.com is not endorsed by Coats & Clark Inc. It is not permissible to contract production of projects made from designs published by Coats & Clark to a third party for sale or distribution.
Bookworm Buddies
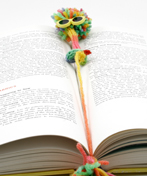
Supplies:
Susan Bates Knitting Knobby, Art 14075 or Small French Knitter, Art 14102
Red Heart® Super Saver®, Art E300 or E301
12" pipe cleaner, any color, cut in half
Susan Bates 2 inch Steel Yarn Needle, Art 14081
"Sunglasses" button
Sewing thread and hand sewing needle
Instructions:
Leave at least a 12" tail at the beginning.
Bend the wire ends of the pipe cleaner under by wrapping the end around the pointed end of the tool included with the Knitting Knobby.
Work until tube measures about 1 inch. Insert pipe cleaner into tube, being careful not to push the pipe cleaner end beyond the end of the tube. Continue working until the pipe cleaner is totally covered by the knit tube. Bind off per instructions leaving a 12" tail.

To make hair: make a small pom pom and use the tail to secure to the knit tube. You can also make loops over your finger and using a needle, secure each loop to the end of the tube.
Make a small tassel or pom pom and secure to one of the tail ends.
Twist the top 2 inches below the hair around the end of a pencil to shape.
Using a needle and thread, attach sunglasses where the "hair" and knit tube meet.
Pattern © by Coats & Clark Inc. Reproduced with permission from Coats & Clark Inc. PurpleKittyYarns.com is not endorsed by Coats & Clark Inc. It is not permissible to contract production of projects made from designs published by Coats & Clark to a third party for sale or distribution.
Brilliant Butterfly Pillow LW2326
Designed by Katherine Eng.
Butterfly is 16" wide x 11" high.
INTERMEDIATE
RED HEART® "Super Saver®": 1 skein each 724 Baby Pink A, 319 Cherry Red B, 528 Medium Purple C, 512 Turqua D.
Crochet Hook: 4 mm [US G-6]
Polyester fiberfill, stitch markers, yarn needle.
GAUGE: Rows 1-7 of bottom wing = 2" long x 1¾" wide. CHECK YOUR GAUGE. Use any size hook to obtain the gauge.
Special Abbreviation
sc2tog: [Insert hook next st, yo, draw yarn through st] twice, yo, draw yarn through 3 loops on hook.
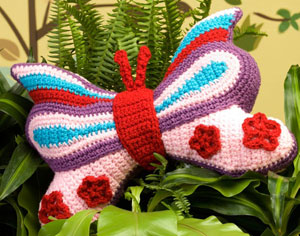
BUTTERFLY
Bottom Wings (make 2)
Left Side
With A, ch 7.
Row 1: Sc in 2nd ch from hook and in next 4 ch, hdc in last ch, turn - 6 sts.
Row 2: Ch 1, sc in each st across, turn - 6 sc.
Row 3: Ch 1, sc in first 5 sc, hdc in last sc, turn - 6 sts.
Row 4: Repeat row 2.
Rows 5-6: Sc in each sc across, turn - 6 sc.
Row 7: Ch 1, 2 sc in first sc, sc in each of next 4 sc, 2 sc in last sc, turn - 8 sc.
Rows 8-10: Ch 1, sc in each sc across, turn.
Row 11: Repeat row 7 - 10 sc.
Rows 12-14: Ch 1, sc in each sc across, turn - 10 sc.
Row 15: Repeat row 7 - 12 sc.
Row 16: Ch 1, sc in each sc across, turn.
Row 17: Repeat row 7 - 14 sc.
Rows 18-20: Ch 1, sc in each sc across, turn.
Row 21: Ch 1, sc2tog in first 2 sts, sc in each sc across to last 2 sts, sc2tog in last 2 sts, turn -12.
Rows 22-24: Ch 1, sc in each sc across, turn.
Row 25: Repeat row 21 - 10 sc.
Row 26: Ch 1, sc in each sc across, turn.
Rows 27-29: Repeat row 21 - 4 sc at end of last row.
Fasten off.
Right Side
Row 1: With right side facing, join A in first ch on opposite side of foundation ch, ch 1, hdc in first ch, sc in each of next 5 ch, turn - 6 sts.
Row 2: Ch 1, sc in each st across, turn - 6 sc.
Row 3: Ch 1, hdc in first sc, sc in next 5 sc, turn - 6 sts.
Row 4: Repeat row 2.
Repeat rows 5-29 of left side. Fasten off.
Border
Round 1: With right side facing, join A in center ch at top of wings, ch 1, sc in center ch, working around right side, 2 sc in end of row 1, sc in end of row 2, 2 sc in end of row 3, sc in end of rows 4-16, 2 sc in end of rows 17 and 18, sc in end of rows 19-28, 2 sc in first sc at end of row 29, sc in each of next 3 sc, sc in end of each row to row 19, 2 sc in end of rows 18 and 17, sc in end of each row to end of right side, sc in center ch at bottom of wings, sc in end of rows 1-16 of left side, 2 sc in end of rows 17-18, sc in end of rows 19-28, sc in first 3 sc of row 29, 2 sc in last sc in row 19, sc in end of each row through row 19, 2 sc in end of rows 18 and 17, sc in end of each row through row 4, 2 sc in end of row 3, sc in end of row 2, 2 sc in end of row 1, slip st in first sc to join. Fasten off. Weave in ends.
Top Wings (make 2)
Right Side
With D, ch 3.
Row 1: Sc in 2nd ch from hook and in next ch, turn - 2 sc.
Rows 2-12: Ch 1, sc in each sc across, turn - 2 sc.
Row 13: Ch 1, sc in first sc, 2 sc in next sc, turn - 3 sc.
Row 14: Ch 1, sc in first 2 sc, 2 sc in next sc, turn - 4 sc.
Rows 15-20: Ch 1, sc in each sc across, turn.
Row 21: Ch 1, [sc2tog in next 2 sts] twice - 2 sc.
Row 22: Ch 1, sc2tog in next 2 sts - 1 sc. Fasten off.
Left Side
Row 1: With right side facing, join D in first ch on opposite side of foundation ch, ch 1, sc in first ch, sc in next ch, turn - 2 sc.
Repeat rows 2-22 of right side on left side. Fasten off.
Border
Round 1: With right side facing, join A in center ch at top of top wings, ch 1, working around right side of top wings, slip st in same ch, *slip st in end of next 10 rows, sc in end of next 11 rows, 3 sc in end sc, sc in end of next 11 rows, slip st in end of next 10 rows*, slip st in center ch on bottom of top wings, working around left side, repeat from * to * once; join.
Round 2: Ch 1, *slip st in next 13 sts, sc in next 9 sc, 3 sc in next sc, sc in next 9 sc, slip st in next 13 sts*, slip st in center slip st on bottom, repeat from * to * once; join.
Round 3: Ch 1, sc in first st, *sc in each of next 22 sts, 2 sc in each of next 3 sc, sc in each of next 22 sts, sc in next slip st (center st at bottom), repeat from * to * once; join. Fasten off.
Round 4: With right side facing, join C in first sc of round 3, ch 1, slip st in same sc, *slip st in next 16 sc, sc in next 6 sc, 2 sc in each of next 6 sc, sc in next 6 sc, slip st in next 16 sc*, slip st in next sc, repeat from * to * once; join.
Round 5: Ch 1, sc in each st around; join.
Round 6: Ch 1, sc in each sc around; join. Fasten off. Weave in ends.
Top Border
Place a marker in center 2 sc at each end of top wings, 7th and 18th sc from each end on top edge.
With right side facing, join B in 7th sc to the left of marked center 2 sts on left hand side of top wings.
Row 1: Ch 1, 2 sc in first sc, sc in next 11 sc, slip st in each sc across to next marked sc, sc in next 11 sc, 2 sc in next sc, turn, leaving remaining sts unworked.
Row 2: Ch 1, 2 sc in first sc, sc in each of next 12 sc, slip st in each slip st across to next sc, sc in next 12 sc, 2 sc in last sc, turn.
Row 3: Ch 1, (hdc, sc) in first sc, sc in next 13 sc, slip st in each slip st across to next sc, sc in next 13 sc, (sc, hdc) in last sc, do not turn. Fasten off.
With right side facing, join D in first hdc of row 3.
Row 4: Ch 1, 2 sc in first hdc, sc in each sc across to next slip st, slip st in next 2 sc, slip st and in each slip st across, slip st in next 2 sc, sc in each sc across to last hdc, 2 sc in last hdc, turn.
Row 5: Ch 1, 2 sc in first sc, sc in each sc across to next slip st, slip st in each slip st across to next sc, sc in each sc across to last sc, 2 sc in last sc, turn.
Row 6: Ch 1, (hdc, sc) in first sc, sc in next 14 sc, slip st in each slip st across, sc in next 14 sc, (hdc, sc) in last sc, do not turn. Fasten off.
With right side facing, join A in first hdc of row 6.
Rows 7-8: With A, repeat rows 4-5. Fasten off. Weave in ends.
Assembly
Place one marker 1½" to the right and 1½" to the left of center on top of top wings. With a strand of any color yarn, weave over and under sts from one marker to the other marker and pull to tighten and cinch in sts to equal about 2". On bottom edge, mark 9th sc to the right of marked end of right top wing and 9th sc to the left of marked end of left top wing.
Mark center between end 2 sc of both bottom wings. Then mark 16th sc to the left of bottom left wing and 16th sc to the right of bottom right wing. Place top wings over center of bottom wings. Pin in place. Pin together where marked sc of top and bottom wings meet. With C, using running st, sew together top and bottom wings through sc of last round of top wing and ends of rows on bottom wing.
Edging
With right side facing, join C in first sc to the left of bottom center ch of bottom wing.
Round 1: Ch 1, work around entire butterfly by working sc in each sc, sc in each slip st, sc in end of each row, 2 sc in each hdc, and 3 sc in 2 corner scs at top of top wings; join. Fasten off.
Center Body
With B, ch 4.
Row 1: Sc in 2nd ch from hook and in each ch across, turn - 3 sc.
Row 2: Ch 1, sc in each sc across, turn.
Row 3: Ch 1, 2 sc in first sc, sc in next sc, 2 sc in last sc, turn - 5 sc.
Rows 4-6: Ch 1, sc in each sc across, turn.
Row 7: Ch 1, 2 sc in first sc, sc in each sc across to last sc, 2 sc in last sc, turn - 7 sc.
Rows 8-16: Ch 1, sc in each sc across, turn.
Row 17: Ch 1, sc2tog in first 2 sts, sc in each sc across to last 2 sc, sc2tog in last 2 sts, turn - 5 sc.
Row 18: Ch 1, sc2tog in first 2 sts, sc in next sc, sc2tog in last 2 sts, turn - 3 sc.
Body Border
Round 1: With right side facing, ch 1, sc in first sc, 2 sc in next sc, sc in last sc, working across side edge of body, sc in end of each row to bottom, working across opposite side of foundation ch, sc in next ch, 2 sc in center ch, sc in last ch, working across side edge of body, sc in each row to top; join. Do not fasten off.
First Antenna
Row 1: Ch 1, sc in same sc, turn
Row 2: Ch 1, sc in next sc, turn.
Rows 3-8: Repeat row 2.
Row 9: Ch 1, (sc, 2 hdc) in next sc. Fasten off.
Second Antenna
With right side facing, join B in next sc on top of body border.
Rows 1-8: Repeat rows 1-8 of first antenna.
Row 9: Ch 1, (2 hdc, sc) in next sc. Fasten off.
Position body at center with first and last rows over edge at bottom and top. Sew onto wings with B through sc of border round using a running st.
Large Flower (make 4)
With B, ch 4; join with a slip st to form ring.
Round 1: [Sc in ring, ch 5] 5 times; join - 5 ch-5 spaces.
Round 2: *5 sc in next ch-5 space, slip st in next sc; repeat from * around, ending with last slip st in joining slip st of last round. Fasten off leaving a 16" tail.
Small Flower (make 4)
With B, ch 4, join; join with a slip st to form ring.
Round 1: [Sc in ring, ch 4] 5 times; join - 5 ch-5 spaces.
Round 2: *4 sc in next ch-4 space, slip st in next sc; repeat from * around, ending with last slip st in joining slip st of last round. Fasten off leaving a 16" tail.
FINISHING
Pin 1 small and 1 large flower on each side of bottom wings. Sew flowers on with tails of yarn. Place 2 butterfly pieces together with right sides facing out. With C, sew front to back using a whipstitch through border round, leaving a space open at the bottom center for stuffing. Fill with polyester fiberfill and sew opening closed. With B, sew top edges of body together and bottom edges of body together using a running st. With B, sew corresponding antennae together. Fasten off. Weave in ends.
ABBREVIATIONS: A, B, C, D = Color A, B, C, D; hdc = half double crochet; mm = millimeters; sc = single crochet; st(s) = stitch(es); [ ] = work directions in brackets the number of times specified, * or ** = repeat whatever follows the * or ** as indicated.
Pattern © by Coats & Clark Inc. Reproduced with permission from Coats & Clark Inc. PurpleKittyYarns.com is not endorsed by Coats & Clark Inc. It is not permissible to contract production of projects made from designs published by Coats & Clark to a third party for sale or distribution.
Camouflage Patch Throw LW1737
Skill Level: EASY
Designed by Marianne Forrestal
Throw measures 46" x 51".
RED HEART® "Super Saver®": 2 Skeins each 991 Desert Camouflage A, 971 Dress Blues B and 971 Camouflage C; 1 skein each 330 Linen D and 380 Windsor Blue E.
Crochet Hook: 5.5 mm (US I-9).
Yarn needle.
GAUGE: 14 sc = 5"; 13 rows = 4". CHECK YOUR GAUGE. Use any size hook to obtain the gauge.
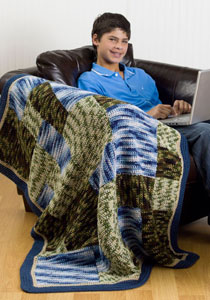
THROW
Square 1
(Make 12 squares total; 4 each in A, B and C. Each measures 5" x 5".)
Ch 15.
Row 1: Sc in 2nd ch from hook and each ch across, turn.
Row 2: Ch 1, sc in each sc across, turn - 14 sc.
Repeat Row 2 for 14 times more or until piece measures 5". Fasten off.
Square 2
(Make 12 squares total, 4 each in A, B and C. Each measures 5" x 10".)
Ch 15.
Row 1: Sc in 2nd ch from hook and each ch across, turn.
Row 2: Sc in each sc across, turn - 14 sc. Repeat Row 2 for 30 times more or until piece measures 10". Fasten off.
Square 3
(Make 9 squares total, 3 each in A, B and C. Each measures 10" x 10".)
Ch 29.
Row 1: Sc in 2nd ch from hook and each ch across, turn.
Row 2: Sc in each sc across, turn - 28 sc. Repeat Row 2 for 30 times more or until piece measures 10" high. Fasten off.
Assembly
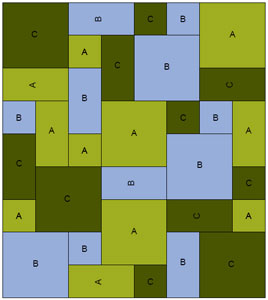
Following assembly diagram, arrange Squares and sew together with matching color yarn.
Border
Round 1: With wrong side facing, join D with slip st in upper right corner, sc, ch 1, 3 sc in same st, work 110 sc evenly across top edge, 3 sc in upper left corner sc, 126 sc evenly along left edge, 3 sc in bottom left corner st, 110 sc evenly across bottom edge, 3 sc in bottom right corner st, 126 sc along right edge, join with slip st to first sc, turn.
Round 2: Ch 1, *sc in each sc across to center sc of 3 sc corner, 3 sc in this sc; repeat from * 3 times more, sc in next sc, join with slip st to first sc. Fasten off D.
Round 3: With right side facing and working in back loops only, join E with slip st in center sc of any corner 3 sc, ch 2 (counts as first hdc, now and throughout), 2 hdc in same st, *hdc in each sc across to center sc of next 3 sc corner, 3 hdc in this sc; repeat from * twice more, hdc in each sc across to beginning of round, join with slip st to top of beginning ch 2.
Round 4: Working in back loops only, ch 2, 3 hdc in next st, *hdc in each st across to center st of next 3 hdc corner, 3 hdc in this st; repeat from * twice more, hdc in each st across to beginning of round, join with slip st to top of beginning ch.
Round 5: Working in back loops only, ch 2, hdc in next st, 3 hdc in next st, *hdc in each st across to center st of next corner, 3 hdc in this st; repeat from * twice more, hdc in each st across to beginning of round, join with slip st to top of beginning ch 2.
Round 6: Working in back loops only, ch 2, hdc in next 2 sts, 3 hdc in next st, *hdc in each st across to center st of next corner, 3 hdc in corner st; repeat from * twice more, hdc in each st across to beginning of round, join with slip st to top of beginning ch 2. Fasten off E.
FINISHING
Weave in ends.
ABBREVIATIONS: A = Color A; B = Color B; C = Color C; ch = chain; hdc = half double crochet; D = Color D; E = Color E; mm = millimeters; sc = single crochet; st(s) = stitch(es); * = repeat whatever follows the * as indicated.
Pattern © by Coats & Clark Inc. Reproduced with permission from Coats & Clark Inc. PurpleKittyYarns.com is not endorsed by Coats & Clark Inc. It is not permissible to contract production of projects made from designs published by Coats & Clark to a third party for sale or distribution.
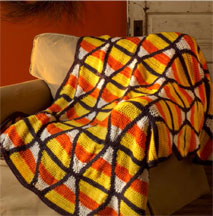
Candy Corn Throw LW3761
Skill Level: EASY
Designed by Marianne Forrestal
What you will need:
Red Heart® Super Saver®: 2 skeins each 324 Bright Yellow A, 254 Pumpkin B and 3950 Charcoal D, 1 skein 316 Soft White C
Susan Bates® Crochet Hook: 6.5 mm (US K-W2)
Yarn needle
GAUGE: Candy Corn = 6" [15 cm] in at widest point; 6" [15 cm] tall. CHECK YOUR GAUGE. Use any size hook to obtain the gauge.
Candy corn does not have to be made from sugar you can crochet your own non-caloric version and enjoy it as a colorful graphic throw! Sweet!
Throw measures 47" x 57"
SPECIAL ABBREVIATIONS
dc2tog: [Yarn over, insert hook in next stitch, yarn over and pull up loop, yarn over, draw through 2 loops] 2 times, yarn over, draw through all loops on hook
THROW
Candy Corn (Make 72)
With A, ch 21.
Row 1 (Right Side): Dc in 4th ch from hook and each ch across - 19 sts.
Row 2: Ch 2, turn, dc in next dc (ch 2 and dc counts as beginning dc2tog here and throughout), dc in next 15 sts, dc2tog - 17 sts.
Row 3: Ch 2, turn, dc in next dc, dc in next 13 sts, dc2tog - 15 sts. Fasten off A.
Row 4: Turn, join B with slip st in first st, ch 2, dc in next st, dc in next 11 sts, dc2tog - 13 sts.
Row 5: Ch 2, turn, dc in next st, dc in next 9 sts, dc2tog - 11 sts.
Row 6: Ch 2, turn, dc in next st, dc in next 7 sts, dc2tog - 9 sts. Fasten off B.
Row 7: Turn, join C with slip st in first st, ch 2, dc in next st, dc in next 5 sts, dc2tog - 7 sts.
Row 8: Ch 2, turn, dc in next st, dc in next 3 sts, dc2tog - 5 sts.
Row 9: Ch 2, turn, dc in next st, dc in next st, dc2tog - 3 sts. Fasten off C.
Edging
With right side facing and working opposite edge of foundation ch, join D with slip st in first ch in right hand corner, ch 1, 3 sc in same ch, sc in next 17 chs, 3 sc in next ch, turn to work alongside edge, work 2 sc in edge of each of next 8 rows, sc in edge of Row 9, turn to work along last row, 3 sc in first st of Row 9, sc in second st of Row 9, 3 sc in last st of Row 9, turn to work along opposite side edge, sc in edge of Row 9, 2 sc in edge of each of next 8 rows, slip st in first sc to join - 17 sc along each side, 1 st in short end and 3 sc in each of 4 corners. Fasten off D.
FINISHING
Assembly
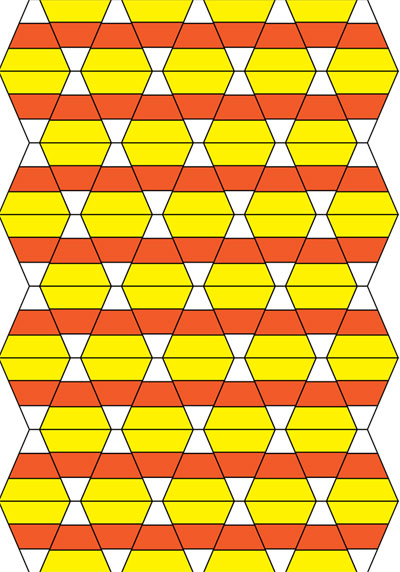
With short end pointing down on first Candy Corn and opposite wide end pointing down on next Candy Corn, arrange 9 Candy Corns into a strip of 9, alternating direction and ending with short end of last Candy Corn pointing down. With D, whipstitch Candy Corn pieces together. Repeat to make 8 strips. Alternating direction of strips, sew 8 strips together.
Border
Round 1: With right side facing, join D with slip st in center sc of corner 3-sc in upper right corner, ch 3, 2 dc in same st, *dc in next 4 sc, [dc in joining of 2 Candy Corns, dc in next 21 sc, dc in joining of 2 Candy Corns, dc in next 5 sc] 3 times, dc in joining of 2 Candy Corns, dc in next 21 sc, dc in joining of 2 Candy Corns, dc in next 4 sc, 3 dc in center sc of next corner, [dc in next 20 sc, dc in joining of 2 Candy Corns, dc in next 20 sc, dc2tog in last sc and first sc on next Candy Corn] 3 times, dc in next 20 sc, dc in joining of 2 Candy Corns, dc in next 20 sc,** 3 dc in next center sc, repeat from * to **, join with slip st to top of beginning ch 3.
Fasten off.
Weave in ends.
Abbreviations
A, B, C = Color A, B, C; ch = chain; cm = centimeters; dc = double crochet; mm = millimeters; sc = single crochet; st(s) = stitch(es); tog = together; yo = yarn over; [ ] = work directions in brackets the number of times specified; * or ** = repeat whatever follows the * or ** as indicated.
Pattern © by Coats & Clark Inc. Reproduced with permission from Coats & Clark Inc. PurpleKittyYarns.com is not endorsed by Coats & Clark Inc. It is not permissible to contract production of projects made from designs published by Coats & Clark to a third party for sale or distribution.
Cat Teaser
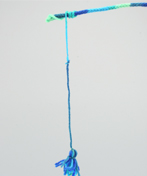
Have a favorite feline that loves play time? This simple to make Cat Teaser is a fun project for all ages, and your kitty will will love it!
Supplies:
Susan Bates Knitting Knobby, Art 14075 or Small French Knitter, Art 14102
Red Heart® Super Saver®, Art E300 or E301
12" pipe cleaner, any color
Susan Bates 2 inch Steel Yarn Needle, Art 14081
Instructions:
Leave at least a 24" tail at the beginning.
Bend the wire ends of the pipe cleaner under by wrapping the end around the pointed end of the tool included with the Knitting Knobby.

Insert pipe cleaner into tube, being careful not to push the pipe cleaner end beyond the end of the tube.
Continue working until the pipe cleaner is totally covered by the knit tube.
Bind off per instructions leaving a 12" tail.
Make a knot about 1/4 inch from the end of the tube.
Using a yarn needle, pull the knot inside the yarn tube and back out after an inch.
Trim the yarn where it emerges, close to the tube, being careful not to cut the tube.
Make a small tassel or pom pom and attach to the long tail end.
Twist the top 2 inches around the end of a pencil to shape to make a handle.
Pattern © by Coats & Clark Inc. Reproduced with permission from Coats & Clark Inc. PurpleKittyYarns.com is not endorsed by Coats & Clark Inc. It is not permissible to contract production of projects made from designs published by Coats & Clark to a third party for sale or distribution.
Cheerleader Dog WR1784
Designed by Darla Sims
Skill Level: EASY
Directions are for size Small. Changes for sizes Medium and Large are in parentheses.
RED HEART® "Super Saver": 385 Royal A and 321 Gold B.
Crochet Hook: 5.5mm [US I-9].
Yarn needle.
One button, ⅞" diameter.
Two 1" D-rings.
2 ½" square of cardboard.
GAUGE: 12 sts = 4". CHECK YOUR GAUGE. Use any size hook to obtain the specified gauge.
Finished Chest: 16-19 (20-25, 26-32)".
Finished Length: 10 (14, 17)".
NOTE: Skirt is worked from side to side. To change color, pull new color through last loop of last st. Carry colors not in use loosely along edges.
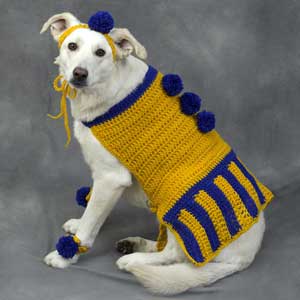
SKIRT
With A, ch 12 (16, 18).
Row 1 (RS): Dc in 4th ch from hook, dc in next 3 ch, hdc in next 5 (7, 8) ch, turn - 10 (14, 16) sts.
Row 2: Ch 1 (does not count as st), hdc in first st and in next 4 (6, 7) sts, dc in next 5 (7, 8) sts, change to B, turn.
Row 3: Ch 3 (counts as dc), dc in next 4 (6, 7) sts, hdc in next 5 (7, 8) sts, turn.
Row 4: Ch 1, hdc in first st and in next 4 (6, 7) sts, dc in next 5 (7, 8) sts, change to A, turn.
Row 5: Ch 3, dc in next 4 (6, 7) sts, hdc in next 5 (7, 8) sts, turn.
Rows 6-22 (38, 54): Repeat Rows 2-5, end with Row 2. Fasten off.
WAISTBAND
Row 1: With right side facing and working along ends of hdc rows, join B with sc in first row, sc in same row, work 2 sc in next row, sc in each row to last 2 rows, 2 sc in each of last 2 rows, turn - 26 (42, 58) sts.
Row 2: Ch 2, dc in next st (counts as dc2tog), dc in each st to last 2 sts, dc2tog - 24 (40, 56) sts.
Fasten off.
TOP
Row 1: Join A with slip st in first st, dc2tog, dc in each st to last 2 sts, dc2tog, turn - 22 (38, 54) sts.
Row 2: Ch 3, dc in each st to end, turn.
Repeat Rows 1-2 for 0 (1, 3) more times - 22 (36, 48) sts.
Repeat Row 2 until piece measures 10 (14, 17)".
Fasten off.
NECKBAND
Join B with slip st in last st, ch 8 (9, 9) for extension.
Fasten off.
With B, ch 9 (10, 10).
Row 1: Sc in 2nd ch from hook, sc in next 7 (8, 8) chs, sc in next 22 (36, 48) sts, sc in 8 (9, 9) chs, turn - 38 (54, 66) sts.
Row 2: Ch 1, sc in each st across, ch 2 for button loop, turn.
Row 3: Ch 1, skipping ch-2 loop, sc in each sc across, turn.
Repeat Row 3 for 0 (1, 1) time. Fasten off.
EDGING
With right side facing, join A with slip st in first st of Neckband close to Body, sc evenly space around Neckband, working 3 sc in each corner, slip st in last st close to Body. Fasten off.
STRAP
Row 1: With right side facing, join A with sc 6 (7, 8 ½)" from Bottom edge of Skirt, sc in next 2 sts, turn. Work in sc until Strap measures 11 (12, 12)" or desired length. Fasten off.
FINISHING
Pompoms (Make 6)
Wrap B around cardboard 75 times. Slip from cardboard, using 12" length to tie tightly in center. Cut loops and trim ends to make 1 ½" pompom.
Sew button to neckband opposite button loop. Sew 3 pompoms to center back. Sew both D rings together opposite strap on left side edge. Weave in ends.
Ankle Straps
With A, ch 4.
Row 1: Sc in 2nd ch from hook and in next 2 chs - 3 sc.
Rows 2-6 (7, 8): Ch 1, sc in each st, turn.
At end of last row, turn, do not ch, slip st in first 2 sts, ch 18 for Tie.
Fasten off.
Second Tie
Join A in 2nd sc at other end of strap, ch 18. Fasten off.
Sew one pompom to center front of each Strap. Weave in ends.
Headband
With A, ch 4.
Row 1: Sc in 2nd ch from hook and in next 2 chs, turn - 3 sc.
Rows 2-18 (20, 22): Ch 1, sc in each st across, turn. Do not cut yarn on last row, turn, slip st in first 2 sts, ch 35 (40, 45) for Tie. Fasten off.
Second Tie
Join yarn in 2nd sc at opposite end of Headband, ch 35, (40, 45) for Tie. Fasten off.
Sew pompom to center of Headband. Weave in ends.
ABBREVIATIONS: ch = chain; dc = double crochet; dc2tog = double crochet 2 sts together; hdc = half double crochet; mm = millimeters; sc = single crochet; st(s) = stitch(es); yo = yarn over needle; [ ] = work directions in brackets the number of times specified; * or ** = repeat whatever follows the * or ** as indicated.
Pattern © by Coats & Clark Inc. Reproduced with permission from Coats & Clark Inc. PurpleKittyYarns.com is not endorsed by Coats & Clark Inc. It is not permissible to contract production of projects made from designs published by Coats & Clark to a third party for sale or distribution.
| Pattern Categories Browse the categories to help you find the patterns you're looking for. |
||


