 |
Red Heart Super Saver
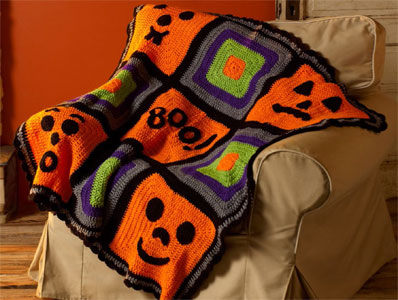
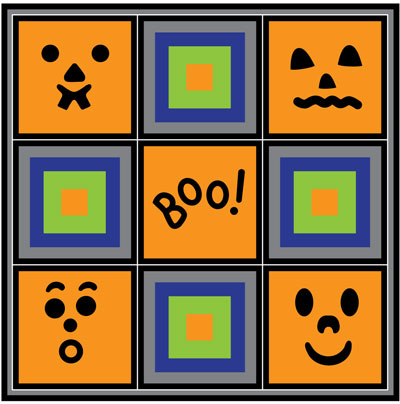
Pumpkin Face Throw LW3747
Skill Level: EASY
Designed by Michele Wilcox
What you will need:
Red Heart® Super Saver®: 2 skeins each 312 Black A and 254 Pumpkin B; 1 skein each of 400 Grey Heather C, 356 Amethyst D and 672 Spring Green E
Susan Bates® Crochet hook: 5.5mm [US I-9]
Yarn needle; scissors
Gauge: 16 sts = 5" (12.7 cm); 6 rows = 4" (10 cm). CHECK YOUR GAUGE. Use any size hook to obtain your gauge.
If you're decorating for Halloween, make sure you have this crochet throw to complete your decor! The funny pumpkin faces are combined with the "BOO!" center square to give everyone happy memories of this fun season.
Throw measures 49" x 49"
THROW
Pumpkin Square (make 5)
With B, ch 4, join with slip st in first ch.
Round 1: Ch 3 (counts as first dc throughout), 11 dc in ring, join with slip st in top of beginning ch-3—12 dc.
Round 2: Ch 3, *[(2 dc, 1 tr) in next dc, (1 tr, 2 dc) in next dc] (corner), dc in next dc, repeat from * twice, (2 dc, 1 tr) in next dc, (1 tr, 2 dc) in next dc, join with slip st in top of beginning ch-3.
Round 3: Ch 3, dc in next 2 dc, *corner in next 2 tr, dc in next 5 dc, repeat from * twice, corner, dc in next 2 dc, join with slip st in top of beginning ch-3.
Round 4: Ch 3, dc in next 4 dc, *corner in next 2 tr, dc in next 9 dc, repeat from * twice, corner in next 2 tr, dc in next 4 dc, join with slip st in top of beginning ch-3.
Round 5: Ch 3, dc in each dc across to corner tr, *corner in next 2 tr, dc in each dc across to corner tr, repeat from * twice, corner in next 2 tr, dc in each remaining dc across, join with slip st in top of beginning ch-3.
Rounds 6-9: Repeat Round 5. Fasten off at end of last round.
Round 10: Join A in same st as last round join, repeat round 5. Fasten off.
Stripes Squares (make 4)
Rounds 1 & 2: With B, repeat rounds 1 and 2 of Pumpkin Square. Fasten off at end of last round.
Rounds 3-5: Join E in same st as last round join, repeat rounds 3-5 of Pumpkin Square. Fasten off at end of last round.
Rounds 6 & 7: Join D in same st as last round join, repeat round 5 of Pumpkin Square. Fasten off at end of last round.
Rounds 8 & 9: Join C in same st as last round join, repeat round 5 of Pumpkin Square. Fasten off at end of last round.
Round 10: Repeat round 10 of Pumpkin Square.
Pumpkin face #1
Eye (make 2)
Round 1: With A, ch 2, 6 sc in 2nd ch from hook—6 sc.
Round 2: 2 sc in each sc around—12 sc.
Round 3: [Sc in next sc, 2 sc in next sc] around—18 sc. Leaving long end, fasten off.
Nose
With A, ch 2.
Rounds 1 & 2: Repeat rounds 1 & 2 of Eyes— 12 sc. Leaving long end, fasten off.
Mouth
With A, ch 12, join with slip st in first ch.
Round 1: Ch 2 (counts as first hdc), 23 hdc in ring, join with slip st in top of beginning ch-2. Leaving long end, fasten off.
Eyebrow (make 2)
With A, ch 7.
Row 1: Sc in 2nd ch from hook and in next ch, 2 sc in each of next 2 chs, sc in last 2 chs. Leaving long end, fasten off.
Pumpkin Face #2
Eye (make 2)
With A, ch 2.
Round 1: 6 sc in 2nd ch from hook.
Round 2: [3 sc in next sc, sc in next sc] 3 times—12 sc.
Round 3: Sc in next sc, [3 sc in next sc, sc next 3 sc] twice, 3 sc in next sc, sc in next 2 sc, join with slip st in first sc. Leaving long end, fasten off.
Nose (make 1)
Rounds 1-3: Repeat Rounds 1-3 of Pumpkin Face #2 Eye.
Mouth
With A, ch 5.
Row 1: Sc in 2nd ch from hook and each remaining ch across, ch 1, turn—4 sc.
Row 2: Sc in each sc across, ch 1, turn.
Row 3: Sc in each sc across, ch 5, turn.
Row 4: Sc in 2nd ch from hook and in next 3 chs, ch 1, turn—4 sc.
Row 5: Sc in each sc across, ch 1, turn.
Row 6: Sc in each sc across, ch 1, do not turn, work 6 sc across top of teeth, ch 4, turn.
Row 7: Slip st in 2nd ch from hook and in next 2 chs, sc in next 6 sc, ch 4, turn.
Row 8: Slip st in 2nd ch from hook and in next 2 chs, slip st in next sc. Leaving long end, fasten off.
Pumpkin Face #3
Eye (make 2)
With A, ch 6.
Row 1: Sc in 2nd ch from hook, hdc in next st, dc in next 2 sts, tr in last st, ch 1, turn.
Row 2: Sc in next 5 sts, 3 sc in tip, working on opposite side of starting ch, sc in next 5 chs, ch 1,turn.
Row 3: Sc in next 6 sc, 3 sc in next sc, sc in remaining 6 sc. Leaving long end, fasten off.
Nose
Rows 1 & 2: Repeat Rows 1 & 2 of Pumpkin Face #3 Eye. Leaving long end, fasten off at end of last row.
Mouth
With A, ch 25.
Row 1: Dc in 4th ch from hook, dc in next 2 chs, [3 dc in next ch, dc in next ch, dc3tog, dc in next ch] 3 times, dc in last ch. Leaving long end, fasten off.
Pumpkin Face #4
Eye (make 2)
With A, ch 6.
Round 1: Sc in 2nd ch from hook and in next 3 chs, 3 sc in last ch, working on opposite side of ch, work sc in next 3 chs, 2 sc in last ch—12 sc.
Round 2: 2 sc in next sc, sc in next 3 sc, 2 sc in next 3 sc, sc in next 3 sc, 2 sc in next 2 sc—18 sc.
Round 3: [Sc in next 2 sc, 2 sc in next sc] around—24 sc. Leaving long end, fasten off.
Nose
With A, ch 4, join with slip st in first ch.
Row 1: Ch 3, 9 dc in ring, ch 1, turn—10 dc.
Row 2: 2 sc in next dc, sc in next 8 dc, 2 sc in last dc. Leaving long end, fasten off.
Mouth
With A, ch 21.
Row 1: Sc in 2nd ch from hook and in next 2 chs, hdc in next 3 chs, dc in next 8 chs, hdc in next 3 chs, sc in remaining 3 chs. Leaving long end, fasten off.
BOO! (letters for center square)
Letter B
With A, ch 13.
Row 1: Sc in 2nd ch from hook and in each remaining ch across, ch 9, turn.
Row 2: Skip next 5 sc, sc in next sc, ch 9, skip next 5 sc, sc in last sc, ch 1, turn.
Row 3: Sc in next sc, sc in next 9 chs, slip st in next sc, sc in next 9 chs, slip st in top of last st. Leaving long end, fasten off.
Letter O (make 2)
With A, ch 25, join with slip st in first ch.
Round 1: Ch 1, sc in same ch as joining and each remaining ch around, join with slip st in first sc. Leaving long end, fasten off.
! (Top)
With A, ch 14.
Row 1: Hdc in 3rd ch from hook and in next 7 chs, sc in last 4 chs. Leaving long end, fasten off.
! (Bottom)
With A, ch 2.
Round 1: 6 sc in 2nd ch from hook, join with slip st in first sc. Leaving long end, fasten off.
ASSEMBLY
Using long ends, sew Faces to Squares as shown in diagram.
Sew Squares together through back loops only of Round 10 of Squares.
Border
Round 1: Join C with slip st in any dc on outside edge of throw, ch 3, dc in each st around, working 5 dc between 2 outside corner tr, join with slip st in first st. Fasten off and weave in ends.
Round 2: Join A with sc in any dc on Round 1, *skip next dc, 5 dc in next dc, skip next dc, sc in next dc, repeat from * around, join with slip st in first sc. Fasten off and weave in ends.
ABBREVIATIONS
ch = chain; cm = centimeters; dc = double crochet; hdc = half double crochet; mm = millimeters; sc = single crochet; st(s) = stitch(es); tr = treble crochet; [ ] = work directions in brackets the number of times specified; * or ** = repeat whatever follows the * or ** as indicated.
Pattern © by Coats & Clark Inc. Reproduced with permission from Coats & Clark Inc. PurpleKittyYarns.com is not endorsed by Coats & Clark Inc. It is not permissible to contract production of projects made from designs published by Coats & Clark to a third party for sale or distribution.
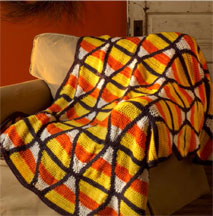
Candy Corn Throw LW3761
Skill Level: EASY
Designed by Marianne Forrestal
What you will need:
Red Heart® Super Saver®: 2 skeins each 324 Bright Yellow A, 254 Pumpkin B and 3950 Charcoal D, 1 skein 316 Soft White C
Susan Bates® Crochet Hook: 6.5 mm (US K-W2)
Yarn needle
GAUGE: Candy Corn = 6" [15 cm] in at widest point; 6" [15 cm] tall. CHECK YOUR GAUGE. Use any size hook to obtain the gauge.
Candy corn does not have to be made from sugar you can crochet your own non-caloric version and enjoy it as a colorful graphic throw! Sweet!
Throw measures 47" x 57"
SPECIAL ABBREVIATIONS
dc2tog: [Yarn over, insert hook in next stitch, yarn over and pull up loop, yarn over, draw through 2 loops] 2 times, yarn over, draw through all loops on hook
THROW
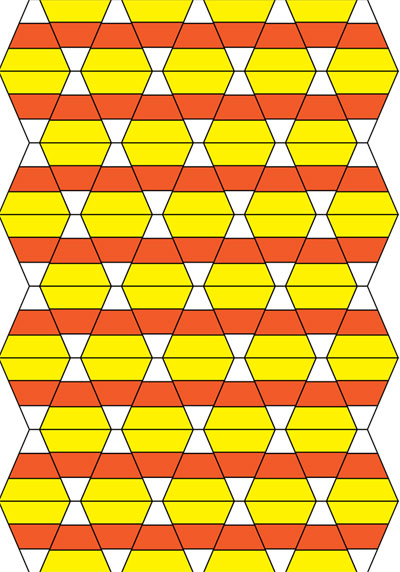
Candy Corn (Make 72)
With A, ch 21.
Row 1 (Right Side): Dc in 4th ch from hook and each ch across - 19 sts.
Row 2: Ch 2, turn, dc in next dc (ch 2 and dc counts as beginning dc2tog here and throughout), dc in next 15 sts, dc2tog - 17 sts.
Row 3: Ch 2, turn, dc in next dc, dc in next 13 sts, dc2tog - 15 sts. Fasten off A.
Row 4: Turn, join B with slip st in first st, ch 2, dc in next st, dc in next 11 sts, dc2tog - 13 sts.
Row 5: Ch 2, turn, dc in next st, dc in next 9 sts, dc2tog - 11 sts.
Row 6: Ch 2, turn, dc in next st, dc in next 7 sts, dc2tog - 9 sts. Fasten off B.
Row 7: Turn, join C with slip st in first st, ch 2, dc in next st, dc in next 5 sts, dc2tog - 7 sts.
Row 8: Ch 2, turn, dc in next st, dc in next 3 sts, dc2tog - 5 sts.
Row 9: Ch 2, turn, dc in next st, dc in next st, dc2tog - 3 sts. Fasten off C.
Edging
With right side facing and working opposite edge of foundation ch, join D with slip st in first ch in right hand corner, ch 1, 3 sc in same ch, sc in next 17 chs, 3 sc in next ch, turn to work alongside edge, work 2 sc in edge of each of next 8 rows, sc in edge of Row 9, turn to work along last row, 3 sc in first st of Row 9, sc in second st of Row 9, 3 sc in last st of Row 9, turn to work along opposite side edge, sc in edge of Row 9, 2 sc in edge of each of next 8 rows, slip st in first sc to join - 17 sc along each side, 1 st in short end and 3 sc in each of 4 corners. Fasten off D.
FINISHING
Assembly
With short end pointing down on first Candy Corn and opposite wide end pointing down on next Candy Corn, arrange 9 Candy Corns into a strip of 9, alternating direction and ending with short end of last Candy Corn pointing down. With D, whipstitch Candy Corn pieces together. Repeat to make 8 strips. Alternating direction of strips, sew 8 strips together.
Border
Round 1: With right side facing, join D with slip st in center sc of corner 3-sc in upper right corner, ch 3, 2 dc in same st, *dc in next 4 sc, [dc in joining of 2 Candy Corns, dc in next 21 sc, dc in joining of 2 Candy Corns, dc in next 5 sc] 3 times, dc in joining of 2 Candy Corns, dc in next 21 sc, dc in joining of 2 Candy Corns, dc in next 4 sc, 3 dc in center sc of next corner, [dc in next 20 sc, dc in joining of 2 Candy Corns, dc in next 20 sc, dc2tog in last sc and first sc on next Candy Corn] 3 times, dc in next 20 sc, dc in joining of 2 Candy Corns, dc in next 20 sc,** 3 dc in next center sc, repeat from * to **, join with slip st to top of beginning ch 3.
Fasten off.
Weave in ends.
Abbreviations
A, B, C = Color A, B, C; ch = chain; cm = centimeters; dc = double crochet; mm = millimeters; sc = single crochet; st(s) = stitch(es); tog = together; yo = yarn over; [ ] = work directions in brackets the number of times specified; * or ** = repeat whatever follows the * or ** as indicated.
Pattern © by Coats & Clark Inc. Reproduced with permission from Coats & Clark Inc. PurpleKittyYarns.com is not endorsed by Coats & Clark Inc. It is not permissible to contract production of projects made from designs published by Coats & Clark to a third party for sale or distribution.
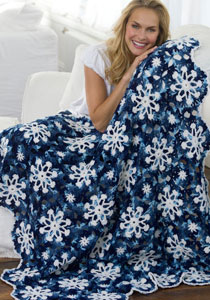
Dusty Snowflake Throw Pattern
Skill Level: INTERMEDIATE
Designed by Tammy Hildebrand.
Throw measures 45" x 52½".
RED HEART® "Super Saver®": 2 skeins 311 White A and 5 skeins 984 Shaded Dusk B.
Crochet Hook: 5.5mm [US I-9].
Yarn needle.
GAUGE: Motif = 7½ diameter. CHECK YOUR GAUGE. Use any size hook to obtain the gauge.
NOTE: After the first motif, all others are joined while working Rnd 7. Motifs are joined in 6 rows of 7 motifs.
MOTIF
With A ch 5; join with a slip st to form a ring.
Rnd 1: Ch 3, 15 dc in ring; join with a slip st to top of ch-3.
Rnd 2: Ch 1, sc in same st as joining, ch 7, skip next dc, [sc in next dc, ch 7, skip next dc] 7 times; join in first sc. Fasten off.
Rnd 3: Working in skipped dc of Rnd 1, behind ch-7 spaces, join B in any skipped dc; ch 3, 2 dc in same dc, [3 dc in next skipped dc] 7 times; join.
Rnd 4: Ch 3, * (dc, ch 1, dc) in next dc **, dc in next 2 dc; repeat from * to last dc, end at **; dc in last dc; join. Fasten off.
Rnd 5: Working in ch-1 spaces of Rnd 4 and ch-7 spaces of Rnd 2 at the same time, join A in any space; ch 3, 4 dc in same space, * ch 1, skip next 2 dc, slip st in space between sts, ch 1, skip next 2 dc **, 5 dc in next space; repeat from * around, end at **; join. Fasten off.
Rnd 6: Join B with a sc in back loop of center dc of any 5-dc group of Rnd 5, * working over slip st of previous rnd (tr, ch 1, tr, ch 2, tr, ch 1, tr) all in next space **, sc in back loop of center dc of next 5-dc group; repeat from * around, end at **; join in first sc.
FIRST MOTIF ONLY-Rnd 7: Ch 3, (dc, ch 1, 2 dc) in same st as joining, * sc in next ch-1 space, (2 dc, ch 3, 2 dc) all in next ch-2 space, sc in next ch-1 space **, (2 dc, ch 1, 2 dc) in next sc; repeat from * around, end at **; join. Fasten off.
Joining Rnd 7: Ch 3, (dc, ch 1, 2 dc) in same st as joining, sc in next ch-1 space, * 2 dc in next ch-3 space, ch 1, slip st in corresponding ch-3 space of previous motif, ch 1, 2 dc in same space on current motif, sc in next ch-1 space, 2 dc in next sc, slip st in corresponding ch-1 space on previous motif, 2 dc in same space on current motif, sc in next ch-1 space **; repeat from * to ** for each corresponding join, ***(2 dc, ch 1, 2 dc) in next sc, sc in next ch-1 space, (2 dc, ch 3, 2 dc) in next ch-3 space, sc in next ch-1 space; repeat from *** around; join. Fasten off.
NOTE: First 7 large motifs will have 3 joins. Beginning large motif of the next 5 rows will have 7 joins. Remaining large motifs will have 9 joins. After first row of 7 large motifs join 6 filler motifs between rows.
FILLER MOTIF
With A ch 4; join with a slip st to form a ring.
Rnd 1: Ch 4, [dc in ring, ch 1] 7 times; join in 3rd ch of ch-4. Fasten off.
Rnd 2: Join B with a sc in any dc, (dc, ch 1, dc) in next ch-1 space, [sc in next dc, (dc, ch 1, dc) in next ch-1 space] 7 times; join.
Joining Rnd 3: Slip st to next ch-1 space; ch 3, dc in same space, ch 1, slip st in corresponding ch-3 space of large motif, ch 1, 2 dc in same space on filler motif, * 2 dc in next space, slip st in next ch-1 space of large motif, 2 dc in same space on filler motif, 2 dc in next ch-1 space, ch 1, slip st in next ch-3 space of large motif, ch 1, 2 dc in same space on filler motif **; repeat from * to ** one time; (2 dc, ch 1, 2 dc) in next ch-1 space, (2 dc, ch 3, 2 dc) in next ch-1 space, (2 dc, ch 1, 2 dc) in next ch-1 space; join. Fasten off. Weave in ends.
Border
Rnd 1: Join A in ch 5 space at top right corner, ch 1, 5 sc in same space, *[skip next 2 sts, sc in next st, 3 sc in next ch space, skip next 2 sts, sc in next st, 5 sc in next ch space] 3 times, **5 sc in next ch space; rep from * across ending at **(left corner), rep from * to ** 2 times, 5 sc in next ch space; rep from * around.
Rnd 2: Join with slip stitch to beg sc, fasten off.
ABBREVIATIONS: A, B = color A, B; ch = chain; dc = double crochet; mm = millimeters; rnd = round; sc = single crochet; st(s) = stitch(es); tr = treble crochet; yo = yarn over; * or ** = repeat whatever follows the * or ** as indicated; [ ] = work directions in brackets the number of times specified.
Pattern © by Coats & Clark Inc. Reproduced with permission from Coats & Clark Inc. PurpleKittyYarns.com is not endorsed by Coats & Clark Inc. It is not permissible to contract production of projects made from designs published by Coats & Clark to a third party for sale or distribution.
Baby Black Cat Pattern LW2828

Knit this sweater and hat set and you'll have the cutest black kitten that ever crossed your path. Of course your kitten can be any Super Saver color that you desire. And (if it gets in the way) you can remove the tail after all the Halloween festivities.
Designed by Mary Jane Protus.
Skill Level: INTERMEDIATE
Sweater directions are for size 6 months. Changes for sizes 12 months, 18 months, and 24 months are in parentheses.
Hat directions are for size 6-12 months. Changes for sizes 12-24 months are in parentheses.
Finished Chest: 22 (24, 25, 26)"
Finished Length: 11 (12, 13, 14)"
Hat to Fit: 16-18 (19-21)" head circumference
RED HEART® Super Saver®: 1 (1, 1, 2) skeins 312 Black A, 1 skein 319 Cherry Red B.
Knitting Needles: 4.5 mm [US 7] and 6mm [US 10].
Stitch holders, stitch markers, two ⅝" buttons, yarn needle.
GAUGE: 15 sts = 4"; 20 rows = 4", in Stockinette st (knit on Right Side, p on Wrong Side) using larger needles. CHECK YOUR GAUGE. Use any size needles to obtain the gauge.
Special Stitches
M1 = Make 1 (Increase) — Lift strand between needles to left-hand needle and knit strand through the back loop, twisting it to prevent a hole.
skp = slip next stitch as if to knit to right needle, knit next stitch, lift slipped stitch over knit stitch and off needle.
s2kp = slip next 2 stitches as if to k2tog to right needle, knit next stitch, lift the 2 slipped stitches over knit stitch and off needle.
Pattern Stitches
1x1 Rib (multiple of 2 sts + 1)
Row 1 (Wrong Side): K1, *p1, k1; repeat from * to end of row.
Row 2: P1, *k1, p1; repeat from * to end of row.
Repeat Rows 1 and 2 for 1x1 Rib.
SWEATER
Back
With smaller needles and A, cast on 41 (45, 47, 49) sts.
Ribbing
Row 1 (Wrong Side): Knit.
Row 2: Knit.
Rows 3-7: Beginning with a Wrong Side row, work in 1x1 Rib for 5 rows.
Rows 8 and 9: Knit. Place a marker in last row for Wrong Side.
Change to larger needles.
Beginning with a Right Side (knit) row work even in St st until piece measures 9 (10, 11, 12)" from beginning, end with a Wrong Side (purl) row.
Shape Neck
Row 1 (Right Side): K15 (16, 17, 17) sts, join a 2nd ball of yarn, k11 (13, 13, 15) and place these sts on a holder for back neck, knit to end of row—15 (16, 17, 17) sts for each shoulder.
Work both shoulders at the same time using a separate ball of yarn for each shoulder.
Row 2: Purl across sts of both shoulders.
Row 3 (Right Side): Knit to last 3 sts of first shoulder, k2tog, k1; on 2nd shoulder, k1, skip, knit to end of row—14 (15, 16, 16) sts on each shoulder.
Rows 4-7: Repeat last 2 rows 2 more times—12 (13, 14, 14) sts on each shoulder.
Continue in St st over both shoulders until piece measures 11 (12, 13, 14)" from beginning. Bind off.
Front
Work same as back until piece measures 8 (9, 10, 11)" from beginning, end with a Wrong Side row.
Shape Neck
Row 1 (Right Side): K15 (16, 17, 17) sts, join a 2nd ball of yarn, k11 (13, 13, 15) and place these sts on a holder for front neck, knit to end of row—15 (16, 17, 17) sts for each shoulder.
Work both shoulders at the same time using a separate ball of yarn for each shoulder.
Row 2: Purl across sts of both shoulders.
Row 3 (Right Side): Knit to last 3 sts of first shoulder, k2tog, k1; on next shoulder, k1, skp, knit to end of row—14 (15, 16, 16) sts on each shoulder.
Rows 4-7: Repeat last 2 rows 2 more times—12 (13, 14, 14) sts on each shoulder.
Continue in St st over both shoulders until piece measures same as back. Bind off.
Sleeves (Make 2)
With smaller needles and A, cast on 25 (29, 31, 33) sts.
Ribbing
Row 1 (Wrong Side): Knit.
Row 2: Knit.
Rows 3-7: Work in 1x1 Rib for 5 rows.
Row 8: Knit.
Row 9: Knit across working 1 (1, 0, 2) increases (M1) near middle of row—26 (30, 31, 35) sts. Place a marker in last row for Wrong Side.
Beginning with a Right Side row, work even in St st for 2 (2, 4, 6) rows.
Increase Row (Right Side): K1, M1, knit to last st, M1, k1—28 (32, 33, 37) sts.
Work even in St st for 3 (5, 5, 5) rows.
Repeat Increase Row—30 (34, 35, 39) sts.
Repeat last 4 (6, 6, 6) rows 2 more times—34 (38, 39, 43) sts.
Work even in St st until piece measures 6½ (7½, 8½, 9½)" from beginning.
Bind off.
TAIL
With smaller needles and A, cast on 9 sts.
Work even in St st until piece measures 8" from beginning, end with a Wrong side row.
Shape Tip
Row 1: K2tog, knit to last 2 sts, k2tog—7 sts.
Row 2: Purl.
Repeat last 2 rows until only 3 sts remain. Cut yarn, leaving a long tail. Thread tail through sts of last row and pull to gather. Use remainder of tail to sew seam. Sew tail to center of back of sweater.
FINISHING
Sew right shoulder seam.
Neckband
Set Up: With Right Side facing, smaller needles and A, cast on 5 sts for button tab, working around neck edge and beginning at left side of neck edge, pick up and k11 sts across left front neck, knit across 11 (13, 13, 15) sts on front neck holder, pick up and k11 sts across right front neck, pick up and k8 sts across right back neck, knit across 11 (13, 13, 15) sts on back neck holder, pick up and k8 sts across left back neck—65 (69, 69, 73) sts.
Rows 1 and 2: Knit.
Rows 3 and 4: Beginning with a Wrong Side row, work in 1x1 Rib for 2 rows.
Row 5 (buttonhole): K1, *p1, k1; repeat from * to last 6 sts, p1, k2tog, yo, k1, p1, k1.
Rows 6 and 7: Beginning with a Right Side row, work in 1x1 Rib for 2 rows.
Rows 8 and 9: Knit.
Bind off as if to knit.
Sew left shoulder seam, leaving ends of neckband unsewn. Sew button to neckband, opposite buttonhole. Measure and mark 4½ (5, 5¼, 5¾)" from shoulder on front and back, for armhole. Place sleeve between markers and sew into armhole. Repeat for other sleeve. Sew sleeve and side seams. Weave in ends.
HAT
With smaller needles and A, Cast on 53 (59) sts.
Front Ribbing
Row 1 (Wrong Side): Knit.
Row 2: Knit.
Rows 3-7: Work in 1x1 Rib for 5 rows.
Row 8: Knit.
Row 9: K26 (29), M1, knit to end of row—54 (60) sts. Change to larger needles.
Beginning with a Right Side (knit) row work even in St st until piece measures 5½ (6½)" from beginning, end with a Wrong Side (purl) row. Place a marker at the beginning and end of this last row.
Shape Back of Hat
Row 1 (Right Side): *K4, k2tog; repeat from * to end of row—45 (50) sts.
Row 2: Purl.
Row 3: *K3, k2tog; repeat from * to end of row—36 (40) sts.
Row 4: Purl.
Row 5: *K2, k2tog; repeat from * to end of row—27 (30) sts.
Row 6: Purl.
Row 7: *K1, k2tog; repeat from * to end of row—18 (20) sts.
Row 8: Purl.
Row 9: *K2tog; repeat from * to end of row—9 (10) sts.
Row 10: Purl.
Row 11: K1 (0), *k2tog; repeat from * to end of row—5 sts.
Cut yarn, leaving a long tail. Weave tail through sts of last row and pull to gather. Fold cast-on edge in half (fold runs across top of head). Use remaining tail to sew back seam, from down to markers at beginning of back of head shaping.
EARS (make 2)
Back of Ear
with smaller needles and A, cast on 5 sts.
Row 1: K2, yo, k1, yo, k2—7 sts.
Row 2: Knit all sts, knitting into the back loop of each yo.
Row 3: K3, yo, k1, yo, k3—9 sts.
Row 4: Repeat Row 2.
Row 5: K4, yo, k1, yo, k4—11 sts.
Row 6: Repeat Row 2.
Row 7: K5, yo, k1, yo, k5—13 sts.
Row 8: Repeat Row 2.
Row 9: K6, yo, k1, yo, k6—15 sts.
Row 10: Repeat Row 2.
Row 11: K7, yo, k1, yo, k7—17 sts.
Row 12: Repeat Row 2.
Change to B.
Front of Ear
Row 1 (Right Side): With B, knit.
Row 2: Purl.
Row 3: Skp, k5, s2kp, k5, k2tog—13 sts.
Row 4: Purl.
Row 5: Skp, k3, s2kp, k3, k2tog—9 sts.
Row 6: Purl.
Row 7: Skp, k1, s2kp, k1, k2tog—5 sts.
Row 8: Purl.
Row 9: Skp, k1, k2tog—3 sts.
Cut yarn, leaving a long tail. Thread tail through sts of last row and pull to gather, knot and secure. Fold front of ear over back of ear, with A sew all edges together.
FINISHING
Neckband
Set Up: With Right Side facing, smaller needles and A, CO 18 (22) sts for buttonhole tab, beginning at lower front corner of hat, pick up and k41 (49) sts evenly spaced across lower edge (the lower edge is the edge that does not yet have ribbing) to opposite lower front corner—59 (71) sts.
Rows 1 and 2: Knit.
Rows 3 and 4: Beginning with a Wrong Side row, work in 1x1 Rib for 2 rows.
Row 5 (buttonhole): K1, *p1, k1; repeat from * to last 6 sts, p1, k2tog, yo, k1, p1, k1.
Rows 6 and 7: Beginning with a Right Side row, work in 1x1 Rib for 2 rows.
Rows 8 and 9: Knit.
Bind off as if to knit.
Sew button to neckband, opposite buttonhole.
Using photograph as a guide for placement, sew ears to top of hat. Weave in ends.
ABBREVIATIONS: A, B = Color A, Color B; k = knit; k2tog = knit next 2 sts together; p = purl; yo = yarn over; * = repeat whatever follows the * or ** as indicated.

Pattern © by Coats & Clark Inc. Reproduced with permission from Coats & Clark Inc. PurpleKittyYarns.com is not endorsed by Coats & Clark Inc. It is not permissible to contract production of projects made from designs published by Coats & Clark to a third party for sale or distribution.
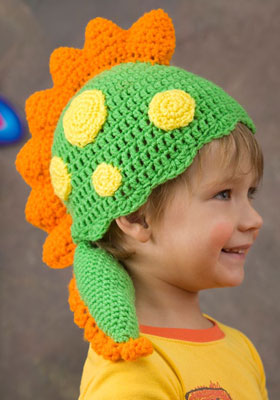
Dragon Hat Pattern LW2322
Skill Level: EASY
Designed by Michele Wilcox.
Hat measures 18" in circumference.
Fits Child's size 2-4 years.
RED HEART® Super Saver®: 1 skein each 672 Spring Green A, 254 Pumpkin B and 324 Bright Yellow C.
Crochet Hook: 4 mm [US G-6].
Polyfill Stuffing, Yarn Needle.
Gauge: 5 dc = 1½"; 3 Rounds dc = 1½". CHECK YOUR GAUGE. use any size hook to obtain the gauge.
SPECIAL ABBREVIATIONS
sc2tog: [Draw up a loop in next st] twice, yo and draw through all 3 loops on hook.
HAT
Beginning at top of hat with A, ch 4; join into a ring with slip st in first ch.
Round 1: Ch 3 (counts as dc here and throughout), 11 dc in ring; join with a slip st in top of beginning ch 3 - 12 dc.
Round 2: Ch 3, dc in first st, 2 dc in each dc around; join with a slip st in top of beginning ch 3 - 24 dc.
Round 3: Ch 3, 2 dc in next dc, *dc in next dc, 2 dc in next dc; repeat from * around, join with a slip st in top of beginning ch 3 - 36 dc.
Round 4: Ch 3, dc in next dc, 2 dc in next dc, *dc in next 2 dc, 2 dc in next dc; repeat from * around, join with a slip st in top of beginning ch 3 - 48 dc.
Round 5: Ch 3, dc in next 2 dc, 2 dc in next dc, *dc in next 3 dc, 2 dc in next dc; repeat from * around, join with a slip st in top of beginning ch 3 - 60 dc.
Rounds 6-13: Ch 3, dc in each dc around, join with a slip st in top of beginning ch 3.
Round 14: Ch 1, sc in same st as joining, *skip 2 dc, 5 sc in next dc, skip 2 dc, sc in next dc, repeat from * around, join with a slip st in top of beginning ch 3. Fasten off.
Hat Scales (make 2)
With B, ch 43.
Row 1: Sc in 2nd ch from hook and each ch across, turn - 42 sc.
Row 2: Ch 1, sc in next 6 sc, turn.
Row 3: Ch 1, sc2tog over next 2 sc, sc in next 2 sc, sc2tog over next 2 sc, turn.
Row 4: Ch 1, sc in each st across, turn.
Row 5: Ch 1, [sc2tog over next 2 sc] twice, turn.
Row 6: Ch 1, sc2tog over next 2 sc, work 4 sc evenly spaced down side of scale.
Row 7: Sc in next 6 sc in Row 1.
Repeat Rows 3-7 (5 times); then repeat Rows 3-6 once, turn.
Joining Row: With wrong sides of hat scales together, ch 1, working through double thickness, sc evenly across top of scales, working 3 sc in top of each scale, leaving bottom open. Stuff each scale very lightly then sew scales in place on top of hat.
Tail
With A, ch 2.
Round 1: 6 sc in 2nd ch from hook, do not join. Work in a spiral, marking beginning of each round, moving marker up as work progresses.
Round 2: Sc in each sc around.
Round 3: *Sc in next 2 sc, 2 sc in next sc; repeat from * around - 8 sc.
Round 4: *Sc in next 3 sc, 2 sc in next sc; repeat from * around - 10 sc.
Round 5: *Sc in next 4 sc, 2 sc in next sc; repeat from * around - 12 sc.
Round 6: Sc in each sc around.
Round 7: *Sc in next 3 sc, 2 sc in next sc; repeat from * around - 15 sc.
Rounds 8-9: Sc in each sc around.
Round 10: *Sc in next 4 sc, 2 sc in next sc; repeat from * around - 18 sc.
Rounds 11-12: Sc in each sc around.
Round 13: *Sc in next 5 sc, 2 sc in next sc; repeat from * around - 21 sc.
Rounds 14-27: Sc in each sc around. Fasten off.
Tail Scales
With B, ch 26.
Row 1: Slip st in 2nd ch from hook, ch 1, *3 dc in next ch, skip next ch, slip st in next ch**, ch 1; repeat from * across, ending last repeat at **. Fasten off. Sew to top center of tail. Stuff tail and sew in place.
Large Spot (make 2)
With C, ch 2.
Round 1: 6 sc in 2nd ch from hook, do not join, work in a spiral as before.
Round 2: 2 sc in each sc around - 12 sc.
Round 3: *Sc in next sc, 2 sc in next sc; repeat from * around - 18 sc.
Round 4: *Sc in next 2 sc, 2 sc in next sc; repeat from * around - 24 sc. Fasten off, leaving long sewing length.
Medium Spot (make 4)
Work same as Large Spot through Round 3. Fasten off, leaving long sewing length.
Small Spot (make 2)
Work same as Large Spot through Round 2. Fasten off, leaving long sewing length. Randomly arrange spots on each side of hat and sew in place.
ABBREVIATIONS: A, B, C = color A, B, C; ch = chain; dc = double crochet; mm = millimeters; sc = single crochet; st(s) = stitch(es); [ ] = work directions in brackets the number of times specified; * or ** = repeat whatever follows the * or ** as indicated.
Pattern © by Coats & Clark Inc. Reproduced with permission from Coats & Clark Inc. PurpleKittyYarns.com is not endorsed by Coats & Clark Inc. It is not permissible to contract production of projects made from designs published by Coats & Clark to a third party for sale or distribution.
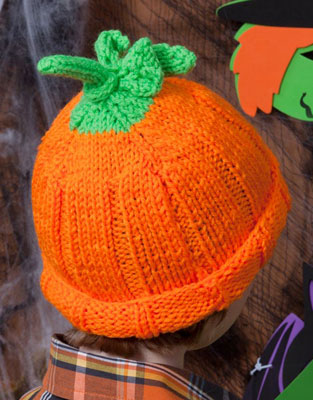
Knit Pumpkin Hat Pattern LW2829
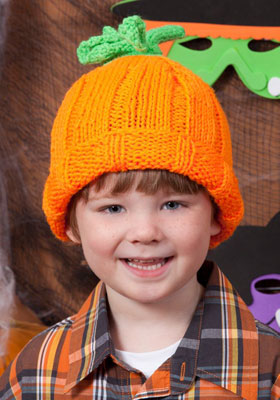
Kids will love their bright knit pumpkin hat for the way it looks. Mom will love it for the way it keeps ears warm and easy washability. Pattern includes baby and adult sizes too, so everyone can be part of the fun.
Skill Level: EASY
Designed by Kathleen Sams.
Directions are for Baby hat; changes for child, adult, and large adult hats are in parentheses.
To Fit Head: 14 (16, 20, 22)".
RED HEART® Super Saver®: 1 skein each 254 Pumpkin A and 672 Spring Green B.
Knitting Needles: 5.5mm [US 9].
Yarn needle, stitch markers.
GAUGE: 22 sts = 4"; 22 rows = 4" in pattern. CHECK YOUR GAUGE. Use any size needles to obtain the gauge.
Special Abbreviation
ssk (slip, slip, knit) = slip next 2 sts knitwise, one at a time, to right needle, insert tip of left needle into these 2 sts from the front and knit together.
HAT
With A, cast on 49 (57, 65, 73) sts.
 Row 1 (Right Side): Knit.
Row 2: Purl.
Row 3: Knit.
Row 4: K1, [P4 (5, 6, 7), K2] 8 times.
Row 5: [P2, K4 (5, 6, 7)] 8 times, P1.
Repeat Rows 4 and 5 until 5 (6, 7, 9)" from beginning, end Row 4.
Shape Top
Row 1 (Right Side): [K2tog, K8 (10, 12, 14), slip 1, K1, psso, place marker] 4 times, K1 - 41 (49, 57, 65) sts.
Row 2 and all even Rows: Purl.
Row 3: [K2tog, Knit to 2 sts before marker, slip 1 K1, psso] 4 times, K1 - 33 (41, 49, 57) sts.
Stem
Join B and repeat Rows 2 and 3 until 17 sts remain, end Row 2.
Next Row (Right Side): [K2tog] 8 times, K1 - 9 sts.
Next Row: P1, [P2tog] 4 times - 5 sts. Cut yarn leaving 10" tail. Weave yarn through remaining sts and draw up firmly; fasten securely.
FINISHING
Sew back seam. Weave in ends.
Leaves (Make 3)
With B, cast on 5 sts.
Rows 1, 3, 5, 7, 9, 11: Purl.
Row 2: K2, yo, K1, yo, K2 - 7 sts.
Row 4: K3, yo, K1, yo, K3 - 9 sts.
Row 6: SSK, K5, K2tog - 7 sts.
Row 8: SSK, K3, K2tog - 5 sts.
Row 10: SSK, K1, K2tog - 3 sts.
Row 12: Slip 1, K2tog, psso.
Fasten off. Weave in ends. Sew leaves around stem as desired.
ABBREVIATIONS: A, B = color A, B; K = knit; mm = millimeters; P = purl; psso = pass the slipped st over; St st = Stockinette stitch (Knit on right side rows; Purl on wrong side rows.); st(s) = stitch(es); tog = together; yo = yarn over; * or ** = repeat whatever follows the * or ** as indicated; [ ] = work directions in brackets the number of times specified.
Pattern © by Coats & Clark Inc. Reproduced with permission from Coats & Clark Inc. PurpleKittyYarns.com is not endorsed by Coats & Clark Inc. It is not permissible to contract production of projects made from designs published by Coats & Clark to a third party for sale or distribution.
Crochet Pumpkin Hat Pattern LW2830

This cute pumpkin hat will crochet up so quickly you can make it for all the kids and create your own pumpkin patch! Pattern includes baby and adult sizes too, so everyone can be a pumpkin head.
Skill Level: EASY
Designed by Kathleen Sams.
Directions are for Baby hat; changes for child, adult, large adult hats are in parentheses.
To Fit Head: 14 (16, 20, 22)".
RED HEART® Super Saver®: 1 skein each 254 Pumpkin A and 672 Spring Green B.
Crochet Hook: 5.5mm [US-I 9].
Yarn needle, stitch markers.
GAUGE: 14 sts = 4"; 15 rounds = 4" in sc. CHECK YOUR GAUGE. Use any size hook to obtain the gauge.
Special Abbreviation
Fphdc (front post half double crochet) = yo and insert hook from front to back to front around the post of indicated stitch and draw yarn through, yo and draw through 3 loops on hook.
Special Technique
Reverse Sc: Ch 1, insert hook in last st worked and draw through a loop, yo and draw through 2 loops on hook, * insert hook in next st to the right and draw through a loop, yo and draw through 2 loops on hook; repeat from * across.
HAT
Hat-Stem
With B, ch 2; 4 sc in 2nd ch from hook; do not join but work in continuous rounds unless otherwise noted. Place marker for end of round and move up each round.
Rounds 1-5: Sc in each sc around - 4 sc.
Round 6: 2 sc in each sc around; join with a slip st in next st - 8 sc.
Round 7: Ch 1, sc in same sc as joining, ch 1, [sc in next sc, ch 1] 7 times; join in first sc changing to A - 8 sc, 8 ch-1 spaces.
Pumpkin
Round 8: With A, ch 1, 2 sc in same sc as joining, dc in ch-1 space, [2 sc in next sc, dc in next ch-1 space] 7 times; join to first sc - 24 sts.
Round 9: Ch 1, 2 sc in same sc as joining, 2 sc in next sc, Fphdc around post of next dc, [2 sc in each of next 2 sc, Fphdc around post of next dc] 7 times; join - 40 sts.
Round 10: Ch 1, sc in same st as joining and next sc, 2 sc in next sc, sc in next sc, Fphdc around next Fphdc, [sc in next 2 sc, 2 sc in next sc, sc in next sc, Fphdc around next Fphdc] 7 times; join - 48 sts.
Round 11: Ch 1, 1 (2, 2, 2) sc in same st as joining, sc in next 3 sc, 1 (2, 2, 2) sc in next sc, Fphdc around next Fphdc, [1 (2, 2, 2) sc in next sc, sc in next 3 sc, 1 (2, 2, 2) sc in next sc, Fphdc around next Fphdc] 7 times; join; TURN - 48 (64, 64, 64) sts.
Round 12 (Wrong Side): Ch 1, sc in same sc as joining, * ch 1, skip Fphdc **, sc in next 5 (7, 7, 7) sc; repeat from * to last 4 (6, 6, 6) sc, end at **; sc in last 4 (6, 6, 6) sc; join; TURN.
Round 13 (Right Side): Ch 1, 1 (1, 1, 2) sc in same sc as joining, sc in next 4 (6, 6, 5) sc, [2 sc in next sc] 0 (0, 0, 1) time, Fphdc around next Fphdc 2 rows below, * 1 (1, 1, 2) sc in next sc, sc in next 4 (6, 6, 5) sc, [2 sc in next sc] 0 (0, 0, 1) time, Fphdc around next Fphdc 2 rows below; repeat from * around; join; TURN - 48 (64, 64, 80) sts.
Baby (Child, Adult) Only: Repeat Rounds 12 and 13 until 6 (7, 8)" from beginning, end Round 13; do NOT turn.
Large Adult Only-Round 14: Ch 1, sc in same sc as joining, * ch 1, skip Fphdc **, sc in next 9 sc; repeat from * to last 8 sc, end at **; sc in last 8 sc; join; TURN.
Round 15: Ch 1, sc in same sc as joining, sc in next 8 sc, Fphdc around next Fphdc 2 rows below, [sc in next 9 sc, Fphdc around next Fphdc 2 rows below] 7 times; join; TURN.
Repeat Rounds 14 and 15 until 9" from beginning, end Round 15; do NOT turn.
All Sizes-Edging Round: Ch 1, work Reverse sc in each st around. Fasten off. Weave in ends.
Curly Leaves (Make 3)
Ch 17; 5 sc in 2nd ch from hook, 3 sc in each ch across. Fasten off. Weave in ends. Sew around stem as desired.
ABBREVIATIONS: A, B = color A, B; ch = chain; dc = double crochet; hdc = half double crochet; mm = millimeters; sc = single crochet; st(s) = stitch(es); yo = yarn over; * or ** = repeat whatever follows the * or ** as indicated; [ ] = work directions in brackets the number of times specified.
Pattern © by Coats & Clark Inc. Reproduced with permission from Coats & Clark Inc. PurpleKittyYarns.com is not endorsed by Coats & Clark Inc. It is not permissible to contract production of projects made from designs published by Coats & Clark to a third party for sale or distribution.
Blushing Grannies WR1713
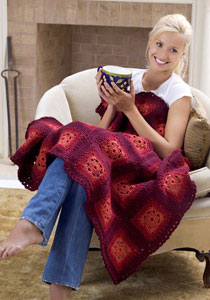
Throw measures 36" x 50".
Skill Level: Easy
RED HEART® "Super Saver®": 1 Skein each 0332 Ranch Red A and 0376 Burgundy B; 2 skeins 0378 Claret C.
Crochet Hook: 5.5mm [US I-9].
Yarn needle.
GAUGE: Rnds 1-3 = 3½" x 3½". Full square = 6¾" x 6¾". CHECK YOUR GAUGE. Use any size hook to obtain the gauge.
SQUARE (Make 35): With A, ch 5; join with slip st in first ch to form a ring.
Rnd 1: Ch 3 (counts as dc), 15 dc in ring; join with slip st in top of ch-3 - 16 sts.
Rnd 2: Ch 1, sc in same ch as joining, * ch 4, skip next dc **, sc in next dc; repeat from * around, end at **; join with slip st in first sc - 8 sc and 8 ch-4 spaces.
Rnd 3: Ch 1, sc in same sc as joining, * 2 sc in next ch-4 space, (2 dc, ch 2, 2 dc) all in next sc, 2 sc in next ch-4 space **, sc in next sc; repeat from * around, end at **; join in first sc - 20 sc, 16 dc and 4 corner ch-2 spaces. Fasten off A.
Rnd 4: Join B in any corner ch-2 space; ch 3 (counts as dc), (dc, ch 2, 2 dc) all in same space as joining, * dc in next 9 sts **, (2 dc, ch 2, 2 dc) all in next ch-2 space; repeat from * around, end at **; join in top of ch-3 - 52 dc and 4 corner ch-2 spaces.
Rnd 5: * Ch 2, skip next dc, (slip st, ch 2, slip st) all in next corner ch-2 space **, [ch 2, skip next dc, slip st in next dc] 6 times; repeat from * around, end at **; [ch 2, skip next dc, slip st in next dc] 5 times, ch 2, skip next dc; join with slip st in joining slip st - 32 slip sts and 32 ch-2 spaces. Fasten off B.
Rnd 6: Join C in any corner ch-2 space; ch 3 (counts as dc), (dc, ch 2, 2 dc) all in same space as joining, * 2 dc in each of next 7 ch-2 spaces **, (2 dc, ch 2, 2 dc) all in next corner ch-2 space; repeat from * around, end at **; join - 72 dc and 4 corner ch-2 spaces.
Rnd 7: Ch 1, sc in same ch as joining, sc in next dc, * (sc, ch 2, sc) all in next corner ch-2 space **, sc in next 18 dc; repeat from * around, end at **; sc in last 16 dc; join - 80 sc and 4 corner ch-2 spaces. Fasten off C, leaving a long end for sewing.
FINISHING: Weave in all loose ends, except long end. Sew squares together through both loops of last round into 5 strips of 7 squares each. Sew strips together.
Edging-Rnd 1: Join C in any sc; ch 1, sc in each sc around all 4 edges of afghan, working 2 sc in each ch-2 space at corners of joined squares and 3 sc in each of 4 corner ch-2 spaces of afghan; join in first sc.
Rnd 2: Ch 1, sc in same sc as joining, ch 3, skip next sc, * sc in next sc, ch 3, skip next sc; repeat from * around; join.
Rnd 3: Ch 1, * 2 sc in next ch-3 space, slip st in next sc; repeat from * around; join. Fasten off. Weave in ends.
ABBREVIATIONS: A, B, C = color A, B, C; ch = chain; dc = double crochet; mm = millimeters; rnd = round; sc = single crochet; st(s) = stitch (es); * or ** = repeat whatever follows the * or ** as indicated; [ ] = work directions in brackets the number of times specified.
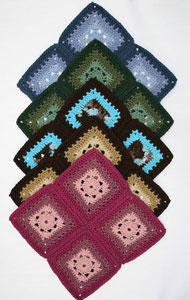
Alternate Color Choices:
Blues - 883 Spa Blue A, 382 Country Blue B, 380 Windsor Blue C
Greens - 631 Lt Sage A, 406 Med Thyme B, 633 Dk Sage C
Turquoise/Brown - 928 Earth & Sky A, 512 Turqua B, 365 Coffee C Browns - 334 Buff A, 336 Warm Brown B, 365 Coffee C
Roses - 372 Rose Pink A, 374 Country Rose B, 905 Magenta C
Pattern © by Coats & Clark Inc. Reproduced with permission from Coats & Clark Inc. PurpleKittyYarns.com is not endorsed by Coats & Clark Inc. It is not permissible to contract production of projects made from designs published by Coats & Clark to a third party for sale or distribution.
Crochet Sunflower Afghan WR1028

Skill Level: Intermediate
Designed by Mary Jane Protus.
Afghan measures approximately 50" x 64".
RED HEART® "Super Saver®": 16 Ounces No. 365 Coffee CA, 3 ounces No. 254 Pumpkin CB, 5 ounces No. 321 Gold CC, 10 ounces No. 406 Med. Thyme CD, and 20 ounces No. 313 Aran CE.
Crochet Hook: 6mm [US J-10].
Yarn needle.
GAUGE: Square measures approximately 10½ " x 10½". CHECK YOUR GAUGE. Use any size hook to obtain the gauge.
SPECIAL ABBREVIATIONS:
PST (Puff Stitch): [Yo and draw up a lp] 3 times all in the same st, yo and draw through all 7 lps on hook.
Tr3tog: * [Yo] twice, draw up a lp in sp indicated, [yo and draw through 2 lps on hook] twice; rep from * twice more, yo and draw through 4 lps remaining on hook.
Trpc (Tr Popcorn): Work 4 tr in same st, drop lp from hook, insert hook in top of first tr or ch 4 and into dropped lp, pull lp through.
VST: (dc, ch 1, dc) all in same st.
SQUARE (Make 24): With CA, ch 5; join with a sl st to form a ring.
Rnd 1: Ch 1, 12 sc in ring; join with a sl st in first sc.
Rnd 2: Ch 4, skip first sc, [PST in next sc, ch 1, dc in next sc, ch 1] 5 times, PST in next sc, ch 1; join with a sl st in 3rd ch of ch-4. Fasten off.
Rnd 3: Join CB in any PST; ch 1, * (sc, ch 3, sc) all in PST, sc in next ch-1 sp, (sc, ch 3, sc) all in next dc, sc in next ch-1 sp; rep from * around; join with a sl st in first sc. Fasten off.
Rnd 4: Join CC in any ch-3 sp; ch 1, [(sc, ch 4, Tr3tog, ch 4, sc) all in ch-3 sp] 12 times; join. Fasten off.
Rnd 5: Join CD in any Tr3tog; ch 1, [sc in Tr3tog, ch 5] 12 times; join.
Rnd 6: Ch 1, [sc in sc, (3 sc, ch 2, 3 sc) all in ch-5 sp] 12 times; join.
Rnd 7: Ch 1, [sc in sc, ch 4, Trpc in ch-2 sp, ch 4] 12 times; join. Fasten off.
Rnd 8: Join CE in first ch-4 sp of Rnd 7; ch 1, * sc in sp, ch 3 (corner sp), sc in next sp, ch 2, VST in next sc, ch 2, [sc in next sp, ch 1, sc in next sp, ch 2, VST in next sc, ch 2] twice; rep from * around; join.
Rnd 9: (Sl st, ch 3, 2 dc, ch 2, 3 dc) all in first ch-3 sp, * 3 dc in ch-1 sp of next VST, [3 dc in next ch-1 sp, 3 dc in ch-1 sp of VST] twice **, (3 dc, ch 2, 3 dc) all in corner ch-3 sp; rep from * around, end at **; join in top of ch-3.
Rnd 10: (Sl st, ch 3, 2 dc, ch 2, 3 dc) all in first ch-2 sp, * [3 dc between 3-dc groups] 6 times **, (3 dc, ch 2, 3 dc) all in corner sp; rep from * around, end at **; join. Fasten off.
Rnd 11: Join CA in ch-2 sp of any corner; ch 3, (2 dc, ch 2, 3 dc) all in same sp, * [3 dc between 3-dc groups] 7 times **, (3 dc, ch 2, 3 dc) all in corner sp; rep from * around, end at **; join. Fasten off.
MIDDLE STRIP (Make 3): With CE, ch 233.
Row 1: Sc in 2nd ch from hook, ch 2, skip 2 ch, sc in next ch, [sc in next ch, ch 2, skip 2 ch, sc in next ch] 57 times - 58 ch- 2 sps; do NOT turn but now work around as follows:
Rnd 1 (Right Side): Ch 5 (counts as a dc and ch-2), working over the last sc, (3 dc, ch 2, 3 dc) in the last ch-2 sp made, * 3 dc in next ch-2 sp; rep from * across to last sp; working over the first sc of Row 1, (3 dc, [ch 2, 3 dc] twice) all in last sp; working on opposite side of Row 1 rep from * to last ch-2 sp; 2 dc in last sp; join with a sl st in 3rd ch of ch-5. Fasten off.
Rnd 2: Join CA in first ch-2 sp made on Rnd 1 (part of ch-5); ch 3, (2 dc, ch 2, 3 dc) all in same sp, (3 dc, ch 2, 3 dc) in next ch-2 sp, * 3 dc between 3-dc groups; rep from * across to ch-2 sp of next corner; [(3 dc, ch 2, 3 dc) in ch-2 sp] twice; rep from * across; join in top of ch 3. Fasten off.
FINISHING: Sew squares together in 4 strips of 6 squares each. Sew Middle Strips between Sunflower Strips matching 3-dc groups along side of squares and one 3-dc group over the seam area between squares.
EDGING-Rnd 1: With right side facing, join CA in ch-2 corner sp of square at upper right corner; ch 5, 3 dc in same sp, * work 3 dc between 3-dc groups and work 3 dc in each sp before and after seams; rep from * to ch-2 sp of next corner; ** (3 dc, ch 2, 3 dc) all in ch-2 corner sp, work 3 dc between 3-dc groups to next corner ***; (3 dc, ch 2, 3 dc) all in corner sp; rep from * around, end at ***; 2 dc in first sp; join in 3rd ch of ch-5.
Rnd 2: (Sl st, ch 1, sc, ch 2, sc) all in first sp, ch 1, skip next dc, sc in next dc, * ch 1, sc between 3-dc groups, ch 1, skip next dc, sc in next dc; rep from * to next ch-2 corner sp; (sc, ch 2, sc) all corner sp; rep from * around; join. Fasten off. Weave in ends.
ABBREVIATIONS: CA, CB, CC, etc = Colors A, B, C, etc.; ch = chain; dc = double crochet; lp = loop; mm = millimeters; rep = repeat; rnd = round; sc = single crochet; sl = slip; sp = space; st(s) = stitch (es); tr = treble crochet; yo = yarn over; * or ** = repeat whatever follows the * or ** as indicated; [ ] = work directions in brackets the number of times specified.
Pattern © by Coats & Clark Inc. Reproduced with permission from Coats & Clark Inc. PurpleKittyYarns.com is not endorsed by Coats & Clark Inc. It is not permissible to contract production of projects made from designs published by Coats & Clark to a third party for sale or distribution.
Stars and Stripes Ripple Afghan WR1003
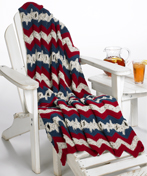
Skill Level: Experienced
Designed by Leigh K. Nestor.
Afghan measures approximately 45" wide x 60" long.
RED HEART® "Super Saver®": 18 Ounces No. 4313 Aran Fleck CA, 16 ounces No. 376 Burgundy CB, and 14 ounces No. 380 Windsor Blue CC.
Crochet Hook: 6mm [US J-10].
Yarn needle.
GAUGES: 12 sts = 4"; 12 rows = 4" in pat; star = 3½" point to point. CHECK YOUR GAUGE: Use any size hook to obtain the gauges.
SPECIAL STITCHES:
3 dccl: [yo and draw up a lp, yo and draw through 2 lps] 3 times all in same st, yo and draw through all 4 lps on hook.
3 trcl: [yo] twice, draw up a lp in next tr, [yo and draw through 2 lps] twice, [yo] twice, draw up a lp in next sl st between points, [yo and draw through 2 lps] twice, [yo] twice, draw up a lp in next tr, [yo and draw through 2 lps] twice, yo and draw through all 4 lps on hook.
NOTES: Afghan is made in horizontal panels that are sewn together. Each panel begins with the center star row. Always mark the last point made (for joining process). Always join full stars in the 5th (marked) point then the 4th point (the point before the marked point) of previous star. The star row is worked as follows: beg ½ star, 17 full stars (9A, 8B), end ½ star. Sew in all loose ends.
INSTRUCTIONS:
STAR ROW: Beg ½ Star: With CA, ch 4, (6 dc, 3 tr) all in 4th ch from hook, turn sideways, sl st in next 2 bars of last tr, sl st in next 3 ch, [ch 4, sc in 2nd ch from hook, dc in next ch, tr in last ch, skip next 2 sts of star center, sl st in next st] twice - 2 points. Mark the last point made. Fasten off.
FULL STAR A: With CA, ch 4, 14 dc in 4th ch from hook; join with a sl st in top of beg ch - 15 sts.
First Point: Ch 4, sl st to tip of marked point of previous star, skip sl st and one ch; sc in next ch, dc in next ch, tr in last ch, skip 2 sts of center, sl st in next st - point made.
2nd Point: Ch 4, sl st to tip of point before marked point of previous star (this is the rem point on beg 1/2 star or 4th point of a full star), skip sl st and one ch, make point.
3rd-5th Points: [Ch 4, skip first ch, make point] 3 times.
Fasten off.
FULL STAR B: With CA, ch 4, 14 dc in 4th ch from hook; join with a sl st in top of ch - 15 sts.
First Point: Ch 4, skip first ch, make point.
2nd Point: Ch 4, sl st to tip of marked point of previous star, skip sl st and one ch, make point.
3rd Point: Ch 4, sl st to tip of point before marked point of previous star, skip sl st and one ch, make point.
4th and 5th Points: Work same as for first point. Fasten off.
Continue to alternate A and B stars until there are 17 full stars completed and joined and one beg ½ star.
End ½ Star: Ch 5, (2 tr, 7 dc) all in 5th ch from hook, turn sideways, sl st in bar of last dc and in each ch of beg ch-4 and in next 3 sts of center.
First Point: Ch 4, sl st to tip of marked point of previous star, skip sl st and one ch, make point.
2nd Point: Ch 4, sl st to tip of point before marked point of previous star, skip sl st and one ch, make point. Fasten off.
Lower Stripe of Panel-Row 1: With right side facing, join CC in top of ch-4 of End ½ Star; ch 1, sc in same st, sc in next 2 tr, slip sl st, sc in next 3 sts of point, sc in sl st between points, sc in next 3 sts of next star point, skip sl st between points, * sc in next 3 sts of point, sc in sl st between points **, sc in next 2 sts, 3 trcl, dc in next st, sc in next st, 3 sc in tip of point; sc in next 2 sts, 3 trcl, dc in next st, sc in next st, sc in sl st between points, sc in next 3 sts, skip sl st between points **; rep from * to last point (Beg ½ Star), end at **; sc in next 3 sts of ½ star point, skip sl st, sc in last 3 tr; turn.
Rows 2-4: Ch 1, 2 sc in first st, sc in next 8 sts, * skip next 2 sts **, sc in next 9 sts, 3 sc in next st, sc in next 9 sts; rep from * to last 9 sts, end at **; sc in next 8 sts, 2 sc in last st; turn. Fasten off at end of Row 4.
Upper Stripe of Panel-Row 1: With right side facing, join CC in base of tr in point of Beg ½ Star; ch 1, sc in same st, sc in next 2 sts of point, * sc in sl st between points, sc in next st, dc in next st, 3 trcl, dc in next st, sc in next st, 3 sc in tip of point, sc in next st, dc in next st, 3 trcl, dc in next st, sc in next st, sc in sl st between points, sc in next 3 sts **, skip sl st between points, sc in next 3 sts of point; rep from * to last point (End ½ Star), end at **; turn.
Rows 2-4: Ch 1, sc in first st, skip next st, sc in next 8 sts, * 3 sc in next st **, sc in next 9 sts, skip next 2 sts, sc in next 9 sts; rep from * to last 10 sts, end at **; sc in next 8 sts, skip next st, sc in last st; turn. Change to CB at end of Row 4.
Rows 5-9: With CB rep Row 2. Change to CA at the end of Row 9.
Rows 10-11: With CA, rep Row 2.
Row 12: Ch 1, sc in first 2 sts, * 3 dccl in next st, [sc in next 3 sts, 3 dccl in next st] 4 times **, sc in next 4 sts; rep from * to last 2 sts, end at **; sc in last 2 sts; turn.
Rows 13-14: Rep Row 2. Change to CB at the end of Row 14.
Rows 15-19: With CB, rep Row 2. Fasten off at the end of Row 19.
Panel 1 (bottom panel) completed. Make 5 panels total.
To Join Panels: Sew lower stripe of Panel 2 to upper stripe of Panel 1. Rep for rem panels. Additional stripes are added at lower end of afghan for finishing.
Additional Stripes-Row 1: With right side facing, join CB in first st of Lower Stripe of Panel 1 at bottom of afghan; rep Lower Stripe Row 2
Rows 2-5: Rep Lower Stripe Row 2. Change to CA at the end of Row 5.
Rows 6-7: With CA, rep Row 2 as before.
Row 8: Ch 1, sc in first 2 sts, * [dccl in next st, sc in next 4 sts] 3 times, dccl in next st **, sc in next 5 sts; rep from * to last 2 sts, end at **; sc in last 2 sts; turn. Rows 9-10: Rep Row 2 as before. Change to CB at the end of Row 10.
Rows 11-15: With CB, rep Row 2 as before. Fasten off at the end of Row 15.
ABBREVIATIONS: approx = approximately; beg = beginning; CA, CB, CC = Color A, Color B, Color C; ch = chain; cl = cluster; dc = double crochet; hdc = half double crochet; lp(s) = loop(s); mm = millimeters; pat = pattern; rem = remaining; rep = repeat; rnd = round; sc = single crochet; sl = slip; sl st = slip stitch; sp(s) = space(s); st(s) = stitch(es); tog = together; tr = treble crochet; yo = yarn over; [ ] = work directions in brackets the number of times specified; * or ** = repeat whatever follows the * or ** as indicated.
Pattern © by Coats & Clark Inc. Reproduced with permission from Coats & Clark Inc. PurpleKittyYarns.com is not endorsed by Coats & Clark Inc. It is not permissible to contract production of projects made from designs published by Coats & Clark to a third party for sale or distribution.
| Pattern Categories Browse the categories to help you find the patterns you're looking for. |
||
    
|
|
|


Navigation

All contents © 2003-2026 Purple Kitty LLC. All rights reserved.
Privacy Policy | FAQ | About Me