 |
Red Heart Super Saver
Beginner Fun Knit Projects WR1640
Hat, IPod/Cell Phone Cover, Headband & Purse
Skill Level: Beginner
Hat Size to Fit 14" head; changes for size 16", 18" 20" heads are in parentheses.
Purse measures 7 (8, 9, 10)" high.
Headband measures 4" wide x 13 (15, 17, 19)" long.
IPod/Cell Phone Cover measures 4" wide x 6" high.
RED HEART® "Super Saver®": 1 Skein 972 Pink Camo, 932 Zebra or 672 Spring Green.
RED HEART® "Easy Tweed™": 1 Ball 6665 Coffee.
TLC® "Essentials™": 1 Skein 2981 Jungle.
Knitting Needles: 6mm [US 10].
Yarn needle; optional pom pom maker and embellishments like buttons, beads, elastic, etc.
GAUGES: 14 sts = 4"; 20 rows = 4" in St st; 14 sts = 4"; 26 rows = 4" in Garter st; 16 sts = 4"; 20 rows = 4" in Rib st. CHECK YOUR GAUGE. Use any size needles to obtain the gauges.
NOTE: Three different stitch patterns using the basic stitches in Rib Stitch, Garter Stitch and Stockinette Stitch.
HAT
For all stitch patterns: Cast on 24 (28, 32, 36) sts.
Rib Stitch: Cast on 24 (28, 32, 36) sts.
Row 1 (Right Side): * K2, P2; rep from * across.
Rep Row 1 until 3" from beginning, end wrong side row.
Now work in St st, begin K row, until 11 (13, 15, 17)" from beginning, then work 3" in Rib Stitch Pattern. Bind off in pat.
OR
Garter Stitch: Cast on 24 (28, 32, 36) sts.
Knit each row until 14 (16, 18, 20)" from beginning. Bind off.
OR
Stockinette Stitch: Cast on 24 (28, 32, 36) sts.
Row 1 (Right Side): Knit.
Row 2: Purl.
Rep Rows 1 and 2 until 14 (16, 18, 20)" from beginning, end by working a P row. Bind off.
FINISHING: Fold in half, right sides together. Sew side seams, leaving opening at bottom (where cast-on and bind-off edges meet). Turn right side out and attach pom poms in each corner. Weave in ends.
PURSE
Make same as for hat (any size). Make a Twisted Cord and attach for strap.
HEADBAND
Cast on 16 sts. Work in Rib Stitch, Stockinette Stitch or Garter Stitch until 13 (15, 17, 19)" from beginning. Bind off. Fold in half and sew ends together. Weave in ends.
IPOD/CELL PHONE COVER
Cast on 16 sts. Work in Rib Stitch, Stockinette Stitch or Garter Stitch until 15" from beginning (or desired length). Bind off. Fold up with wrong sides together, leaving 3" for flap. Sew sides, leaving flap free. Weave in ends. Attach Twisted Cord for strap.
TWISTED CORD: Cut 2 strands or 4 strands of yarn (depending on desired thickness of strap), 72" each in length. Bring the cut ends together and tie a knot close to the ends forming a large loop. Secure the knotted end to a stable surface or have a friend hold the end. Slip a pencil into the loop and hold the yarn just below the loop and the pencil. Holding the yarn taut, twirl the pencil, thereby twisting the yarn, until the entire length is tightly twisted and begins to twist back upon itself. Bring the loop end and the knotted end together. Tie with an overhand knot. Trim the ends. Smooth out the kinks so that the cord lies flat and is evenly twisted along its length.
ABBREVIATIONS: K = knit; mm = millimeters; P = purl; rep = repeat; St st = Stockinette stitch (Knit on right side rows; Purl on wrong side rows.); st(s) = stitch (es); * = repeat whatever follows the * as indicated.
Pattern © by Coats & Clark Inc. Reproduced with permission from Coats & Clark Inc. PurpleKittyYarns.com is not endorsed by Coats & Clark Inc. It is not permissible to contract production of projects made from designs published by Coats & Clark to a third party for sale or distribution.
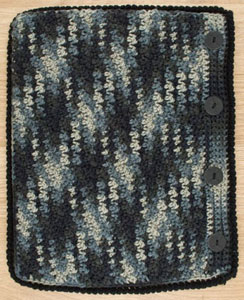
Laptop Case LW2273
Skill Level: Easy
Designed by Tracie Barrett
Case measures 15" wide x 11" long.
RED HEART® "Super Saver®": 2 balls 985 Urban Camo A; 1 ball 312 Black B.
Crochet Hook: 5.5mm [US I-9].
Yarn needle, four buttons - 1" diameter, matching thread and needle.
GAUGE: 13 sts = 4"; 12 rows = 4". CHECK YOUR GAUGE. Use any size needles to obtain the gauge.
CASE
Back Panel
With A, ch 46.
Row 1 (wrong side): Dc in 2nd ch from hook, *sc in next st, dc in next st; repeat from * across.
Row 2: Ch 1, turn, skip first st, *dc in next sc, sc in next dc; repeat from * across, dc in beginning ch. Repeat Row 2 until piece measures 11" from beginning, ending with wrong side row.
Last Round: Ch 1, work sc evenly around piece, working sc in each st and each edge of row and working 2 sc in each corner, slip st in first ch to join.
Fasten off.
Front Panel
With A, ch 46.
Work as for Back Panel until piece measures 10½" from beginning.
Row 1-2: Ch 1, turn, sc in each st across.
Buttonhole Row: Ch 1, turn, sc in first 3 sts, ch 3, skip 3 sts, *sc in next 9 sts, ch 3, skip 3 sts; repeat from * to last 3 sts, sc in last 3 sts.
Next Row: Ch 1, turn, sc in each st across, working 3 sc in ch-3 spaces.
Repeat Row 1.
Last Round: Ch 1, work sc evenly around piece, working sc in each st and each edge of row and working 2 sc in each corner, slip st in first ch to join.
Fasten off.
FINISHING
With wrong sides together and Front Panel on top, Join B with a sc in top left corner. Matching stitches and working in back loops only of both layers, sc around 3 sides to join layers. Leave top edge open. Do not turn. Working from left to right, ch 1, work in reverse single crochet in each st around, slip st in first st to join.
Fasten off.
Edging
Join B in corner of opening, sc evenly around opening, slip st in first st to join. Do not turn. Working from left to right, ch 1, work in reverse single crochet in each st around, slip st in first st to join.
Fasten off.
Weave in ends. Sew buttons on wrong side of Back Panel opposite buttonholes.
Abbreviations: A, B, C = Color A, B, C; ch = chain; dc = double crochet; mm = millimeters; sc = single crochet; st(s) = stitch(es); * or ** = repeat whatever follows the * or ** as indicated.
Pattern © by Coats & Clark Inc. Reproduced with permission from Coats & Clark Inc. PurpleKittyYarns.com is not endorsed by Coats & Clark Inc. It is not permissible to contract production of projects made from designs published by Coats & Clark to a third party for sale or distribution.
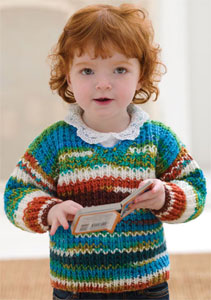
Baby Sweater LW2333
Skill Level: Easy
Designed by Trish Warrick.
Directions are for size 12 months; changes for sizes 18 months and 24 months are in parentheses.
Finished Chest: 24 (26, 28)".
Finished Length: 12 (12¾, 13½)".
RED HEART® "Super Saver®": 2 skeins 946 Peruvian Print. (See Notes section below regarding yardage).
Knitting Needles: 5mm [US 8].
Stitch holders (2), stitch markers (2), yarn needle.
GAUGE: 17 sts = 4"; 28 rows = 4" in Broken Rib. CHECK YOUR GAUGE. Use any size needles to obtain the gauge.
NOTES
Purchase 3 skeins of yarn if exact matching stripe pattern is desired on front and back pieces, and sleeves. Unwind yarn as necessary to matching color repeat to begin each piece.
Special Abbreviation
Ssk = Slip next 2 sts knitwise, one at a time to right needle; insert point of left needle into the fronts of these 2 sts and knit them together from this position.
P1, k1 Rib (worked over an even number of sts)
Row 1: * P1, k1; repeat from * to end.
Repeat Row 1 for P1, k1 Rib.
Broken Rib Pattern
Row 1 (Right Side): * P1, k1; repeat from * to end.
Row 2: Purl.
Repeat Rows 1 and 2 for Broken Rib.
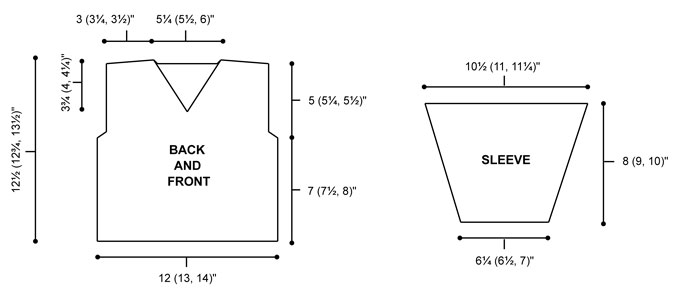
SWEATER
Back
Cast on 52 (56, 60) sts. Work in P1, k1 rib for 1", end by working a wrong side row.
Begin Broken rib and work even until piece measures 7 (7½, 8)" from beginning, end by working a wrong side row.
Shape Armholes
Dec 1 st at each end of next 2 rows-48 (52, 56) sts **. Work even until armhole measures 5 (5¼, 5½)", end by working a wrong side row.
Shape Shoulders
Rib 13 (14, 15) sts and place on holder for left shoulder; bind off 22 (24, 26) sts for back neck, work to end of row. Continue on these 13 (14, 15) sts for right shoulder, p 1 row even. Bind off. With wrong side facing attach yarn to sts on holder and p across. Bind off.
Front
Cast on and work same as for Back to **. Work even for 1", end by working a wrong side row.
Divide for Neck Shaping
Next Row: Rib 22 (24, 26) sts, k2tog, join a separate skein of yarn matching color repeat if desired, ssk, work to end
of row. Working both sides at once with separate skeins of yarn, repeat decs at each neck edge every other row 10 (11, 12) times more-13 (14, 15) sts each side. Work even until armhole measures 5 (5¼, 5½)", end by working a wrong side row.
Shape Shoulders
Working both side at once with separate skeins of yarn, work 2 rows even. Bind off.
Sleeves (Make 2)
Cast on 26 (28, 30) sts. Work in P1, k1 rib for 1", end by working a wrong side row.
Begin Broken rib and shape sleeve by inc 1 st at each end next row, then every 4th row 8 times-44 (46, 48) sts. Work even until sleeve measures 8 (9, 10)" from beginning, end by working a wrong side row. Bind off.
FINISHING
Sew shoulder seams.
Neckband
With right side facing, begin at back right shoulder edge, pickup and k22 (24, 26) sts across back neck edge, 18
(19, 20) st down left front neck edge, place a marker on center st of V, and 18 (19, 20) sts up right front neck edge-58 (62, 66) sts.
Row 1: Begin P1, k1 rib and work to center st, p2tog, rib to end.
Row 2: Work even in rib.
Row 3: Repeat Row 1.
Row 4: K the k sts and slip the purl sts wyib.
Bind off loosely.
ABBREVIATIONS: Dec = decrease; inc = increase; k = knit; mm = millimeters; p = purl; st(s) = stitch(es); tog = together; wyib = with yarn in back; * or ** = repeat whatever follows the * or ** as indicated.
Pattern © by Coats & Clark Inc. Reproduced with permission from Coats & Clark Inc. PurpleKittyYarns.com is not endorsed by Coats & Clark Inc. It is not permissible to contract production of projects made from designs published by Coats & Clark to a third party for sale or distribution.
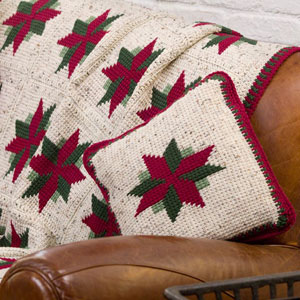
Christmas Star Throw and Pillow LW2071
INTERMEDIATE
Designed by Glenda Winkleman.
Throw measures 42" x 57½". Pillow measures 15" x 15½".
RED HEART® "Super Saver®": 7 skeins 4313 Aran Fleck A; 2 balls each 376 Burgandy B and 633 Dark Sage C; 1 Ball 631 Light Sage D.
Afghan Crochet Hook: 6mm [US J-10].
Yarn needle, 16" pillow form.
GAUGE: 13 sts = 3"; 10 rows = 3" in Afghan st. CHECK YOUR GAUGE. Use any size hook to obtain the gauge.
NOTES: Use separate ball of yarn for each large block of color. Pick up new yarn from under old to twist yarns and prevent holes.
THROW
Block (Make 20)
With Afghan hook and A, ch 31.
Row 1: First Half: Insert hook in 2nd ch from hook, yo, draw yarn through st, *insert hook in next ch, yo, draw yarn through st; repeat from * across - 31 loops on hook;
Second Half of Row: Yo, draw yarn through first loop on hook, *yo, draw yarn through 2 loops on hook; repeat from * across until 1 loop remains on hook, (counts as first loop of next row).
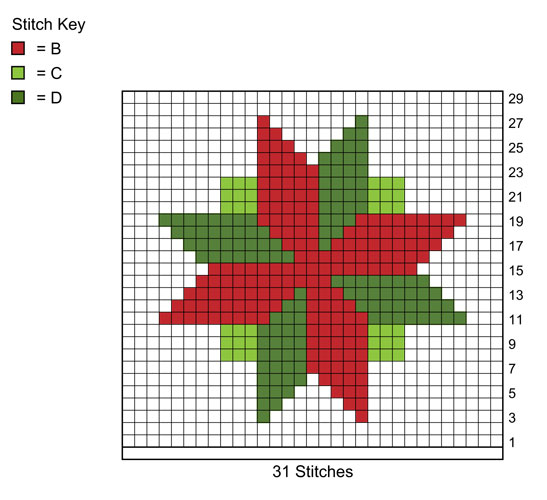
Rows 2-29: Beginning with Row 2, follow Chart through Row 29.
Row 30: Slip st in each vertical st across. Fasten off.
Block Border
With right side facing and crochet hook, join A in upper right hand corner st.
Round 1: Ch 3 (counts as dc), dc in corner st, dc in next 2 sts, [skip next st, dc in next 3 sts] across to 3 sts from corner, skip next st, dc in next st, 2 dc in next st, ch 2, turn to work along side edge, 2 dc in edge of first row, dc in edge of each row to last row, 2 dc in last row, ch 2, turn to work along opposite edge of foundation ch, dc in next st, dc in next 2 sts, [skip next st, dc in next 3 sts] across to 3 sts before next corner, skip next st, dc in next st, 2 dc in next st, ch 2, turn to work along side edge, 2 dc in edge of first row, dc in edge of each row to last row, 2 dc in last row, ch 2, slip st in top of beginning ch. Fasten off.
FINISHING
Arrange Blocks, 4 Blocks wide by 5 Blocks long, for Throw. Holding wrong sides together, join A in one Block with crochet hook, working through sts of two Blocks, slip st Blocks together. Repeat until all Blocks are joined.
Border
Round 1: With right side facing and crochet hook, join A in upper right hand corner dc, ch 3 (counts as first dc), dc in each dc and ch-space around, working (2 dc, ch 2, 2 dc) in each corner ch-2 space, join with slip st to top of beginning ch.
Round 2: Ch 1, sc in each dc around, working (2 sc, ch 2, 2 sc) in each corner ch-2 space, join with slip st to first sc.
Round 3: Ch 3 (counts as first dc), dc in each sc around, working (2 dc, ch 2, 2 dc) in each corner ch-2 space, join with slip st to top of beginning ch 3.
Round 4: Ch 1, sc in each dc around, working 4 sc in each corner ch-2 space, join with slip st to first sc.
Round 5: Ch 3 with B, [dc with D in next sc, dc with B in next sc] around, end with D, join with slip st in top of beginning ch. Cut B.
Round 6: With D only, ch 3 (counts as first dc), dc in same st, ch 1, skip next dc, [dc in next dc, ch 1, skip next dc] 56 times, [2 dc in next dc, ch 1, skip next dc] 4 times, turn to work along side edge, [dc in next dc, ch 1, skip next dc] 85 times, [2 dc in next dc, ch 1, skip next dc] 4 times, turn to work along next edge, [dc in next dc, ch 1, skip next dc] 57 times, turn to work along side edge, [dc in next dc, ch 1, skip next dc] 85 times, [2 dc in next dc, ch 1, skip next dc] 3 times, join with slip st to top of beginning ch 3. Fasten off.
Round 7: Join B in top of beginning ch 3, ch 1, sc in same space, *[sc in next dc, dc in next dc 2 rounds below, pulling dc up to current level of work] across to first set of 2 dc of next corner, [sc in next 2 dc, dc in next dc 2 rounds below, pulling dc up to current level of work] 4 times; repeat from * around to last side, [sc in next dc, dc in next dc 2 rounds below, pulling dc up to current level of work] across to first set of 2 dc of next corner, [sc in next 2 dc, dc in next dc 2 rounds below, pulling dc up to current level of work] 3 times, join with slip st to first sc. Fasten off. Weave in ends.
PILLOW
Back
With Afghan hook and A, ch 51.
Row 1: First Half: Insert hook in 2nd ch from hook, yo, draw yarn through st, *insert hook in next ch, yo, draw yarn through st; repeat from * across - 51 loops on hook;
Second Half of Row: Yo, draw yarn through first loop on hook, *yo, draw yarn through 2 loops on hook; repeat from * across until 1 loop remains on hook, (counts as first loop of next row).
Repeat Row 1 until 41 rows have been worked.
Last Row: Slip st in each vertical st across. Fasten off.
Front
With Afghan hook and A, ch 51.
Row 1: First Half: Insert hook in 2nd ch from hook, yo, draw yarn through st, *insert hook in next ch, yo, draw yarn through st; repeat from * across - 51 loops on hook;
Second Half of Row: Yo, draw yarn through first loop on hook, *yo, draw yarn through 2 loops on hook; repeat from * across until 1 loop remains on hook, (counts as first loop of next row).
Repeat Row 1 until 8 rows have been worked.
Begin Chart
Next Row: Work 5 sts, beginning with Row 3, work Chart across 31 sts, work 5 sts.
Continue to work Chart as established until 29 rows have been worked.
Repeat Row 1 for 6 rows.
Last Row: Slip st in each vertical st across. Fasten off.
Block Border
Round 1: With right side of Front facing, join D in upper right hand corner st, ch 3 (counts as first dc), 2 dc in corner st, ch 1, [skip next st, dc in next st] across to last st, 3 dc in last st, turn to work along side edge, 2 dc in edge of row, [ch 1, skip next row, dc in next row] across to last 2 rows, ch 1, skip next row, 2 dc in last row, turn to work along opposite edge of foundation ch, 3 dc in first st, ch 1, [skip next st, dc in next st] across to last st, 3 dc in last st, turn to work along side edge, 2 dc in edge of row, [ch 1, skip next row, dc in next row] across to last 2 rows, ch 1, skip next row, 2 dc in last row, ch 1, join with slip st to top of beginning ch 3. Fasten off.
Round 2: Join B in top of beginning ch, ch 1, sc in first 3 dc, *[dc in next dc 2 rounds below, pulling dc up to current level of work, sc in next dc] across to first dc of corner 5-dc, sc in next 5 dc; repeat from * around to last side, [dc in next dc 2 rounds below, pulling dc up to current level of work, sc in next dc] across to last 2 dc, sc in next 2 dc, join with slip st in first sc.
Round 3: Ch 1, sc in first 3 sts, *[skip next st, sc in next 3 sts] 12 times, sc in next 48 sts; repeat from * around to last side, [skip next st, sc in next 3 sts] to last 2 sts, sc in next 2 sc, join with slip st in first sc.
Repeat Border around Pillow Block.
FINISHING
Round 1: Holding wrong sides together, join B in one Block with crochet hook, working through sts of two Blocks, ch 1, sc in each st around 3 sides, turn to work along last side, sc in each st across on only 1 piece.
Fasten off.
Insert pillow form.
Whipstitch opening closed.
Weave in ends.
ABBREVIATIONS: A, B, C = Color A, B, C; ch = chain; dc = double crochet; mm = millimeters; sc = single crochet; st(s) = stitch(es); yo = yarn over; [ ] = work directions in brackets the number of times specified; * or ** = repeat whatever follows the * or ** as indicated.
Pattern © by Coats & Clark Inc. Reproduced with permission from Coats & Clark Inc. PurpleKittyYarns.com is not endorsed by Coats & Clark Inc. It is not permissible to contract production of projects made from designs published by Coats & Clark to a third party for sale or distribution.
Millennium Loop Pillow WR2016
INTERMEDIATE
Designed by Glenda Winkleman.
PILLOW measures approx. 14½" x 14½".
For Millennium Throw see LW2015
RED HEART® "Fiesta®": 1 skein 6341 Millenium A
RED HEART® "Super Saver®": 1 skein 500 Grey Heather B
Crochet Hook: 6.50mm [US K-10.5].
14" Pillow Form
Yarn Needle
GAUGE: 12 sc = 4"; and 16 rows = 4" in pattern. CHECK YOUR GAUGE. Use any size hook to obtain gauge.

Pillow Back
With B, ch 34.
Row 1 (Right Side): Sc in 2nd ch from hook, sc in each ch across; turn - 33 sc.
Rows 2-43: ch 1, sc in each sc across, turn. Fasten off at the end of Row 43.
Border
With Right Side facing, join A in top right hand corner sc. Ch 1, sc in each sc across, ch 1, work 36 sc evenly spaced down edge, ch 1, working across bottom of foundation ch, sc in each ch across, ch 1, work 36 sc evenly spaced up edge, slip st to beginning sc. Fasten off.
Pillow Front
With B, ch 34.
Row 1 (Right Side): Sc in 2nd ch from hook, sc in each ch across; turn - 33 sc.
Rows 2 and 3: Ch 1, sc in each sc across, turn.
Row 4: Ch 1, sc in back loop of first 3 sc, ch 3, slip st in top of last sc made, *sc in back loop of next 2 sc, ch 3, slip st in top of last sc made; repeat from * to last 2 sc; sc in back loop of last 2 sc; turn. Fasten off.
Row 5 (Right Side): With A, join in back loop of first sc 2 rows below; ch 1, sc in back loop of each sc across; turn.
Rows 6 and 7: Working in both loops, sc in each sc across; turn.
Row 8: Repeat Row 4.
Rows 9-12: With B, repeat Rows 5-8.
Rows 13-52: Repeat Rows 5-12, 5 times.
Border
With right side facing, join A in back loop of first sc in top right hand corner of Row 51.
Rnd 1: Ch 1, sc in back loop of each sc across Row 51, ch 1, work 36 sc evenly spaced along side edge, ch 1, working across bottom of foundation ch, sc in each ch across, ch 1, work 36 sc evenly spaced along side edge, ch 1, join with slip st to beginning sc. Fasten off.
Pillow Assembly and Border
Place front and back pieces with wrong sides together.
Rnd 1: With A, beginning at upper right corner, ch 1, working through both front and back scs together (sc in each sc across, 2 sc in corner ch-space) 3 times; working through single thickness of pillow front only, sc in each sc across, 2 sc in corner ch-space, join with slip st to front loop of first sc.
Rnd 2: *Ch 5, slip st in front loop of next sc*, repeat from * around, join with slip st in front loop of first sc. Fasten off.
Rnd 3: Join B in back loop of first sc in upper right hand corner 2 rnds below, ch 3 (counts as dc), 2 dc in back loop of first sc, 3 dc in back loop of each sc around, join with slip st to top of ch-3.
Rnd 4: Ch 3 (counts as dc), dc in each dc around, join with slip st to top of ch-3. Fasten off.
Insert Pillow Form into pillow cover. With yarn needle and matching yarn, sew opening closed.
ABBREVIATIONS: A, B = color A, B; ch = chain; dc = double crochet; mm = millimeters; rnd(s) = round(s); sc = single crochet; * = repeat whatever follows the * as indicated.
Pattern © by Coats & Clark Inc. Reproduced with permission from Coats & Clark Inc. PurpleKittyYarns.com is not endorsed by Coats & Clark Inc. It is not permissible to contract production of projects made from designs published by Coats & Clark to a third party for sale or distribution.
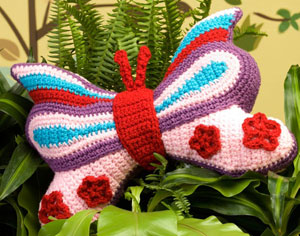
Brilliant Butterfly Pillow LW2326
Designed by Katherine Eng.
Butterfly is 16" wide x 11" high.
INTERMEDIATE
RED HEART® "Super Saver®": 1 skein each 724 Baby Pink A, 319 Cherry Red B, 528 Medium Purple C, 512 Turqua D.
Crochet Hook: 4 mm [US G-6]
Polyester fiberfill, stitch markers, yarn needle.
GAUGE: Rows 1-7 of bottom wing = 2" long x 1¾" wide. CHECK YOUR GAUGE. Use any size hook to obtain the gauge.
Special Abbreviation
sc2tog: [Insert hook next st, yo, draw yarn through st] twice, yo, draw yarn through 3 loops on hook.
BUTTERFLY
Bottom Wings (make 2)
Left Side
With A, ch 7.
Row 1: Sc in 2nd ch from hook and in next 4 ch, hdc in last ch, turn - 6 sts.
Row 2: Ch 1, sc in each st across, turn - 6 sc.
Row 3: Ch 1, sc in first 5 sc, hdc in last sc, turn - 6 sts.
Row 4: Repeat row 2.
Rows 5-6: Sc in each sc across, turn - 6 sc.
Row 7: Ch 1, 2 sc in first sc, sc in each of next 4 sc, 2 sc in last sc, turn - 8 sc.
Rows 8-10: Ch 1, sc in each sc across, turn.
Row 11: Repeat row 7 - 10 sc.
Rows 12-14: Ch 1, sc in each sc across, turn - 10 sc.
Row 15: Repeat row 7 - 12 sc.
Row 16: Ch 1, sc in each sc across, turn.
Row 17: Repeat row 7 - 14 sc.
Rows 18-20: Ch 1, sc in each sc across, turn.
Row 21: Ch 1, sc2tog in first 2 sts, sc in each sc across to last 2 sts, sc2tog in last 2 sts, turn -12.
Rows 22-24: Ch 1, sc in each sc across, turn.
Row 25: Repeat row 21 - 10 sc.
Row 26: Ch 1, sc in each sc across, turn.
Rows 27-29: Repeat row 21 - 4 sc at end of last row.
Fasten off.
Right Side
Row 1: With right side facing, join A in first ch on opposite side of foundation ch, ch 1, hdc in first ch, sc in each of next 5 ch, turn - 6 sts.
Row 2: Ch 1, sc in each st across, turn - 6 sc.
Row 3: Ch 1, hdc in first sc, sc in next 5 sc, turn - 6 sts.
Row 4: Repeat row 2.
Repeat rows 5-29 of left side. Fasten off.
Border
Round 1: With right side facing, join A in center ch at top of wings, ch 1, sc in center ch, working around right side, 2 sc in end of row 1, sc in end of row 2, 2 sc in end of row 3, sc in end of rows 4-16, 2 sc in end of rows 17 and 18, sc in end of rows 19-28, 2 sc in first sc at end of row 29, sc in each of next 3 sc, sc in end of each row to row 19, 2 sc in end of rows 18 and 17, sc in end of each row to end of right side, sc in center ch at bottom of wings, sc in end of rows 1-16 of left side, 2 sc in end of rows 17-18, sc in end of rows 19-28, sc in first 3 sc of row 29, 2 sc in last sc in row 19, sc in end of each row through row 19, 2 sc in end of rows 18 and 17, sc in end of each row through row 4, 2 sc in end of row 3, sc in end of row 2, 2 sc in end of row 1, slip st in first sc to join. Fasten off. Weave in ends.
Top Wings (make 2)
Right Side
With D, ch 3.
Row 1: Sc in 2nd ch from hook and in next ch, turn - 2 sc.
Rows 2-12: Ch 1, sc in each sc across, turn - 2 sc.
Row 13: Ch 1, sc in first sc, 2 sc in next sc, turn - 3 sc.
Row 14: Ch 1, sc in first 2 sc, 2 sc in next sc, turn - 4 sc.
Rows 15-20: Ch 1, sc in each sc across, turn.
Row 21: Ch 1, [sc2tog in next 2 sts] twice - 2 sc.
Row 22: Ch 1, sc2tog in next 2 sts - 1 sc. Fasten off.
Left Side
Row 1: With right side facing, join D in first ch on opposite side of foundation ch, ch 1, sc in first ch, sc in next ch, turn - 2 sc.
Repeat rows 2-22 of right side on left side. Fasten off.
Border
Round 1: With right side facing, join A in center ch at top of top wings, ch 1, working around right side of top wings, slip st in same ch, *slip st in end of next 10 rows, sc in end of next 11 rows, 3 sc in end sc, sc in end of next 11 rows, slip st in end of next 10 rows*, slip st in center ch on bottom of top wings, working around left side, repeat from * to * once; join.
Round 2: Ch 1, *slip st in next 13 sts, sc in next 9 sc, 3 sc in next sc, sc in next 9 sc, slip st in next 13 sts*, slip st in center slip st on bottom, repeat from * to * once; join.
Round 3: Ch 1, sc in first st, *sc in each of next 22 sts, 2 sc in each of next 3 sc, sc in each of next 22 sts, sc in next slip st (center st at bottom), repeat from * to * once; join. Fasten off.
Round 4: With right side facing, join C in first sc of round 3, ch 1, slip st in same sc, *slip st in next 16 sc, sc in next 6 sc, 2 sc in each of next 6 sc, sc in next 6 sc, slip st in next 16 sc*, slip st in next sc, repeat from * to * once; join.
Round 5: Ch 1, sc in each st around; join.
Round 6: Ch 1, sc in each sc around; join. Fasten off. Weave in ends.
Top Border
Place a marker in center 2 sc at each end of top wings, 7th and 18th sc from each end on top edge.
With right side facing, join B in 7th sc to the left of marked center 2 sts on left hand side of top wings.
Row 1: Ch 1, 2 sc in first sc, sc in next 11 sc, slip st in each sc across to next marked sc, sc in next 11 sc, 2 sc in next sc, turn, leaving remaining sts unworked.
Row 2: Ch 1, 2 sc in first sc, sc in each of next 12 sc, slip st in each slip st across to next sc, sc in next 12 sc, 2 sc in last sc, turn.
Row 3: Ch 1, (hdc, sc) in first sc, sc in next 13 sc, slip st in each slip st across to next sc, sc in next 13 sc, (sc, hdc) in last sc, do not turn. Fasten off.
With right side facing, join D in first hdc of row 3.
Row 4: Ch 1, 2 sc in first hdc, sc in each sc across to next slip st, slip st in next 2 sc, slip st and in each slip st across, slip st in next 2 sc, sc in each sc across to last hdc, 2 sc in last hdc, turn.
Row 5: Ch 1, 2 sc in first sc, sc in each sc across to next slip st, slip st in each slip st across to next sc, sc in each sc across to last sc, 2 sc in last sc, turn.
Row 6: Ch 1, (hdc, sc) in first sc, sc in next 14 sc, slip st in each slip st across, sc in next 14 sc, (hdc, sc) in last sc, do not turn. Fasten off.
With right side facing, join A in first hdc of row 6.
Rows 7-8: With A, repeat rows 4-5. Fasten off. Weave in ends.
Assembly
Place one marker 1½" to the right and 1½" to the left of center on top of top wings. With a strand of any color yarn, weave over and under sts from one marker to the other marker and pull to tighten and cinch in sts to equal about 2". On bottom edge, mark 9th sc to the right of marked end of right top wing and 9th sc to the left of marked end of left top wing.
Mark center between end 2 sc of both bottom wings. Then mark 16th sc to the left of bottom left wing and 16th sc to the right of bottom right wing. Place top wings over center of bottom wings. Pin in place. Pin together where marked sc of top and bottom wings meet. With C, using running st, sew together top and bottom wings through sc of last round of top wing and ends of rows on bottom wing.
Edging
With right side facing, join C in first sc to the left of bottom center ch of bottom wing.
Round 1: Ch 1, work around entire butterfly by working sc in each sc, sc in each slip st, sc in end of each row, 2 sc in each hdc, and 3 sc in 2 corner scs at top of top wings; join. Fasten off.
Center Body
With B, ch 4.
Row 1: Sc in 2nd ch from hook and in each ch across, turn - 3 sc.
Row 2: Ch 1, sc in each sc across, turn.
Row 3: Ch 1, 2 sc in first sc, sc in next sc, 2 sc in last sc, turn - 5 sc.
Rows 4-6: Ch 1, sc in each sc across, turn.
Row 7: Ch 1, 2 sc in first sc, sc in each sc across to last sc, 2 sc in last sc, turn - 7 sc.
Rows 8-16: Ch 1, sc in each sc across, turn.
Row 17: Ch 1, sc2tog in first 2 sts, sc in each sc across to last 2 sc, sc2tog in last 2 sts, turn - 5 sc.
Row 18: Ch 1, sc2tog in first 2 sts, sc in next sc, sc2tog in last 2 sts, turn - 3 sc.
Body Border
Round 1: With right side facing, ch 1, sc in first sc, 2 sc in next sc, sc in last sc, working across side edge of body, sc in end of each row to bottom, working across opposite side of foundation ch, sc in next ch, 2 sc in center ch, sc in last ch, working across side edge of body, sc in each row to top; join. Do not fasten off.
First Antenna
Row 1: Ch 1, sc in same sc, turn
Row 2: Ch 1, sc in next sc, turn.
Rows 3-8: Repeat row 2.
Row 9: Ch 1, (sc, 2 hdc) in next sc. Fasten off.
Second Antenna
With right side facing, join B in next sc on top of body border.
Rows 1-8: Repeat rows 1-8 of first antenna.
Row 9: Ch 1, (2 hdc, sc) in next sc. Fasten off.
Position body at center with first and last rows over edge at bottom and top. Sew onto wings with B through sc of border round using a running st.
Large Flower (make 4)
With B, ch 4; join with a slip st to form ring.
Round 1: [Sc in ring, ch 5] 5 times; join - 5 ch-5 spaces.
Round 2: *5 sc in next ch-5 space, slip st in next sc; repeat from * around, ending with last slip st in joining slip st of last round. Fasten off leaving a 16" tail.
Small Flower (make 4)
With B, ch 4, join; join with a slip st to form ring.
Round 1: [Sc in ring, ch 4] 5 times; join - 5 ch-5 spaces.
Round 2: *4 sc in next ch-4 space, slip st in next sc; repeat from * around, ending with last slip st in joining slip st of last round. Fasten off leaving a 16" tail.
FINISHING
Pin 1 small and 1 large flower on each side of bottom wings. Sew flowers on with tails of yarn. Place 2 butterfly pieces together with right sides facing out. With C, sew front to back using a whipstitch through border round, leaving a space open at the bottom center for stuffing. Fill with polyester fiberfill and sew opening closed. With B, sew top edges of body together and bottom edges of body together using a running st. With B, sew corresponding antennae together. Fasten off. Weave in ends.
ABBREVIATIONS: A, B, C, D = Color A, B, C, D; hdc = half double crochet; mm = millimeters; sc = single crochet; st(s) = stitch(es); [ ] = work directions in brackets the number of times specified, * or ** = repeat whatever follows the * or ** as indicated.
Pattern © by Coats & Clark Inc. Reproduced with permission from Coats & Clark Inc. PurpleKittyYarns.com is not endorsed by Coats & Clark Inc. It is not permissible to contract production of projects made from designs published by Coats & Clark to a third party for sale or distribution.
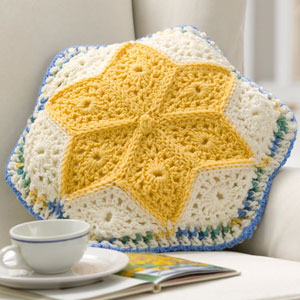
Alaska Snow Flowers Pillow WR2047
EASY
Designed by Joyce Nordstrom.
Pillow measures 12" x 12".
RED HEART® "Super Saver®": 1 skein each 316 Soft White MC, 347 Light Periwinkle A, 320 Cornmeal B, 20 yds 962 Seascape C.
Crochet Hook: 5.5mm [US I-9].
Pillow Form shaped to fit six-sided figure, Yarn needle.
GAUGE: 1 Diamond = 3½" wide x 5" long. CHECK YOUR GAUGE: Use any size hook to obtain the gauge.
SPECIAL ABBREVIATION:
Fpdc (front post double crochet) = Yo, insert hook from the front side of the work to back and to front again around the post of the indicated stitch on a previous row; yo and pull up a loop (3 loops on hook), yo and draw through two loops (2 loops on hook), yo and draw through two loops (1 loop on hook).

PILLOW FRONT & BACK
Diamond (Make 12 in MC, 6 in A, 6 in B)
Ch 5. Slip st into first ch to form a loop.
Round 1: Slip st into ch, ch 1; * [2 sc; hdc, dc, trc, ch 1 (for end space), tr, dc, hdc, 2 sc] all into ring; repeat from *. Slip st into top of ch-1 to join.
Round 2: Ch 3 (for hdc and ch 1): * [skip 1 st, hdc in next st, ch 1] twice, skip next st, [dc, ch 1, dc, ch 1] in ch-1 end space; [hdc in next st, ch 1, skip 1 st] 2 times; hdc in next st, ch 1**, hdc in next st, ch 1; repeat from *, ending at **, slip st into 2nd ch of beginning ch-3 (16 ch-1 spaces).
Round 3: Slip st in first ch-1 space; ch 2, * hdc, hdc in same space; [2 hdc in next space] twice; [2 dc, ch 1 for end space, 2 dc] in end space; [2 hdc in next space] 3 times; [hdc, ch 1 for side space, hdc] in next space; repeat from *; slip st in top of ch-2. Fasten off.
Arrange 12 diamonds to make flower shape as shown (each with 6 in MC, one with center in A and one with center in B). With wrong sides together and using matching color, slip st through back loops of diamonds to join.
Make center bobble
Attach matching flower color to any ch-1 end space at center of flower. Ch 3 (for dc), 5 dc in same space, drop loop of last dc, insert hook through top of ch-3, grasp loop and pull through to create bobble. Cut yarn, leaving tail to sew in place. Using long cut end, whip sides and end of bobble to cover center ends of flower diamonds.
Flower Border
Round 1: Join MC in any outside corner. Ch 2, * [fpdc around next st, hdc in next hdc] 4 times; fpdc around next st; hdc in ch-1 end space; dc in next ch-1 end space of joining, hdc in next ch-1 end space, [fpdc around next st, hdc in next hdc] 4 times, fpdc around next st; [hdc, ch 2, hdc] in ch-1 side space; repeat from * around, ending last repeat with slip st in top of beginning ch-2 (counts as last hdc). Fasten off.
Round 2: Join C in any ch-1 side space. Ch 3 for dc, * [hdc in hdc, fpdc around fpdc] 5 times, hdc in hdc, fpdc around dc, hdc in hdc, [fpdc around fpdc, hdc in next hdc] 5 times, [dc, ch 1, dc] in side space; repeat from * around, ending last repeat with slip st in top of ch-3. Fasten off.
Assemble Pillow: With Right Side facing, join MC in any outside ch-1 corner of one side of pillow. Ch 1, sc in same space, ch 2 for hdc, * fpdc around dc, [hdc in hdc, fpdc around fpdc] to next outside corner, [hdc, ch 1, hdc] in corner; repeat from * around. Repeat for other side of pillow. With wrong sides together, join A in any outside corner, inserting hook through matching corners of each side. Working from left to right, ch 1, [sc, ch 1, sc] in same corner, [sc in next hdc, ch 1, skip fpdc] around pillow, working [sc, ch 1, sc] in each outside corner. When pillow is half assembled, insert pillow form and work to end. Fasten off.
ABBREVIATIONS: ch = chain; dc = double crochet; hdc = half double crochet; mm = millimeters; sc = single crochet; st(s) = stitch(es); tr = treble crochet; yo = yarn over needle; [ ] = work directions in brackets the number of times specified; * or ** = repeat whatever follows the * or ** as indicated.
Pattern © by Coats & Clark Inc. Reproduced with permission from Coats & Clark Inc. PurpleKittyYarns.com is not endorsed by Coats & Clark Inc. It is not permissible to contract production of projects made from designs published by Coats & Clark to a third party for sale or distribution.
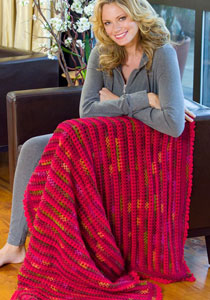
Love & Kisses Throw WR2112
INTERMEDIATE
Designed by Darla Fanton
Afghan measures 55" x 44"
RED HEART® "Super Saver®": 2 skeins each 376 Burgundy A and 319 Cherry Red C; 3 skeins 0944 Cherrycola B
Crochet Hook: 6 mm (US J-10)
GAUGE: 7 cls = 4" 8 rows = 4". CHECK YOUR GAUGE. Use any size needles/hook to obtain the gauge given.
Special Abbreviations:
Cl(s): Cluster(s) - Yo, draw up loop in same ch or ch-space as last st made, skip next ch or st, pick up loop in next ch or ch-space, yo, draw through all 4 loops on hook.
Hdc2tog: [yo and draw up a loop in the next st] 2 times, yo and draw through all 5 loops on the hook.
Picot: Ch 3, slip st in first ch made.
Notes:
Beginning ch-2 does not count as a st. When working edging, mark first st of the round.
Color Sequence:
Work 1 row with A. 1 row with B and 1 row with C. Carry unused colors along side edges. To change color, work yo, draw through final four loops with new color.
THROW
With A, ch 140.
Row 1 (Right Side): Hdc in 2nd ch from hook, ch 1, *yo, draw up loop in same ch as last st made, skip next ch, pick up loop in next ch, yo, draw through all 4 loops on hook (cl made), ch 1; repeat from * until 2 chs remain, yo, draw up loop in same ch as last st made, skip next ch, pick up loop in next ch, yo, draw through all 4 loops on hook, turn - 1 hdc; 69 ch-1 spaces; 69 cls.
Row 2: Change to B. Ch 2, hdc in first ch-1 space, ch 1, *yo, draw up loop in same ch-space as last st, skip next st, pick up loop in next ch-space, yo, draw through all 4 loops on hook, ch 1; repeat from * until 1 st remains, yo, draw up loop in same ch-space as last st, draw up loop in hdc, yo, draw through all 4 loops, turn. Change to C.
Rows 3-103: Repeat Row 2, working in Color Sequence and changing color every row working while carrying unused colors along side edges, end with Row A. Fasten off all colors.
EDGING
Round 1: With right side facing, join A with sc in hdc at upper right hand corner, 2 sc in same place as join, (sc in each of next 5 ch-1 spaces or cls, skip next st) 23 times, 3 sc in final cl on top edge, working in edges of rows, [sc in edge of second row, 2 sc in edge of next row] 50 times, sc in edge of next row, working in opposite side of foundation ch, 3 sc in first st, (sc in each of next 5 ch-1 spaces or sts, skip next st) 23 times, 3 sc in final st for bottom edge, working in edges of rows, [sc in edge of second row, 2 sc in edge of next row] 50 times, sc in edge of next row - 115 sts along top and bottom edges, 151 along each side edge and 3 sc in each corner.
Round 2: Sc in first sc of Round 1, 3 sc in next st, sc in each of next 117 sts, 3 sc in next st, sc in each of next 153 sts, 3 sc in next st, sc in each of next 117 sts, 3 sc in next st, sc in each of next 152 sts, join with slip in first sc.- 552 sts.
Round 3: Slip st in next st, *[sc, ch 4, sc] in next st for corner, [ch 1, skip next st, sc in next st] 59 times, ch 1, skip next st, [sc, ch 4, sc] in next st, [ch 1, skip next st, sc in next st] 77 times, ch 1, skip next st; repeat from * around, slip st in first sc. Fasten off A.
Round 4: With right side facing, join B with slip st in a corner ch-4 space, ch 2, yo, pick up a loop in ch-4 space, pick up loop in next ch-1 space, yo, draw through all 4 loops on hook, ch 1, *yo, pick up loop in same ch-space as last st, pick up loop in next ch-space, yo, draw through all 4 loops on hook, ch 1; repeat from * to next corner ch-4 space, [hdc2tog, ch 1] twice in ch-4 space, repeat from *around, end [hdc2tog, ch 1] twice in first ch-4 space, join with slip st to beginning cl. Fasten off B.
Round 5: With right side facing, join C with sc in any ch-1 space, picot, sc in same space, *[sc, picot, sc] in next ch-1 space; repeat from * around, join with slip st in first sc. Fasten off.
FINISHING
Weave in ends.
ABBREVIATIONS: ch = chain; dc = double crochet; hdc = half double crochet; mm = millimeters; rnd = round; sc = single crochet; st(s) = stitch(es); yo = yarn over; * or ** = repeat
Pattern © by Coats & Clark Inc. Reproduced with permission from Coats & Clark Inc. PurpleKittyYarns.com is not endorsed by Coats & Clark Inc. It is not permissible to contract production of projects made from designs published by Coats & Clark to a third party for sale or distribution.
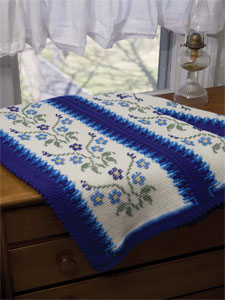
Morning Glory Afghan WR1708
EXPERIENCED
Designed by Glenda Winkleman
Afghan measures 46" x 68"
RED HEART® "Super Saver®": 5 skeins 316 Soft White CA; 4 skeins 385 Royal CB; 1 skein each 381 Light. Blue CC, 885 Delft Blue CD, 631 Lt. Sage CE; 329 Cornmeal CF.
Afghan crochet hook: 6.50 mm [US K- 10½] or size needed to obtain gauge.
Crochet hook: 6.00 mm [US J-10]
Yarn Needle.
GAUGE: In afghan st: 15 sts and 14 rows = 4". CHECK YOUR GAUGE. Use any size afghan hook to obtain the gauge.
PANEL (Make 3): With afghan crochet hook and CA, chain 43.
Row 1: Insert hook into 2nd ch from hook, yo, draw yarn through st, * insert hook in next chain, yo, draw yarn through st *, repeat from * to * across (43 loops on hook).
Second Half of Row: Yo, draw yarn through 1 loop on hook, ** yo, draw yarn through 2 loops on hook **, repeat from ** to ** across - 1 loop remains on hook and counts as first loop of next row.
Rows 2-207: First loop on hook counts as first st, * insert hook into next vertical st, yo, draw yarn through st *, repeat from * to * across (43 loops on hook.)
Second Half of Row: Yo, draw yarn through 1 loop on hook, ** yo, draw yarn through 2 loops on hook **, repeat from ** to ** across - 1 loop remains on hook and counts as first loop of next row.
Row 208: Slip st in each vertical st across. Fasten off.
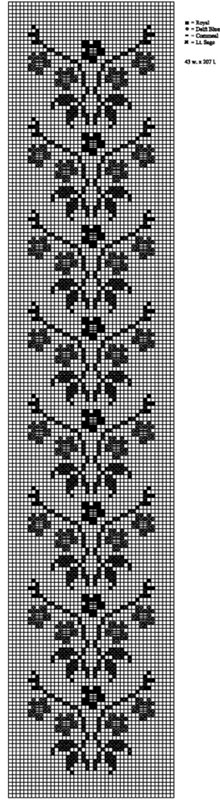
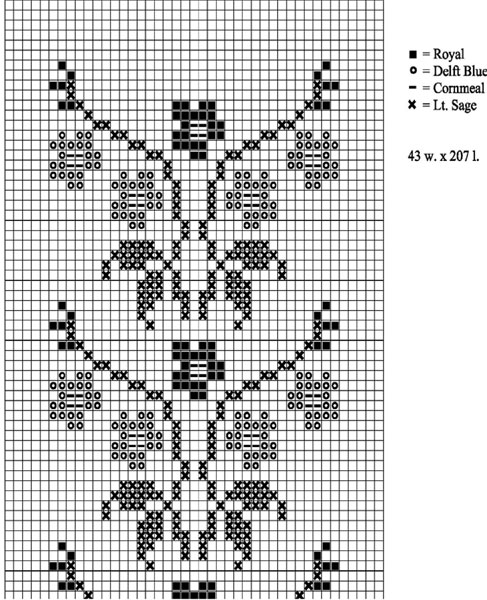
EMBROIDERY
With right side of panel facing, follow chart to cross-stitch design onto panels.
PANEL BORDER
With right side of Panel facing, using crochet hook, join CC in first row-end st down length.
Round 1: Working down length, chain 1, sc in first row-end st, ** tr in next corresponding horizontal st 4 rows below pulling tr up to current level of work, * sc in each of next 3 row-end sts, tr in next corresponding horizontal st 4 sts below pulling tr up to current level of work *, repeat from * to * down length to within last st across, sc in last row-end st, ch 2, sc in each st across to next corner, chain 2 **, sc in first row-end st down length, rep from ** to ** around, join with slip st to beg sc. Fasten off.
Round 2: Join CD in beginning sc, chain-1, sc in beg sc, * sc in next tr, tr in next corresponding horizontal st 3 sts below pulling tr up to current level of work, sc in next sc, tr in next corresponding horizontal st 3 sts below pulling tr up to current level of work *, ** repeat from * to * across to within 2 sts from corner, sc in next tr, sc in next sc, (sc, ch 2, sc) in corner ch-2 space, sc in each sc across to next corner, (sc, ch 2, sc) in corner ch-2 space **, sc in next sc, repeat from ** to ** around, join with slip st to top of beg sc. Fasten off.
Round 3: Join CB in beg sc, ch 1, sc in beginning sc, sc in each of next 2 sts, * tr in next corresponding horizontal st 3 sts below pulling tr up to current level of work, sc in each of next 3 sts *, ** repeat from * to * across to within 1 sc from corner, sc in next sc, (sc, ch 2, sc) in corner ch-2 space, sc in each sc across to next corner, (sc, ch 2, sc) in corner ch-2 space **, sc in each of next 4 sts, repeat from ** to ** around to within last sc, sc in last sc, join with slip st to beg sc. Fasten off.
PANEL SIDE BORDER
With right side of Panel facing, working down length, join CD in corner ch-2 space.
Row 1: Ch 1, sc in corner ch-2 space, * sc in each of next 3 sts, fptr in next corresponding CC tr st 3 rows below pulling tr up to current level of work *, repeat from * to * across to within 3 sts from corner, sc in each of next 3 sts, sc in corner ch-2 space. Fasten off.
Row 2: Return to beginning of Row 1, join CB in beg sc, chain 1, sc in beg sc, sc in each of next 4 sts, * fptr in next corresponding CD tr 3 rows below pulling tr up to current level of work, sc in next st *, repeat from * to * across to within last 4 sc, sc in each of last 4 sc, turn.
Rows 3 and 4: Ch 1, sc in each st across,turn.
End of Row 4, fasten off.
Repeat Rows 1-4 to opposite side of Panel.
Repeat Side Border to each remaining panel.
PANEL ASSEMBLY
With right sides of 2 panels aligned, slip st panels together on wrong side using back loops, matching sts from corner to corner down length. Repeat for each panel.
AFGHAN BORDER
With right side of afghan facing, using crochet hook, join CB in top right-hand corner st.
Round 1: Chain 1, sc in each of first 4 sts, * skip next st, sc in each of next 4 sts *, *** repeat from * to * across to within 3 sts from corner, skip next st, sc in each of next 2 sts, chain 2, working down length, sc in each of next 10 sts, ** skip next st, sc in each of next 10 sts **, repeat from ** to ** across to within 5 sts from corner, skip next st, sc in each of next 4 sts, chain 2 ***, sc in each of next 4 sts, rep from *** to *** around, join with slip st to beginning sc.
Round 2: Chain 1, sc in each sc around, work 3 sc in each corner chain-2 space, join with slip st to beginning sc.
Round 3: Chain 3 (first dc), dc in next sc, (chain 3, slip st) to top of last dc made, * dc in each of next 2 sc, (chain 3, slip st) in top of last dc made *, repeat from * to * around to within last st, dc in last st. Fasten off.
ABBREVIATIONS CA = Color A; CB = Color B; CC = Color C; CD = Color D; CE = Color E; CF = Color F; ch = chain; dc = double crochet; fptr = front post treble; mm = millimeters; sc = single crochet; sp(s) = space(s); st(s) = stitch(es); tr = treble crochet; yo = yarn over hook; [ ] = work directions in brackets the number of times specified; * or ** = repeat whatever follows the * or ** as indicated.
Pattern © by Coats & Clark Inc. Reproduced with permission from Coats & Clark Inc. PurpleKittyYarns.com is not endorsed by Coats & Clark Inc. It is not permissible to contract production of projects made from designs published by Coats & Clark to a third party for sale or distribution.
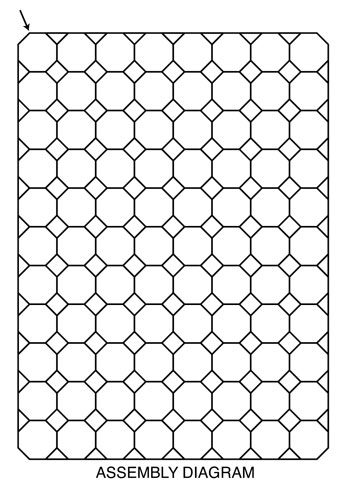
Circles in Octagons Throw WR2039
INTERMEDIATE
Designed by Anne Halliday.
Throw is 50" x 68".
RED HEART® "Super Saver®": 4 Skeins 313 Aran A; 2 skeins each 631 Light Sage B and 406 Medium Thyme C.
Crochet Hook: 5mm [US H-8].
Yarn needle.
GAUGE: Motif is 6" across. CHECK YOUR GAUGE. Use any size hook to obtain the gauge.

MOTIF (Make 88)
With B, ch 7; join with slip st in 1st ch to form ring.
Round 1 (Right Side): Ch 5 (counts as tr, ch 1), [tr, ch 1] 15 times in ring; join in 4th ch of ch-5 - 16 ch-1 spaces. Fasten off.
Round 2: Attach A in any ch-1 space; ch 1, sc in same space, ch 2, * sc in next ch-1 space, ch 2; repeat from * around; join. Fasten off.
Round 3: Attach C in any ch-2 space; ch 3 (counts as dc here and throughout), dc in same space, ch 1, * 2 dc in next ch-2 space, ch 1; repeat from * around; join. Fasten off.
Round 4: Attach A in any ch-1 space, ch 3, dc in same space, ch 3, 2 dc in next ch-1 space, ch 1, * 2 dc in next ch-1 space, ch 3, 2 dc in next ch-1 space, ch 1; repeat from * around; join. Fasten off.
SQUARE (Make 70)
Round 1 (Right Side): With A, ch 6, ([hdc, ch 3] 3 times) all in 6th ch from hook; join to 3rd ch of beginning ch-6 - 4 ch-3 spaces.
Round 2: Ch 3, (2 dc, ch 3, 2 dc) all in next ch-3 space, * dc in next hdc, (2 dc, ch 3, 2 dc) all in next ch-3 space; repeat from * around; join. Fasten off.
TRIANGLE (Make 34)
Row 1 (Wrong Side): With A, ch 5, (hdc, ch 3, hdc, ch 1, dc) all in 5th ch from hook; turn.
Row 2: Ch 5 (counts as tr, ch 1), dc in 1st dc, dc in next ch-1 space, dc in next hdc, (2 dc, ch 3, 2 dc) all in next ch-3 space, dc in next hdc, dc in next ch-1 space, (dc, ch 1, tr) all in 4th ch of beginning ch-5. Fasten off.
FINISHING
Following diagram, hold right sides of 2 Motifs together. With A and working through back loops only of both Motifs, sew through center st of any ch-3 space, next ch, next 2 dc, next ch-1 space, next 2 dc, next 2 ch. Fasten off. In this manner, join all pieces according to diagram.
Edging-Round 1: With Right Side facing, attach A in ch-3 space at corner marked with arrow on diagram, ch 5, dc in same space, [ch 1, skip next dc, dc in next dc, ch 1, (dc, ch 3, dc) all in next ch-3 space] 3 times; ch 1, skip next dc, dc in next dc, ch 1, * sc around post of next tr, ch 1, sc in top of next dc, ch 1, sc in center ch, ch 1, sc in top of next dc, ch 1, sc around post of next tr, ch 1, dc in next ch-3 space, ch 1, skip next dc, dc in next dc, ch 1, (dc, ch 3, dc) all in next ch-1 space; ch 1, skip next dc, dc in next dc, ch 1, ** repeat from * across side; *** [(dc, ch 3, dc) all in next ch-3 space, ch 1, skip next dc, dc in next dc, ch 1] 4 times; repeat from ** around; end at ***; join.
Round 2: Ch 1, [sc, ch 1] twice in next ch-3 space; work (sc, ch 1) in each ch-1 space and ([sc, ch 1] twice) in each ch-3 space around; join.
Round 3: * Slip st in next ch-1 space, ch 2; repeat from * around; join. Fasten off, weave in ends.
ABBREVIATIONS: A, B = color A, B; ch = chain; dc = double crochet; hdc = half double crochet; mm = millimeters; sc = single crochet; st(s) = stitch(es); tr = treble crochet; * or ** = repeat whatever follows the * or ** as indicated; [ ] = work directions in brackets the number of times specified.
Pattern © by Coats & Clark Inc. Reproduced with permission from Coats & Clark Inc. PurpleKittyYarns.com is not endorsed by Coats & Clark Inc. It is not permissible to contract production of projects made from designs published by Coats & Clark to a third party for sale or distribution.
| Pattern Categories Browse the categories to help you find the patterns you're looking for. |
||
     
|
|
|

|
Navigation

All contents © 2003-2025 Purple Kitty LLC. All rights reserved.
Privacy Policy | FAQ | About Me | Newsletters | Sitemap