 |
Red Heart Super Saver
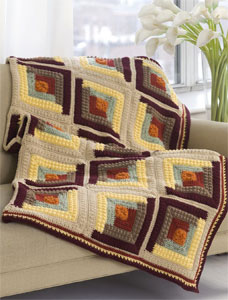
Autumn Beauty Throw WR2040
Skill Level: EASY
Designed by Martha Brooks Stein
Throw measures 46" x 60".
RED HEART® "Classic®": 3 skeins each 365 Coffee A, 289 Copper B, 339 Mid Brown C and 286 Bronze D; 2 skeins 631 Light Sage E and 1 skein 762 Claret F.
Red Heart® Super Saver®: 1 skein 321 Gold G.
Crochet Hook: 5.5mm [US I-9].
Yarn needle.
GAUGE: Square = 7". CHECK YOUR GAUGE. Use any size hook to obtain the gauge.
Special Abbreviation:
sc2tog (sc dec) = Insert hook into st and draw up a loop. Insert hook into next st and draw up a loop. Yarn over, draw through all 3 loops on hook.

THROW
Square (Make 48)
With G, ch 3, slip st in first ch to form a ring.
Round 1: Ch 4 (counts as dc and ch-1), [dc in ring, ch 1] 7 times - 8 dc.
Fasten off.
Round 2: Join F in any ch-space, ch 2, dc in same space, * ch 1, 2 hdc in next ch-space, ch 1, (2 dc, ch 2, 2 dc) in next ch-space; repeat from * around, end ch 1, 2 hdc in next ch-space, 2 dc in first corner ch-space, ch 2, slip st in top of beginning ch to join. Fasten off.
Round 3: Join E in any corner space, ch 2, dc in same space, *[ch 1, 2 dc in next ch-space] twice, ch 1, (2 dc, ch 2, 2 dc ) in corner space; repeat from * around, end 2 dc in first corner space, ch 2, slip st in top of beginning ch to join.
Fasten off.
Round 4: Join D in any corner space, ch 2, dc in same space, *ch 1, [2 dc in next ch-space, ch 1] across to next corner space, work (2 dc, ch 3, 2 dc) in corner ch-space; repeat from * around, end [2 dc in next ch-space, ch 1] across to first corner space, 2 dc in first corner space, ch 2, slip st in top of beginning ch to join. Fasten off.
Round 5: Join C in any corner space, repeat Round 4.
Round 6: Join B in any corner space, repeat Round 4.
Round 7: Join A in any corner space, ch 1, 2 sc in same space, *sc in each dc and in each ch-space across to next corner space, work (2 sc, ch 2, 2 sc) in corner space; repeat from * around, end sc in each dc and in each ch- space across to next corner space, 2 sc in first corner space, ch 2, slip st in top of beginning ch to join. Fasten off, leaving a 16" tail to use in sewing.
FINISHING
With wrong side together, use long tails to whipstitch Squares together through the back loops only. Make 8 Strips of 6 Squares each. Sew 8 Strips together along long edges.
Border
Round 1: Working in back loops only, join A in 2nd ch of any corner ch-2 space, ch 1, sc in same loop, [sc in each sc across to next corner, working sc2tog in corner ch-spaces of adjoining Squares and working (sc, ch 2, sc) in each corner space of Throw] around to first corner space, sc, ch 2, slip st to first st to join. Fasten off.
Round 2: Join D in any corner ch-2 space, ch 2, dc in same space, *[ch 1, skip next sc, dc in next 2 sc] across to 1 st before next corner, ch 1, skip last sc, (2 dc, ch 2, 2 dc) in corner space; repeat from * around, end with ch 1, skip last sc, 2 dc in first corner space, ch 2, slip st in top of beginning ch to join. Fasten off.
Round 3: Join C in any ch-2 corner space, ch 2, dc in same space, *[ch 1, 2 dc in next ch-1 space] across to next corner space, ch 1, work (2 dc, ch 2, 2 dc); repeat from * around, end 2 dc in first corner space, ch 2, slip st in top of beginning ch to join. Fasten off.
Round 4: Join B in any corner space, ch 1, sc in same space, *[ch 4, sc in next ch-1 space] across to next corner, ch 4, work (sc, ch 4, sc) in corner space; repeat from * around, end with sc in first corner space, ch 4, slip st in first sc to join. Fasten off.
FINISHING
Weave in ends.
ABBREVIATIONS: ch = chain; ch-space = chain space; dc = double crochet; hdc = half double crochet; mm = millimeters; sc = single crochet; st(s) = stitch(es); * = repeat whatever follows the * as indicated; [ ] = work directions in brackets the number of times specified.
Pattern © by Coats & Clark Inc. Reproduced with permission from Coats & Clark Inc. PurpleKittyYarns.com is not endorsed by Coats & Clark Inc. It is not permissible to contract production of projects made from designs published by Coats & Clark to a third party for sale or distribution.
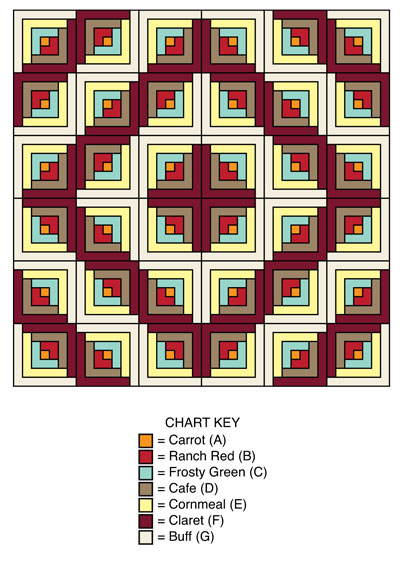
Autumn Log Cabin Throw WR1846
Throw measures 72" x 72".
Skill Level: INTERMEDIATE
Red Heart® Super Saver®: 1 Skein each 256 Carrot A, 332 Ranch Red B, and 4361 Frosty Green Fleck C; 2 skeins each 360 Cafe D, 320 Cornmeal E, and 378 Claret F; 3 skeins 334 Buff G.
Crochet Hook: 5mm [US H-8].
Yarn needle.
MOTIF (Make 36) Section 1: With A, ch 2.
Rnd 1 (Right Side): 8 Sc in 2nd ch from hook; join with a slip st in first sc; TURN.
Rnd 2: Ch 1, sc in next sc; * yo and draw up a loop in next sc, yo and draw through 1 loop on hook, [yo and draw through 2 loops] twice - long-dc made; (sc, long-dc) all in same place where first long-dc was made, sc in next sc; repeat from * twice more; (long-dc, sc, long-dc) all in last sc; join in first sc; turn.
Rnd 3: Ch 1, sc in first st, 3 hdc in next st for corner, [sc in next 3 sts, 3 hdc in next st] 3 times, sc in last 2 sts; join. Fasten off.
Section 2
Row 1: With right side facing, join B with sc in center hdc of any corner; sc in next 5 sts, 3 sc in next hdc, sc in next 6 sts; turn - 15 sc.
Rows 2-5: Ch 1, sc in each st to center sc of corner, 3 sc in next sc, sc in each st to end; turn - 23 sc at end of Row 5. Fasten off.
Section 3
Row 1: With right side facing, join C with sc in end of last row, sc in end of next 4 rows, 5 sc along edge of Section 1 to next corner, 3 sc in corner, 5 sc along edge of Section 1, sc in end of next 5 rows; turn - 23 sc.
Rows 2-5: Repeat Rows 2-5 of Section 2 - 31 sc at end of Row 5. Fasten off.
Section 4
Row 1: With right side facing, join D and sc in end of next 5 rows, sc in next 11 sc, 3 sc in next sc, sc in next 11 sc, sc in end of next 5 rows; turn - 35 sc.
Row 2: Ch 1, sc in first sc, [long-dc in next sc, sc in next sc] 8 times, (long-dc, sc, long-dc) all in corner sc, sc in next sc, [long-dc in next sc, sc in next sc] 8 times; turn - 37 sts.
Row 3: Repeat Row 2 of Section 2 - 39 sc.
Row 4: Repeat Row 2 of Section 4 except work sts in brackets 9 times instead of 8 times - 41 sts.
Row 5: Repeat Row 2 of Section 2 - 43 sts. Fasten off.
Section 5
Row 1: With right side facing, join E and sc in end of next 5 rows, sc in next 15 sc, 3 sc in next sc, sc in next 15 sc, sc in end of next 5 rows; turn - 43 sc.
Row 2: Repeat Row 2 of Section 4 except work sts in brackets 10 times instead of 8 times - 45 sts.
Row 3: Repeat Row 2 of Section 2 - 47 sc.
Row 4: Repeat Row 2 of Section 4 except work sts in brackets 11 times instead of 8 times - 49 sts.
Row 5: Repeat Row 2 of Section 2 - 51 sc. Fasten off.
Section 6
Row 1: With right side facing, join F and sc in end of next 5 rows, sc in next 21 sc, 3 sc in next sc, sc in next 21 sc, sc in end of next 5 rows; turn - 55 sc.
Row 2: Repeat Row 2 of Section 2 - 57 sc.
Row 3: Ch 1, sc in first sc, [ch 1, skip 1 sc, sc in next sc] 13 times, ch 1, skip 1 sc, 3 sc in next sc, [ch 1, skip 1 sc, sc in next sc] 14 times; turn - 59 sts.
Row 4: Ch 1, sc in first sc; (yo, insert hook in sc directly below the ch-1 and draw up a loop to height of row in work, yo and draw through all 3 loops on hook - long-hdc made; sc in next sc] 14 times, 3 sc in next sc, sc in next sc, [long-hdc, sc in next sc] 14 times; turn - 61 sts.
Row 5: Repeat Row 2 of Section 2 - 63 sc. Fasten off.
Section 7
Row 1: With right side facing, join G and sc in end of next 5 rows, sc in next 25 sts, 3 sc in next st, sc in next 25 sts, sc in end of next 5 rows; turn - 63 sc.
Row 2: Repeat Row 2 of Section 2 - 65 sc.
Row 3: Ch 1, sc in first sc, [ch 1, skip 1 sc, sc in next sc] 15 times, ch 1, skip 1 sc, 3 sc in next sc, [ch 1, skip 1 sc, sc in next sc] 16 times; turn - 67 sts.
Row 4: Ch 1, sc in first sc, [long-hdc, sc in next sc] 16 times, 3 sc in next sc, sc in next sc, [long-hdc, sc in next sc] 16 times; turn - 69 sts.
Row 5: Repeat Row 2 of Section 2 - 71 sc. Fasten off.
Motif Border
With right side facing, join G to any corner; ch 1, * (sc, hdc, sc) all in corner sc, 35 sc evenly spaced to next corner; repeat from * around; join in first sc. Fasten off.
FINISHING
Sew motifs together following diagram.
Outer Border
Rnd 1: With right side facing, join B in any sc; ch 1, sc around working 3 sc in each corner; join. There should be an odd number of sc between each center corner sc.
Rnd 2: Ch 1, sc in each sc around and work 3 sc in center corner sc; join. Fasten off.
Rnd 3: With right side facing, join E in any corner; ch 1, 2 sc in corner sc, [sc in each sc to next center corner sc, 3 sc in corner sc] 3 times, sc in each sc to next corner, work 1 more sc in same sc as first 2 sc; join.
Rnd 4: Ch 1, ** 3 sc in center corner sc, * ch 1, skip next sc, sc in next sc; repeat from * to next corner; ch 1, skip next sc; repeat from ** around; join. Fasten off.
Rnd 5: With right side facing, join F in any corner; ch 1, ** 3 sc in center corner sc, * sc in next sc, long-hdc; repeat from * to next corner; sc in next sc; repeat from ** around; join.
Rnd 6: Ch 1, sc in each st around and work 3 sc in center corner sc; join. Fasten off. Weave in ends.
ABBREVIATIONS: A, B, C, etc = color A, B, C, etc; ch = chain; dc = double crochet; hdc = half double crochet; mm = millimeters; rnd = round; sc = single crochet; st(s) = stitch (es); yo = yarn over; * or ** = repeat whatever follows the * or ** as indicated; [ ] = work directions in brackets the number of times specified.
Pattern © by Coats & Clark Inc. Reproduced with permission from Coats & Clark Inc. PurpleKittyYarns.com is not endorsed by Coats & Clark Inc. It is not permissible to contract production of projects made from designs published by Coats & Clark to a third party for sale or distribution.
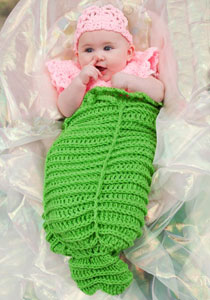
Baby Mermaid Cocoon LW2840
Baby will be a vision of cuteness in this cocoon with crocheted top and sweet tiara. It's perfect for Halloween or anytime baby needs to look cute while staying cozy.
Skill Level: EASY
Designed by Kim Guzman.
Directions are for Infant size 3 months; changes for sizes 6, 9 and 12 months are in parentheses.
Red Heart® Super Saver®: 1 skein each 672 Spring Green A and 373 Petal Pink B.
Crochet Hooks: 5.5mm [US I-9] and 6.5mm [US K-10.5].
Yarn needle; 2 split lock stitch markers.
GAUGE: 10 sts = 4"; 25 rows = 8" in sc with smaller hook. CHECK YOUR GAUGE. Use any size hook to obtain the gauge.
Finished chest measurements: 18½ (20½, 20½, 22½)".
Special Stitches
BPsc (Back Post Single Crochet) = insert hook from back to front to back around st, yarn over and draw loop through, yarn over and draw through 2 loops on hook.
Dc2tog (Double Crochet Two Together) = [yarn over and draw up a loop in next st, yarn over and draw through 2 loops] twice, yarn over and draw through all 3 loops on hook.
MERMAID TAIL
Round 1: Beginning at waist, with larger hook and A, ch 60; join with a slip st in first ch to form a ring being careful that ch is not twisted; change to smaller hook; ch 1, sc in each ch around; join with a slip st in first sc—60 sc.
Eyelet Round 2: Ch 3 (counts as hdc plus ch 1), skip first 2 sc, * hdc in next sc, ch 1, skip next sc; repeat from * around; join with a slip st to 2nd ch of ch-3.
Round 3: Ch 1, sc in each hdc and ch-1 space around; join to first sc. Change to larger hook.
Round 4: With larger hook, ch 3 (counts as first dc here and throughout), skip first sc, dc in each sc around; join to top of ch-3—60 dc.
Round 5: Ch 1, * BPsc; repeat from * around; join to first sc—60 BPsc.
Round 6: Ch 3, skip first sc, dc in each sc around; join.
Repeat Rounds 5 and 6 12 (13, 14, 14) times more.
Next Round: Repeat Round 5.
Next Round: Ch 1, skip first sc, dc in next sc (beginning dc2tog made), * dc2tog; repeat from * around; join to top of first dc—30 sts.
Next Round: Repeat Round 5—30 BPsc.
Next Round: Ch 1, skip first sc, dc in next sc, * dc2tog; repeat from * around; join—15 sts.
Next Round: Repeat Round 5—15 BPsc. Mark any st in this round.
Next Round: Ch 3, dc in same sc as joining, 2 dc in each sc around; join—30 dc.
Next Round: Repeat Round 5—30 BPsc.
Next Round: Repeat Round 6—30 sts.
Repeat last 2 rounds 3 times more. Fasten off, leaving a 12" tail for sewing.
Tail Indent
Lay garment flat with the yarn tail centered (front). With yarn needle and the 12" tail of yarn, beginning in the center of the last round of the Tail, weave the strand through the center of the stitches in a vertical line up to the marked round, then put needle and yarn through both layers of the fabric to the opposite (back) side and weave down through the center of the stitches; draw up firmly to form "indent" and fasten yarn securely.
Vertical lines
Holding larger hook and A on right side of fabric of the front, join yarn in a st on marked round about 2" away from Tail Indent; work a vertical chain st on the surface only up to Round 5 near waist. Fasten off.
Repeat 2nd vertical line approximately 4" from the first. Remove marker.
Waist Trim
Round 1: With larger hook, join A to work in unused loops of beginning ch; ch 1, sc in same st as joining, * skip 2 ch, Sh in next ch, skip 2 sc **, sc in next ch; repeat from * around, end at **; join to first sc.
Round 2: Slip st to first ch-1 space; ch 1, sc in same ch-1 space, [ch 3, sc in next ch-1 space] 3 times, * sc in next ch-1 space, [ch 3, sc in next ch-1 space] 3 times; repeat from * around; join. Fasten off.
Drawstring
With larger hook and A, make a 30" ch; slip st in 2nd ch from hook and in each ch across. Fasten off. Weave drawstring through the spaces of Eyelet Round 2.
MERMAID TOP
Back
** Row 1 (Right Side): With smaller hook and B, ch 25 (27, 27, 29); sc in 2nd ch from hook and in each ch across; turn—24 (26, 26, 28) sc.
Row 2: Ch 1, sc in each sc across; turn.
Repeat Row 2 until 14 (16, 16, 18) rows have been completed.
Shape Armhole
Row 1: Slip st across first 2 sc; ch 1, sc in next 20 (22, 22, 24) sc; turn leaving last 2 sc unworked.
Row 2: Ch 1, skip first sc, sc in each sc to last 2 sc, skip next sc, sc in last sc; turn—18 (20, 20, 22) sc. **
Row 3: Ch 1, sc in each sc across; turn.
Mark each end of last row. Repeat Row 3 until 8 (10, 10, 12) rows have been completed for Armhole.
Shape Shoulder-Next Row: Ch 1, sc in first 4 sc; turn.
Next Row: Ch 1, sc in 4 sc. Fasten off.
Opposite Shoulder
Skip 10 (12, 12, 14) sc of last long row for neck, join B in next sc; ch 1, sc in last 4 sc; turn.
Next Row: Ch 1, sc in 4 sc. Fasten off.
Front
Work same as for Back from ** to **.
Shape Armhole
Row 3: Repeat Row 2—16 (18, 18, 20) sc.
Mark each end of last row.
Row 4: Ch 1, sc in each sc across; turn.
Divide for Neck/Shoulder-Next Row: Ch 1, sc in first 7 sc; turn—7 sc.
Next Row: Ch 1, skip first sc, sc in next 6 sc; turn—6 sc.
Next Row: Ch 1, sc in first 4 sc, skip next sc, sc in last sc; turn—5 sc.
Next Row: Ch 1, skip first sc, sc in next 4 sc; turn—4 sc.
Next Row: Ch 1, sc in each sc across; turn.
Repeat last row until 10 (12, 12, 14) rows have been completed for Armhole. Fasten off.
Opposite Shoulder
Row 1: Skip next 2 (4, 4, 6) sc of last long row, join B in next sc; ch 1, sc in last 7 sc; turn.
Row 2: Ch 1, sc in 5 sc, skip next sc, sc in last sc; turn—6 sc.
Row 3: Ch 1, skip first sc, sc in 5 sc; turn—5 sc.
Row 4: Ch 1, sc in 3 sc, skip next sc, sc in last sc; turn—4 sc.
Row 5: Ch 1, sc in each sc across; turn.
Repeat Row 5 until 10 (12, 12, 14) rows have been completed for Armhole. Fasten off.
With yarn needle and B, sew side seams and shoulder seams.
Neck Trim
With right side facing and smaller hook, join B to a shoulder seam at neck edge; ch 1, sc evenly around; join to first sc. Fasten off.
Armhole Trim
Round 1: With right side facing and smaller hook, join B at top of side seam; ch 1, sc evenly around; join to first sc.
Round 2: Ch 1, sc in each sc around; join. Fasten off.
Repeat for opposite armhole.
Right Armhole Ruffle
Row 1: With right side facing, join yarn 3 rows directly below marker on Back and working through the fabric, ch 1, work 3 sc across 3 rows through fabric up to marker, work 13 (19, 19, 25) sc evenly across sc of Trim to next marker on Front, work 3 sc across 3 rows through fabric directly down from marker; turn—19 (25, 25, 31) sc.
Row 2: Ch 1, sc in same sc, * skip 2 ch, Sh, skip 2 sc, sc in next sc; repeat from * across; turn.
Round 3: Slip st to first ch-1 space; ch 1, sc in same ch-1 space, [ch 3, sc in next ch-1 space] 3 times, * sc in next ch-1 space, [ch 3, sc in next ch-1 space] 3 times; repeat from * across. Fasten off.
Repeat for Left Armhole beginning at marker on Front.
TIARA
Row 1: With smaller hook and B, ch 2; 5 sc in 2nd ch from hook; turn—5 sc.
Row 2: Ch 1, 2 sc in first sc, [sc in next sc, 2 sc in next sc] twice; turn—8 sc.
Row 3: Ch 1, 2 sc in first sc, [sc in next sc, 2 sc in next sc] 3 times, 2 sc in last sc; turn—13 sc.
Row 4: Ch 1, sc in first sc, [skip 2 ch, Sh, skip 2 sc, sc in next sc] twice; turn.
Round 5: Slip st to first ch-1 space; ch 1, sc in same ch-1 space, [ch 3, sc in next ch-1 space] 3 times, sc in next ch-1 space, [ch 3, sc in next ch-1 space] 3 times; do not fasten off; do not turn.
Tie-Next Row: Ch 1, sc in side of Row 3 and in side of Row 1 of Tiara; turn—2 sc.
Next Row: Ch 1, sc in 2 sc; turn.
Repeat last 2 rows until 32 rows have been completed.
Fasten off.
Repeat Tie on opposite side of Tiara: join yarn in Row 1; ch 1, sc in same row, sc in Row 3; turn. Work even in sc on these 2 sc for 32 rows.
ABBREVIATIONS: A, B = color A, B; ch = chain; dc = double crochet; hdc = half double crochet; mm = millimeters; sc = single crochet; st(s) = stitch (es); tog = together; * or ** = repeat whatever follows the * or ** as indicated; [ ] = work directions in brackets the number of times specified.
Pattern © by Coats & Clark Inc. Reproduced with permission from Coats & Clark Inc. PurpleKittyYarns.com is not endorsed by Coats & Clark Inc. It is not permissible to contract production of projects made from designs published by Coats & Clark to a third party for sale or distribution.
Puppy Pirate Hat LW2817
Yo ho, yo ho! Your puppy will be singing "A pirate's life for me" when you crochet him a pirate's hat complete with skull and cross bones.
Designed by Nancy Anderson.
Skill Level: EASY
Red Heart® Super Saver®: 1 skein each 312 Black A and 316 Soft White B.
Crochet Hooks: 4mm [US G-6] and 3.5mm [US E-4] (for applique). Stitch markers. Yarn needle.
GAUGE: With larger hook, 18 sts = 4"; 20 rows sc = 4". Gauge is not overly important for this project since the hat is designed to sit on top of the head. CHECK YOUR GAUGE. Use any size hook to obtain the gauge.
Finished Size
Directions are given for size Small. Changes for Medium/ Large are in parentheses.
Small: 6" wide x 3" tall.
Medium/Large: 7½" wide x 3½ tall.
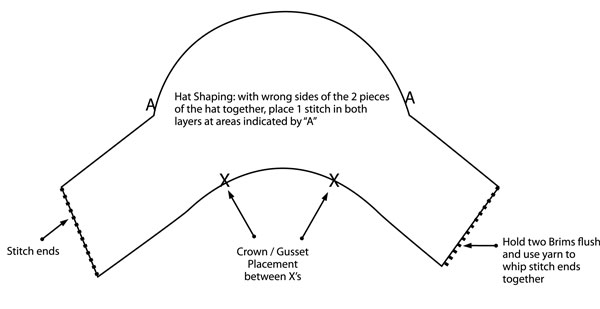
NOTES: Hidden ear openings allow this hat to be worn by perky-eared dogs as well as flat-eared dogs. Some adjustments for individual dog may be needed and can be made by either decreasing or increasing the number of starting chains in the crown piece or increasing or decreasing overall hat width. The latter can be achieved by adding or subtracting an even number of starting ch sts and sc sts, which comprise the sides of the hat brim.
Work in back bumps of chains: Turn foundation ch over to the wrong side, insert hook in the bump formed at the back of the ch and proceed with the st as usual.

HAT
Hat Brim (make 2)
With larger hook and A, ch 21 (31).
Row 1: Working in back bumps only, sc in 2nd ch from hook and in each ch across, turn - 20 (30) sc.
NOTE: On opposite side of foundation ch, mark placement of crown by placing a marker in 6th (11th) ch from each end of foundation ch.
Row 2: Ch 1, sc in first 5 (10) sts, place marker, hdc in next 3 sts, [dc in next st, 2 dc in next st] twice, hdc in next 3 sts, sc in next st, place marker, sc in last 4 (9) sts, turn - 32 (42) sts.
Row 3: Ch 1, sc in first 5 (10) sts, hdc in next 12 sts, sc in last 5 (10) sts, turn - 22 (32) sts.
Row 4: Ch 1, sc in first 5 (10) sts, hdc in next st, 2 hdc in next st, hdc in next 2 sts, dc in next st, 2 dc in each of next 2 sts, dc in next st, hdc in next 2 sts, 2 hdc in next st, hdc in next st, sc in last 5 (10) sts, turn - 26 (36) sts.
Row 5: Ch 2 (does not count as a st), hdc in first st, sc in next 4 (9) sts, 2 hdc in next st, hdc in next 3 sts, 2 hdc in next st, hdc in next 2 sts, 2 hdc in each of next 2 sts, hdc in next 2 sts, 2 hdc in next st, hdc in next 3 sts, 2 hdc in next st, sc in next 4 (9) sts, hdc in last st, turn - 32 (42) sts. Fasten off size Small, leaving a long sewing length.
Size Medium/Large only
Row 6: Ch 2, hdc in first st, sc in next 9 sts, hdc in next 22 sts, sc in next 9 sts, hdc in last st, turn - 42 sts. Row 7: Ch 2, hdc in first st, sc in next 9 sts, hdc in st, 2 hdc in next st, hdc in next 5 sts, 2 hdc in next st, hdc in next 6 sts, 2 hdc in next st, hdc in next 5 sts, 2 hdc in next st, hdc in next st, sc in next 9 sts, hdc in last st - 46 sts. Fasten off, leaving a long sewing length.
Hat Crown/Gusset
Row 1: With right side facing and larger hook, join A with a slip st in back loop of first marked ch on opposite side of foundation ch, working in back loops of ch sts only, ch 1, sc in same st and in next 8 ch sts, turn leaving remaining sts unworked - 9 sts.
Row 2-4: Ch 1, sc in each st across, turn. Fasten off size Small, leaving a long sewing length.
Size Medium/Large only
Row 5: Ch 1, sc in each st across. Fasten off, leaving a long sewing length.
ASSEMBLY
With yarn needle and sewing length, working in inside loops of sts, whipstitch last row of Crown/Gussett to corresponding marked sts of foundation ch on second Hat Brim. Weave in ends.
APPLIQUE
Size Small only
Skull
With smaller hook and B, ch 3.
Row 1: 2 sc in 2nd ch from hook, sc in next st, turn - 3 sc.
Row 2: Ch 1, sc in first sc, 2 sc in next sc, sc in last sc, turn - 4 sc.
Row 3: Ch 1, 2 sc in first sc, sc in next 2 sc, 2 sc last sc, turn - 6 sc.
Row 4: Ch 1, skip first sc, sc in next 3 sts, skip next sc, sc in last sc, turn - 4 sc.
Fasten off, leaving a sewing length.
Cross Bones (make 2)
With smaller hook and B, ch 2.
First End: 4 sc in 2nd ch from hook; join with slip st in first sc, ch 9.
Second End: 4 sc in 2nd ch from hook; join with slip st in first sc. Fasten off, leaving a sewing length.
Size Medium/Large only Skull
With smaller hook and B, ch 3.
Row 1: 2 sc in 2nd ch from hook, sc in next st, turn - 3 sc.
Row 2: Ch 1, 2 sc in first sc, sc in next sc, 2 sc in last sc, turn - 5 sc.
Row 3: Ch 1, sc in each sc across, turn.
Row 4: Ch 1, sc in first sc, [2 sc in next sc, sc in next sc] twice, turn - 7 sc.
Row 5: Ch 1, sc in each sc across, turn.
Row 6: Ch 1, skip first st, sc in next 4 sc, sc2tog over last 2 sts, turn - 5 sts.
Row 7: Ch 1, skip first st, sc in next 2 sc, sc2tog over next 2 sts, slip st in last st.
Fasten off, leaving a sewing length.
Cross Bones (make 2)
With smaller hook and B, ch 2.
First End: 4 sc in 2nd ch from hook; join with slip st in first sc, ch 11.
Second End: 4 sc in 2nd ch from hook; join with slip st in first sc. Fasten off, leaving a sewing length.
Ear Loop: With larger hook, join A with slip st in corner at base of Row 1 of Crown/Gusset, ch 10 (16) or desired length to fit over ear, skip side edge of Crown/Gusset, slip st in corner on opposite side of Crown/Gusset where last row is joined to other Brim (Ear Loop made). Fasten off.
Tie: With larger hook, join A to center of Ear Loop just formed, ch 33 (50) or desired length for Tie. Fasten off. Repeat Ear Loop and Tie on opposite side of Crown/Gusset.
FINISHING
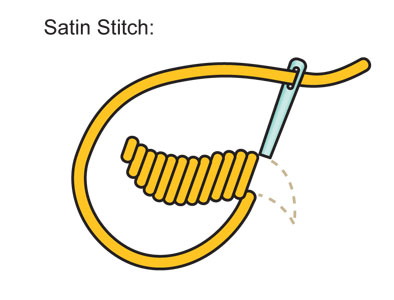
Lay out Cross Bones in an "X" configuration on front of hat as pictured and with yarn needle and sewing length, whipstitch bones in place. With yarn needle and A, satin st 2 eyes and a triangular shaped nose as pictured on Skull. Whipstitch skull onto hat as pictured.
Place 2 Brim pieces together with wrong sides facing. With yarn needle and A, matching sts, whipstitch Brim pieces together across short edges. Brim shape is maintained by making a stitch through both parts in 2 different locations on the top edge of the brim, (do not sew entire brim closed). Hold hat together at the top. Tack the 2 layers together as indicated by the letter "A" on the schematic, using a single stitch. Weave in ends.
Tie to dog's head using ties, being careful not to tie the piece too tightly. The chain loop is designed to hold the hat straight on the head and can be used to poke ears through as needed.
Pattern © by Coats & Clark Inc. Reproduced with permission from Coats & Clark Inc. PurpleKittyYarns.com is not endorsed by Coats & Clark Inc. It is not permissible to contract production of projects made from designs published by Coats & Clark to a third party for sale or distribution.
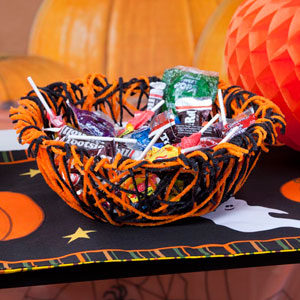
Crafty Yarn Bowl for Treats LW2838
You don't need to knit or crochet to make a bowl with yarn. After soaking yarn in glue, each strand is placed over a bowl to dry. Kids will have fun creating a bowl for Halloween or any occasion. Follow these easy instructions.
Designed by Red Heart Design Team.
Red Heart® Super Saver®: 1 skein each Pumpkin A and 512 Black B.
Materials: Two bowls (one for mixing/soaking and one to use as your mold), plastic wrap, white glue, plastic spoon and newspaper.
Note: Place newspaper under project to protect work surface. This craft project will need to dry for 24 to 48 hours so start in an appropriate work area.
1. Take ¾ cup white glue and ¾ cup water and mix together in one bowl until well blended. (This amount can be reduced for small bowls, or you can mix more if you use up your glue mixture on a larger bowl.)
2. Turn second mixing bowl upside down. Take one strand of yarn and measure across the bowl from one side to the other. It is better to have a little more than not enough. Use that piece as a guide and cut 50 strands of A and 50 strands of B. Take a handful of A and B and soak in the glue mixture.
3. While yarn is soaking, place plastic wrap over the bowl covering entire bowl. Note: As yarn is used, add more yarn to the mixture for soaking.
4. Pull out yarn strands one at a time, running each strand between thumb and forefinger to remove excess glue. Place yarn strand over plastic-covered bowl. Continue this process, randomly selecting colors until entire bowl is covered.
5. Allow to dry for 24 to 48 hours depending on humidity.
6. Once yarn is completely dry, separate from the bowl, remove the plastic wrap and trim the edges.
Pattern © by Coats & Clark Inc. Reproduced with permission from Coats & Clark Inc. PurpleKittyYarns.com is not endorsed by Coats & Clark Inc. It is not permissible to contract production of projects made from designs published by Coats & Clark to a third party for sale or distribution.
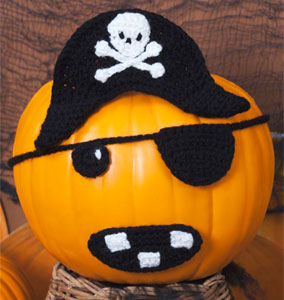
Jolly Roger Pirate Pumpkin LW2827
This one-eyed pirate will add a spooky note to your Halloween decor! Crochet these appliques and simply attach to your pumpkin. It's a great alternative to using a knife to cut out the shapes.
Skill Level: EASY
Designed by Nancy Anderson.
Red Heart® Super Saver®: 1 skein each 312 Black A and 316 Soft White B.
Crochet Hooks: 3.75mm [US F-5] and 3.5mm [US E-4] (for hat appliques).
Stitch markers.
Yarn needle.
Self-stick hook-and-loop fasteners, double sided tape or glue dots for attaching to pumpkin.
GAUGE: With larger hook, 8 sts and 9 rows sc = 2"; Pirate's eye = 1¼" in diameter. CHECK YOUR GAUGE. Use any size hook to obtain the gauge given.
NOTE: Use these appliques on a whole pumpkin. Yarn appliques are not for use near candle flames or lit bulbs.
Work in back bumps of chains: Turn foundation ch over to the wrong side, insert hook in the bump formed at the back of the ch and proceed with the st as usual.
HAT
With larger hook and A, ch 31.
Row 1: Working in back bumps only, sc in 2nd ch from hook and in each ch across, turn - 30 sc.
NOTE: On opposite side of foundation ch, mark placement of crown by placing a marker in 11th ch from each end of foundation ch.
Row 2: Ch 1, sc in first 10 sts, place marker, hdc in next 3 sts, [dc in next st, 2 dc in next st] twice, hdc in next 3 sts, sc in next st, place marker, sc in last 9 sts, turn - 42 sts.
Row 3: Ch 1, sc in first 10 sts, hdc in next 12 sts, sc in last 10 sts, turn - 32 sts.
Row 4: Ch 1, sc in first 10 sts, hdc in next st, 2 hdc in next st, hdc in next 2 sts, dc in next st, 2 dc in each of next 2 sts, dc in next st, hdc in next 2 sts, 2 hdc in next st, hdc in next st, sc in last 10 sts, turn - 36 sts.
Row 5: Ch 2 (does not count as a st), hdc in first st, sc in next 9 sts, 2 hdc in next st, hdc in next 3 sts, 2 hdc in next st, hdc in next 2 sts, 2 hdc in each of next 2 sts, hdc in next 2 sts, 2 hdc in next st, hdc in next 3 sts, 2 hdc in next st, sc in next 9 sts, hdc in last st, turn - 42 sts.
Row 6: Ch 2, hdc in first st, sc in next 9 sts, hdc in next 22 sts, sc in next 9 sts, hdc in last st, turn - 42 sts.
Row 7: Ch 2, hdc in first st, sc in next 9 sts, hdc in st, 2 hdc in next st, hdc in next 5 sts, 2 hdc in next st, hdc in next 6 sts, 2 hdc in next st, hdc in next 5 sts, 2 hdc in next st, hdc in next st, sc in next 9 sts, hdc in last st - 46 sts.
Fasten off, leaving a long sewing length.
Hat Appliques
Skull
With smaller hook and B, ch 3.
Row 1: 2 sc in 2nd ch from hook, sc in next st, turn - 3 sc.
Row 2: Ch 1, 2 sc in first sc, sc in next sc, 2 sc in last sc, turn - 5 sc.
Row 3: Ch 1, sc in each sc across, turn.
Row 4: Ch 1, sc in first sc, [2 sc in next sc, sc in next sc] twice, turn - 7 sc.
Row 5: Ch 1, sc in each sc across, turn.
Row 6: Ch 1, skip first st, sc in next 4 sc, sc2tog over last 2 sts, turn - 5 sts.
Row 7: Ch 1, skip first st, sc in next 2 sc, sc2tog over next 2 sts, slip st in last st.
Fasten off, leaving a sewing length.
Cross Bones (make 2)
With smaller hook and B, ch 2.
First End: 4 sc in 2nd ch from hook; join with slip st in first sc, ch 11.
Second End: 4 sc in 2nd ch from hook; join with slip st in first sc. Fasten off, leaving a sewing length.
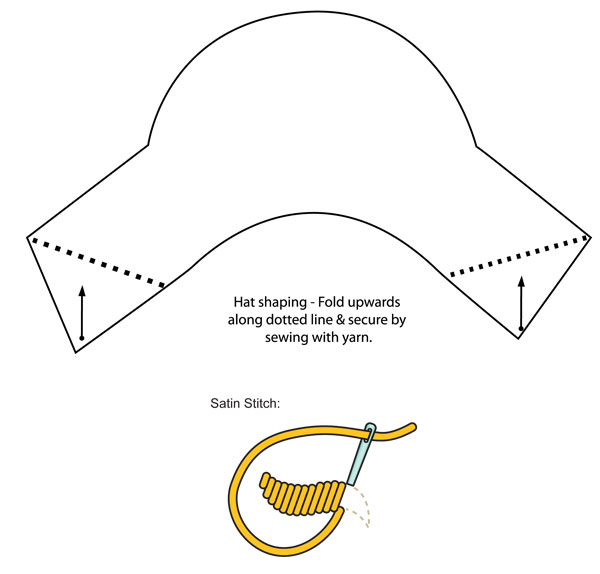
FINISHING
With right side facing upwards, locate the edge on one side of the hat. Referring to the schematic, fold this edge up in a triangular fashion to form a point at the tip of the edge. With yarn needle and A, whipstitch together in a few places. Repeat for the other edge.
Lay out Cross Bones in an "X" configuration on front of hat as pictured and with yarn needle and sewing length, whipstitch bones in place. With yarn needle and A, satin st 2 eyes and a triangular shaped nose as pictured on Skull. Whipstitch skull onto hat as pictured.
APPLIQUES
Eye Patch
Starting at top edge, with larger hook and A, ch 10.
Row 1: Working in back bumps only, sc in 2nd ch from hook and in each ch across, turn - 9 sc.
Row 2-5: Ch 1, sc in each st across, turn.
Row 6: Ch 1, skip first st, sc in next 6 sts, skip next st, sc in last st, turn - 7 sc.
Row 7: Ch 1, skip first st, sc in next 4 sts, skip next st, sc in last st, turn - 5 sc.
Row 8: Ch 1, skip first st, sc in next 2 sts, skip next st, sc in last st turn - 3 sc.
Edging and Ties
First Side: Ch 1, working across side edge of Eye Patch, work sc 8 sc evenly space across to next corner, ch 60 for tie (or desired length to tie around pumpkin). Fasten off.
Second Side: With larger hook and A, ch 60 (or desired length to tie around pumpkin), slip st to opposite top corner of Eye Patch, working across other side edge of Eye Patch, work 7 sc evenly spaced across to corner of Row 8, 2 sc in corner st, sc in next sc, 2 sc in next st, join with slip st in first sc of First Side. Fasten off. Weave and ends.
Pirate Eye
With larger hook and A, make an adjustable loop.
Rnd 1: Work 6 sc in loop; join with a slip st in first sc - 6 sc.
Rnd 2: Ch 1, 2 sc in each sc around; join with a slip st in first sc - 12 sc.
With yarn needle and B, straight st a ⅛" highlight in corner of Eye as pictured.
Mouth
With larger hook and A, ch 17.
Row 1: Working in the back bumps only, sc in 2nd ch from hook and in each across, turn - 16 sc.
Row 2: Ch 1, skip first st, sc in next 13 sts, skip next st, sc in last st, turn - 14 sc.
Row 3: Ch 1, skip first st, sc in next 11 sts, skip next st, sc in last st, turn - 12 sc.
Row 4: Ch 1, skip first st, sc in next 9 sts, skip next st, sc in last st, turn - 10 sc.
Row 5: Ch 1, skip first st, sc in next 7 sts, skip next st, sc in last st, turn - 8 sc.
Row 6: Ch 1, skip first st, sc in next 5 sts, skip next st, sc in last st, turn - 6 sc.
Edging: Ch 1, sc evenly around Mouth; join with a slip st in first sc. Fasten off. Weave in ends.
Teeth (make 3)
With larger hook and B, ch 4.
Row 1: Sc in 2nd ch from hook and in each across, turn - 3 sc.
Row 2: Ch 1, sc in each sc across. Fasten off, leaving a sewing length.
With yarn needle and sewing length, whipstitch teeth to mouth as pictured. Weave in ends.
FINISHING
Weave in ends. Attach self-stick hook-and-loop fastener (or other adhesive) to back of motifs. Arrange and stick to pumpkin.
ABBREVIATIONS: A, B = Color A, B; ch = chain; dc = double crochet; dc = double crochet; hdc = half double crochet; mm = millimeters; sc = single crochet; st(s) = stitch(es); [ ] = work directions in brackets the number of times specified.
Pattern © by Coats & Clark Inc. Reproduced with permission from Coats & Clark Inc. PurpleKittyYarns.com is not endorsed by Coats & Clark Inc. It is not permissible to contract production of projects made from designs published by Coats & Clark to a third party for sale or distribution.
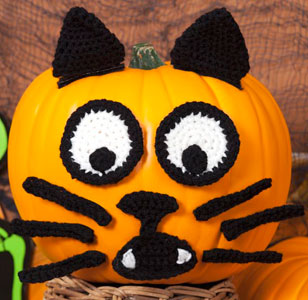
Spooky Cat Pumpkin LW2839
This scary cat is a scream! Crochet these appliques and simply attach to your pumpkin. It's a great alternative to using a knife to cut out the shapes.
Skill Level: EASY
Designed by Nancy Anderson.
Red Heart® Super Saver®: 1 skein each 312 Black A and 316 Soft White B.
Crochet Hooks: 3.75mm [US F-5] and 3.5mm [US E-4].
Stitch markers.
Yarn needle.
Self-stick hook-and-loop fasteners, double sided tape or glue dots for attaching to pumpkin.
GAUGE: With larger hook, 8 sts and 9 rows sc = 2"; Cat's eye = 2¾" in diameter. CHECK YOUR GAUGE. Use any size hook to obtain the gauge given.
Special Stitches
sc2tog: [Insert hook in next st, yo, draw yarn through st] twice, yo and draw through all 3 loops on hook.
NOTE: Use these appliques on a whole pumpkin. Yarn appliques are not for use near candle flames or lit bulbs.
Work in back bumps of chains: Turn foundation ch over to the wrong side, insert hook in the bump formed at the back of the ch and proceed with the st as usual.
APPLIQUES
Eyes (make 2)
With larger hook and B, make an adjustable loop.
Round 1: Work 6 sc in loop; join with a slip st in first sc - 6 sc.
Round 2: Ch 1, 2 sc in first 5 st, 3 sc in last st; join with a slip st in first sc - 13 sc.
Round 3: Ch 1, starting in first st, [sc in next st, 2 sc in next st] 6 times, sc in last st; join with a slip st in first sc - 19 sc.
Round 4: Ch 1, starting in first st, [sc in next 2 sts, 2 sc in next st] 6 times, sc in last st; join with a slip st in first sc - 25 sc. Fasten off B, join A.
Round 5: With A, ch 1, [sc in next 3 sts, 2 sc in next st] 6 times, sc in last st; join with a slip st in first sc - 25 sc.
Pupil (make 2)
With larger hook and B, make an adjustable loop.
Round 1: Work 6 sc in loop; join with a slip st in first sc - 6 sc. Fasten off, leaving a sewing length.
With yarn needle and sewing length, whipstitch pupils to Eyes as pictured. Weave in ends.
Nose
Starting with the crocheted line that connects the nose to the mouth, leaving a sewing length, with larger hook and A, leaving a sewing length, ch 4.
Row 1: Working in the back bumps, sc in 2nd ch from hook and in each ch across, turn to work across row-end st - 3 sc.
Row 2: Ch 1, work 3 sc in row-end st, turn - 3 sc.
Row 3: Ch 1, 2 sc in first st, sc in next st, 2 sc in last st, turn - 5 sc.
Row 4: Ch 1, starting in first st, [2 sc in st, sc in next st] twice, 2 sc in last st, turn - 8 sc.
Row 5: Ch 1, 2 sc in first st, sc in next 6 sts, 2 sc in last st - 10 sc. Fasten off.
Mouth
Starting at bottom edge, with larger hook and A, ch 12.
Row 1: Working in the back bumps, sc in 2nd ch from hook and in each ch across, turn - 11 sc.
Row 2: Ch 1, skip first st, sc in next 8 sts, skip next & slip st in last st, turn - 9 sts.
Row 3: Ch 1, skip first st, sc in next 8 sts, skip next & slip st in last st, turn - 7 sts.
Row 4: Ch 1, skip first st, sc in next 8 sts, skip next & slip st in last st, turn - 5 sts.
Row 5: Ch 1, skip first st, sc in next 8 sts, skip next & slip st in last st, turn - 3 sts.
Edging: Ch 1, sc evenly around, working 3 sc across side edge, 2 sc in next corner, sc in each st across bottom edge, 2 sc in corner st, work 3 sc evenly spaced across side edge, 2 sc in corner st, sc in each st across top edge; join with a slip st in first sc. Fasten off.
With yarn needle and sewing length, whipstitch Nose to center top of Mouth as pictured.
Teeth
With yarn needle and B, make pointed teeth by inserting needle close to the outside edge of the mouth as pictured, insert needle back into mouth piece about ⅜" in from edge. Work another straight st at an angle to the first to form triangular shape. Work another straight st in the middle to fill in tooth.
Ear (make 2)
Starting at bottom, with larger hook and A, ch 10.
Row 1: Working in the back bumps, sc in 2nd ch from hook and in each ch across, turn - 9 sc.
Row 2: Ch 1, sc in each st across, turn.
Work now progresses in rounds.
Round 3: Ch 1, working in back loops only, sc in each st across, rotate, sc in each row-end sts across side edge, rotate, working along opposite side of foundation ch, sc in each ch across side edge; join with a slip st in first sc - 22 sc.
Round 4: Work in a spiral now and throughout remainder of Ear, sc in each st around - 22 sc. Mark first st of round and move marker up as work progresses.
Round 5: [Sc in next 9 sts, sc2tog over next 2 sts] twice - 20 sts.
Round 6: [Sc in next 8 sts, sc2tog over next 2 sts] twice - 18 sts.
Round 7: [Sc in next 7 sts, sc2tog over next 2 sts] twice - 16 sts.
Round 8: Sc in each st around - 16 sc.
Round 9: [Sc in next 6 sts, sc2tog over next 2 sts] twice - 14 sts.
Round 10: [Sc in next 5 sts, sc2tog over next 2 sts] twice - 12 sts.
Round 11: [Sc in next 4 sts, sc2tog over next 2 sts] twice - 10 sts.
Round 12: [Sc in next 3 sts, sc2tog over next 2 sts] twice - 8 sts.
Round 13: [Sc2tog over next 2 sts] around - 4 sts. Fasten off, leaving a sewing length. With yarn needle, weave sewing length though sts in last round, gather tightly and secure. Weave in ends.
Whiskers (make 6)
With larger hook and A, ch 13.
Row 1: Working in the back bumps, sc in 2nd ch from hook and each ch across, turn - 12 sc.
Row 2: Ch 1, sc in each st across. Fasten off.
FINISHING
Weave in ends. Attach self-stick hook-and-loop fastener (or other adhesive) to back of motifs. Arrange and stick to pumpkin.
ABBREVIATIONS: A, B = Color A, B; ch = chain; dc = double crochet; hdc = half double crochet; mm = millimeters; sc = single crochet; st(s) = stitch(es); [ ] = work directions in brackets the number of times specified.
Pattern © by Coats & Clark Inc. Reproduced with permission from Coats & Clark Inc. PurpleKittyYarns.com is not endorsed by Coats & Clark Inc. It is not permissible to contract production of projects made from designs published by Coats & Clark to a third party for sale or distribution.
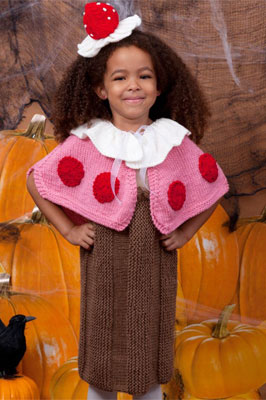
Cupcake Cutie LW2823
It's a cupcake kind of year. This popular dessert gets reinvented into a costume sure to please any little miss from 2 to 8.
Designed by Carolyn Christmas.
Skill Level: INTERMEDIATE
Directions are for size 2 years; changes for sizes 4, 6 and 8 years are in parentheses.
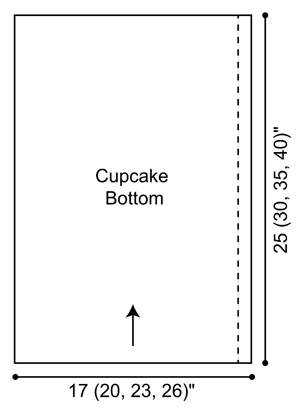
Cupcake Bottom Measurements
Chest: 20 (21, 22, 24)".
Bottom Width: 25 (30, 35, 40)".
Length from Shoulder: 19½ (23, 26, 30)".
Red Heart® Super Saver®: 2 Skeins 360 Cafe A; 1 Skein each 319 Cherry Red B, 706 Perfect Pink C, and 316 Soft White D.
Knitting Needles: 6mm [US 10].
1 yd elastic, ⅜” wide, 1 yd ribbon, ¼” wide, fiberfill, safety pin, stitch holders, stitch markers, yarn needle.
GAUGE: 14 sts = 4"; 24 rows = 4" in Garter st. CHECK YOUR GAUGE. Use any size needles to obtain the gauge.
NOTE: Cupcake Costume consists of Headband, Cupcake Bottom, and Cupcake Icing Topper. Cupcake Bottom is in one piece from side to side. Topper is worked from neck edge down to lower edge.
SPECIAL ABBREVIATIONS
K1-f/b: Knit 1 front and back (1 st inc) - Knit next st, then knit it tbl.
K2tog: (1 st dec) Knit 2 sts together.
K3tog: (2 st dec) Knit 3 sts together.
Ssk: (1 st dec) Slip next two stitches knitwise to right needle, insert point of left needle through front of sts, knit these sts together through back loop.
HEADBAND
Headband
Row 1: With A, cast on 5 sts. Knit until piece measures 16". Bind off.
Icing Fluff
With D, cast on 99 sts.
Knit 6 rows.
Change to work in St st until piece measures 3" from beginning, end with a wrong side row.
Decrease Row: [K3tog] across - 33 sts.
Cut yarn, leaving a long tail. Thread tail through remaining sts twice and pull to close. Knot to secure.
Strawberry
With B, cast on 24 sts.
Row 1 (Wrong Side): Purl.
Row 2: K1-f/b in each st across - 48 sts.
Row 3: P24, place marker, purl to end.
Decrease Row: K2, k2tog, knit to 3 sts before marker, ssk, k2, k2tog, knit to last 4 sts, ssk, k2 - 44 sts.
Repeat Decrease Row every other row 8 times more - 12 sts on last row.
Cut yarn, leaving a long tail. Thread tail through remaining sts twice and pull to close. Knot to secure.
CUPCAKE BOTTOM
With A, cast on 60 (70, 80, 90) sts.
Row 1 (Wrong side): Slip 1, knit to last 5 sts, p1, k4.
Row 2: Slip 1, p3, k1, p4, knit to end.
Row 3: Slip 1, knit to last 5 sts, p1, k4.
Rows 4-21: Repeat Rows 2 and 3.
Row 22: Slip 1, p3, k1, purl to end.
Row 23: Slip 1, knit to last 5 sts, p1, k4.
Rows 24-30: Repeat Rows 21-22.
Repeat Rows 2-30 until piece measures 25 (30, 35, 40)" from beginning, end with Row 30.
Bind off.
Straps (Make 2)
With A, cast on 35 (42, 42, 56) sts.
Work in Garter stitch until piece measures 1½” from beginning.
Bind off.
CUPCAKE ICING TOPPER
Collar
With D, cast on 168 sts. Knit 6 rows.
Change to work in St st until piece measures 4" from beginning, end with a wrong side row.
Decrease Row: [K3tog] across - 56 sts.
Purl 4 rows.
Topper
Note: Wrong side of Collar will now be right side of Topper so both right sides will show when Collar is folded over.
Eyelet Row (Right Side): Change to C, k3, *yo, k2tog, k2; repeat from * across to last st, k1.
Row 1: K3, place marker, p11, [place marker, p14] twice, place marker, p11, k3.
Row 2: K3, k1-f/b, [knit to 2 sts before marker, k1-f/b, k2, k1-f/b] 3 times; knit to 1 st before last marker, k1-f/b, k3 - 64 sts; 8 sts increased.
Row 3: K3, purl to last 3 sts, k3.
Rep Rows 2-3 until piece measures 7" from Eyelet Row, end with Row 2.
Shape Scallops
Row 1 (Wrong Side): K3, *purl to 1 st before marker, k2; repeat from * to last st, k1.
Row 2: K3, k1-f/b, [knit to 3 sts before marker, k1-f/b, k4, k1-f/b] 3 times, knit to 1 st before last marker, k1-f/b, k3.
Row 3: K3, [purl to 3 sts before marker, k6] 3 times, purl to last 3 sts, k3.
Row 4: K3, k1-f/b, [knit to 4 sts before marker, k1-f/b, k6, k1-f/b] 3 times, knit to 1 st before last marker, k1-f/b, k3.
Row 5: K3, purl to 3 sts before marker, k3, leave remaining sts unworked.
First Scallop
Row 6: K3, k2tog, knit to last 5 sts, k2tog, k3.
Row 7: K3, purl to last 3 sts, k3.
Rows 8-13: Repeat Rows 6-7.
Row 14: Repeat Row 6.
Row 15: Knit.
Row 16: K3, k2tog, knit to last 5 sts, k2tog, k3.
Rows 17-20: Repeat Rows 15-16. Bind off.
Second Scallop
Row 5: Join yarn in next unworked st on Row 5, k3, purl to 3 sts before marker, k3, leave remaining sts
unworked.
Work as for First Scallop.
Third and Fourth Scallop
Work as for Second Scallop.
POLKA DOTS (Make 8)
With B, cast on 5 sts.
Rows 1-42: Knit.
Bind off, leaving a long tail.
FINISHING Headband
Sew short ends of Headband together.
Sew short ends of Icing Fluff together.
With D, sew French knots around Strawberry. Sew side seam of Strawberry closed, stuffing with fiberfill before closing. Sew Strawberry to center of Icing Fluff.
Sew both to Headband.
Weave in ends.
Cupcake Bottom
Sew cast-on and bind-off rows together to form a tube. Fold top edge to wrong side along marked stitch and sew in place, leaving an opening for inserting elastic, for casing. Cut a length of elastic, 20 (21, 22, 24)" long, or desired chest measurement. Thread elastic through casing. Overlapping ends, sew ends together. Sew opening closed. Measure and mark center 6 (7, 7, 8)" along top edge on Front and Back for Neck and Strap placement. Sew short edges of each Strap to wrong side of top edge of Front and Back where marked. Weave in ends.
Cupcake Icing Topper
Sew short edges of one Polka Dot together to make a loop. Thread yarn along inside long edge of loop and pull to gather and form center of dot. Knot to secure.
Repeat to make 8 Polka Dots.
Sew two Polka Dots on each scallop.
Weave ribbon through Eyelet Row for neck tie. Fold Collar to right side of Topper.
Weave in ends.
Abbreviations: A, B, C = Color A, B, C; k = knit; mm = millimeters; p = purl; St st = Stockinette stitch; st(s) = stitch(es); tog = together; yo = yarn over; [ ] = work directions in brackets the number of times specified; * or ** = repeat whatever follows the * or ** as indicated.
Pattern © by Coats & Clark Inc. Reproduced with permission from Coats & Clark Inc. PurpleKittyYarns.com is not endorsed by Coats & Clark Inc. It is not permissible to contract production of projects made from designs published by Coats & Clark to a third party for sale or distribution.
Cupcake Bag LW2813
First you make the cake, then you crochet the frosting and before you know it you have a fun cupcake bag. This project was designed for Halloween, but it works for birthday parties and other happy occasions.
Skill Level: EASY
Designed by Michele Wilcox.
Bag: 12" x 11" (excluding handles)
Red Heart® Super Saver®: 1 skein each 0706 Perfect Pink A, 0360 Cafe B, 0316 Soft White C, and 0319 Cherry Red D.
Crochet Hook: 5mm [US H-8]
Stitch marker, Yarn needle.
GAUGE: 13 sc = 4"; 13 rows = 4" in back loop only. 20 sc = 4"; 15 rows = 4" in both loops. CHECK YOUR GAUGE. Use any size needles to obtain the gauge.
NOTE: The cake is worked side to side. The Frosting is worked bottom up.
SPECIAL STITCHES:
Sc2tog = [draw up a loop in next st] twice, yarn over and draw through all 3 loops on hook.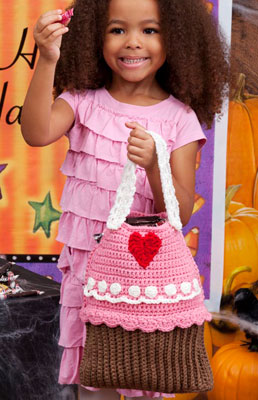
BAG
Cake (make 2)
With B, ch 21.
Row 1 (Right Side): Sc in 2nd ch from hook and in each remaining ch across; turn - 20 sc.
Rows 2-32: Ch 1, working in back loops only sc in each sc across; turn. After row 32, do not fasten off. Continue to Frosting.
FROSTING
Row 1: With B, ch 1, sc in sides of each row. Fasten off B, place marker in last st; turn - 32 sc. Rotate piece so this row becomes the Frosting of the cupcake.
Row 2: Join A with sc in first sc, 2 sc in next sc, sc to last 2 sc, 2 sc in next sc, sc in last sc; turn - 34 sc.
Row 3: Ch 1, working in back loops only, (sc in next sc, 2 sc in next sc) across; turn - 50 sc.
Row 4: Ch 1, working in both loops, (sc in next sc, sc2tog over next 2 sc) across; turn - 34 sc.
Row 5: Ch 1, (skip 1 sc, 4 hdc in next sc, skip 1 sc, slip st in next sc) across to last st, 4 hdc in last sc, slip st in side of row - 36 hdc. Fasten off.
Row 6: Join A with sc in first unused loop of Row 2, sc in each loop across; turn - 34 sc.
Rows 7 and 8: Ch 1, sc in each sc across; turn.
Row 9: Ch 1, sc in first sc, sc2tog over next 2 sc, sc to last 3 sc, sc2tog over next 2 sc, sc in last sc; turn - 32 sc.
Row 10: Ch 1, sc in back loop of first sc, (sc in both loops of next 3 sc, sc in back loop of next sc) 7 times, sc in next 2 sc, sc in back loop of last sc; turn - 32 sc.
Rows 11-15: Ch 1, sc in both loops of each sc across; turn.
Row 16: Repeat row 9-30 sc.
Row 17: Ch 1, sc in each sc across; turn.
Rows 18-21: Repeat rows 16 and 17 twice. Place marker in final st of Row 19.
Row 22: Repeat row 16-24 sc.
Rows 23-27: Repeat Row 9-14 sc. Fasten off.
Edging
Join B with sc in marked st of Frosting Row 1, sc around cupcake matching colors and putting 3 sc in each bottom corner, changing to A, continue with A sc in side of each row and in top of each st of Frosting.
Heart: (make 2)
With D ch 7, slip st in 2nd ch from hook, sc in next ch, hdc in next ch, dc in next ch, (4 tr, ch 3, slip st) in next ch, slip st in last ch, ch 3, (4 tr) in underside of first ch of foundation ch, dc in next ch, hdc in next ch, sc in next ch, slip st last ch. Fasten off leaving a long tail for sewing heart in place on top center of cupcake.
White chain: Join C with sc in first unused loop on Row 9 on Frosting, *ch 5, sc in next unused loop; repeat from *across. Fasten off.
Dots (Make 16)
With C ch 2, work 6 sc in 2nd ch from hook; join with slip st in first sc. Fasten off, leaving long tail for sewing. With yarn needle, sew one dot above each white chain loop.
FINISHING
Holding wrong sides together and matching sts, join A with sc in marked st of Frosting Row 19, sc thru back loops only of both pieces down left side, at Frosting Row 1, change to B and continue working toward bottom corner, 3 sc in bottom corner, sc across to next corner, 3 sc in next corner, sc up the sides, switching to A to sc in sides of rows of Frosting, continue until Row 19 of Frosting. Fasten off.
Handle (Make 2)
With C ch 36.
Round 1: Sc in 2nd ch from hook and in next 33 chs, 3 sc in last ch, working in underside of foundation chs, work sc in each of next 33 chs, 2 sc in last ch - 72 sc.
Round 2: Sc in first sc, (ch 3, skip 1 sc, sc in next sc) around; join with slip st in first sc. Fasten off. With yarn needle and C, sew one strap in place on each side of bag.
Abbreviations: A, B, C = Color A, B, C; ch = chain; dc = double crochet; dec = decrease; hdc = half double crochet; inc = increase; mm = millimeters; sc2tog = single crochet decrease; sc = single crochet; st(s) = stitch(es); tr = treble crochet; * or ** = repeat whatever follows the * or ** as indicated.
Pattern © by Coats & Clark Inc. Reproduced with permission from Coats & Clark Inc. PurpleKittyYarns.com is not endorsed by Coats & Clark Inc. It is not permissible to contract production of projects made from designs published by Coats & Clark to a third party for sale or distribution.
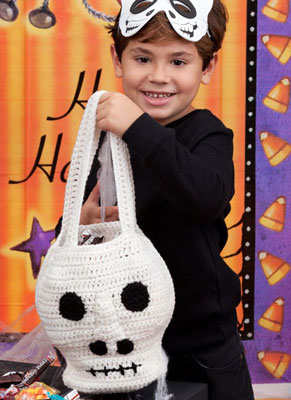
Scary Skull Bag LW2816
Little ghosts and goblins will have fun collecting treats with a skull-shaped bag crocheted just for them. Use it indoors for a haunting decoration to hold candy or other treats.
Skill Level: EASY
Designed by Michele Wilcox.
Bag measures 11" long excluding handles.
Red Heart® Super Saver®: 1 skein each 316 Soft White A and 312 Black B.
Crochet Hook: Size G-6 [4mm].
Yarn needle, small amount of polyfill stuffing.
GAUGE: 5 sts and 4 rows in pattern = 1½". CHECK YOUR GAUGE. Use any size hook to obtain the gauge given.
Special Stitches
sc2tog: [Insert hook in next st, yo, draw yarn through st] twice, yo, draw yarn through 3 loops on hook.
BAG
Side (make 2)
With A, starting at bottom, ch 13.
Row 1: Sc in 2nd ch from hook, 2 sc in next ch, *sc in next ch, 2 sc in next ch; repeat from * across; turn - 18 sc.
Row 2: Ch 1, *sc in next 2 sc, 2 sc in next sc; repeat from * across; turn - 24 sc.
Rows 3-5: Ch 1, sc in each sc across; turn.
Row 6: Ch 3 (counts as dc here and throughout), skip first sc, dc in each sc across; turn - 24 dc.
Row 7: Ch 1, sc in each dc across; turn.
Rows 8-13: Repeat rows 6-7 (3 times).
Row 14: Repeat row 6.
Row 15: Ch 1, starting in first dc, *sc in next dc, 2 sc in next dc; repeat from * across; turn - 36 sc.
Rows 16-25: Repeats rows 6-7 (5 times). Row 26: Repeat row 6.
Row 27: Ch 1, starting in first dc, [sc2tog over next 2 dc] 6 times, sc in next 12 dc, [sc2tog over next 2 dc] 6 times; turn - 24 sc.
Rows 28-29: Repeat rows 6-7. Do not turn at end of last row. Do not fasten off.
Edging: Ch 1, sc evenly around, working 40 sc across side edge, 12 sc across bottom edge, 40 sc across opposite side edge, and 24 sc across top edge, join with a slip st in first sc - 116 sc. Fasten off.
Mouth: With B, back st a straight line across the center 12 sts of row 9 for mouth; make 4 vertical straight sts evenly spaced across mouth.
Nose
With A, ch 2.
Row 1: 3 sc in 2nd ch from hook; turn - 3 sc.
Row 2: Ch 1, sc in each sc across; turn.
Row 3: Ch 1, sc in next sc, 2 sc in next sc, sc in last sc; turn - 4 sc.
Rows 4-8: Ch 1, sc in each sc across; turn.
Row 9: Ch 1, sc in next sc, 2 sc in each of next 2 sc, sc in last 2 sc; turn - 6 sc.
Row 10: Slip st in first 2 sc, sc in next 2 sc; turn leaving remaining sts unworked.
Rows 11-12: Ch 1, sc in each sc across; turn.
Row 13: Ch 1, sc2tog over first 2 sc - 1 st. Fasten off leaving a sewing length. Stuff nose lightly. With yarn needle and sewing length, sew nose in place above mouth.
Nostril (make 2)
With B, ch 3.
Rnd 1: 8 hdc in 3rd ch from hook (ch-2 counts as first hdc); join with a slip st in top of beginning ch-3 - 9 hdc.
Eye (make 2)
With B, ch 3.
Rnd 1: Repeat round 1 of nostril. Do not fasten off. Rnd 2: Ch 1, 2 sc in first st, 2 sc in each st around; join with a slip st in first sc - 18 sc.
FINISHING
With wrong sides of 2 sides of bag facing, working through double thickness in back loops only of edging, join A, in top left-hand corner, ch 1, sc across left side edge, bottom edge and right side edge. Fasten off.
Handle (make 2): With A, ch 51.
Row 1: Sc in 2nd ch from hook and each ch across; turn - 50 sc.
Row 2: Ch 3, skip first sc, dc in each sc across; turn - 50 dc.
Row 3: Ch 1, sc in each dc across. Fasten off leaving a sewing length. Sew ends of one handle to front and back of bag as pictured.
ABBREVIATIONS: Ch = chain; sc = single crochet; dc = double crochet; st = stitch; tog = together; hdc = half double crochet.
Pattern © by Coats & Clark Inc. Reproduced with permission from Coats & Clark Inc. PurpleKittyYarns.com is not endorsed by Coats & Clark Inc. It is not permissible to contract production of projects made from designs published by Coats & Clark to a third party for sale or distribution.
| Pattern Categories Browse the categories to help you find the patterns you're looking for. |
||
|
|
    
|

|
Navigation

All contents © 2003-2022 Purple Kitty LLC. All rights reserved.
Privacy Policy | FAQ | About Me | Newsletters | Sitemap