 |
Red Heart Super Saver
Jingle Bells Baby Hat

Skill Level: INTERMEDIATE
Designed by Shirley Roemer
Hat Circumference: 13¼"
RED HEART® "Super Saver®": 1 Skein 672 Spring Green
Circular Knitting Needles: 4.5mm [US 7]-16".
Double Pointed Needles: 4.5mm [US 7].
3 Stitch markers
Yarn needle
3 jingle bells
Sewing needle and thread.
GAUGE: 18 sts = 4"; 24 rnds = 4" in St st. CHECK YOUR GAUGE. Use any size needles to obtain the gauge.
HAT
With circular needle, cast on 56 sts. Join to work in the round making sure that sts are not twisted and place a marker between first and last sts.
Rnd 1: * K2, P2; repeat from * around.
Repeat Rnd 1 for ribbing for 4½".
K 1 rnd, inc 4 sts evenly spaced - 60 sts. Work even in St st for 2½" - 7" from beginning.
Increase Shaping
[K20, place marker on needle] twice, K 20 to marker at end of rnd.
Rnd 1: K, inc 1 st before and after each marker - 6 sts inc in rnd.
Rnd 2: K.
Repeat Rnds 1 and 2 seven times - 108 sts.
Divide and Shape Points
First Point: Place first 36 sts onto a dpn; leave remaining sts on the circular needle.
Note: Points will measure about 5" from base to tip. To make points longer or shorter, adjust the number of rows between decrease rows.
Rnd 1: [K4, K2tog] 6 times - 30 sts.
Rnds 2-6: K.
Rnd 7: [K3, K2tog] 6 times - 24 sts.
Rnds 8-12: K.
Rnd 13: [K2, K2tog] 6 times - 18 sts.
Rnds 14-18: K.
Rnd 19: [K1, K2tog] 6 times - 12 sts.
Rnds 20-24: K.
Rnd 25: [K2tog] 6 times - 6 sts.
Rnds 26-30: K.
Cut yarn, leaving a 6" tail. With yarn needle, weave yarn tail through remaining sts; draw up firmly; fasten securely.
2nd Point: Place next 36 sts onto a dpn; leave remaining sts on the circular needle and work same as for First Point.
3rd Point: Place last 36 sts onto a dpn and work same as for First Point.
FINISHING: Weave in ends. With sewing needle and thread, sew a bell to each tip. Turn up half of ribbing for cuff.
ABBREVIATIONS: dpn = double pointed needle; inc = increase; K = knit; K2tog = knit next 2 sts together; mm = millimeters; P = purl; rnd = round; St st = Stockinette stitch (Knit every round.); st(s) = stitch (es); * = repeat whatever follows the * as indicated; [ ] = work directions in brackets the number of times specified.
Pattern © by Coats & Clark Inc. Reproduced with permission from Coats & Clark Inc. PurpleKittyYarns.com is not endorsed by Coats & Clark Inc. It is not permissible to contract production of projects made from designs published by Coats & Clark to a third party for sale or distribution.
Jolly Roger Pirate Pumpkin LW2827
This one-eyed pirate will add a spooky note to your Halloween decor! Crochet these appliques and simply attach to your pumpkin. It's a great alternative to using a knife to cut out the shapes.
Skill Level: EASY
Designed by Nancy Anderson.
Red Heart® Super Saver®: 1 skein each 312 Black A and 316 Soft White B.
Crochet Hooks: 3.75mm [US F-5] and 3.5mm [US E-4] (for hat appliques).
Stitch markers.
Yarn needle.
Self-stick hook-and-loop fasteners, double sided tape or glue dots for attaching to pumpkin.
GAUGE: With larger hook, 8 sts and 9 rows sc = 2"; Pirate's eye = 1¼" in diameter. CHECK YOUR GAUGE. Use any size hook to obtain the gauge given.
NOTE: Use these appliques on a whole pumpkin. Yarn appliques are not for use near candle flames or lit bulbs.
Work in back bumps of chains: Turn foundation ch over to the wrong side, insert hook in the bump formed at the back of the ch and proceed with the st as usual.

HAT
With larger hook and A, ch 31.
Row 1: Working in back bumps only, sc in 2nd ch from hook and in each ch across, turn - 30 sc.
NOTE: On opposite side of foundation ch, mark placement of crown by placing a marker in 11th ch from each end of foundation ch.
Row 2: Ch 1, sc in first 10 sts, place marker, hdc in next 3 sts, [dc in next st, 2 dc in next st] twice, hdc in next 3 sts, sc in next st, place marker, sc in last 9 sts, turn - 42 sts.
Row 3: Ch 1, sc in first 10 sts, hdc in next 12 sts, sc in last 10 sts, turn - 32 sts.
Row 4: Ch 1, sc in first 10 sts, hdc in next st, 2 hdc in next st, hdc in next 2 sts, dc in next st, 2 dc in each of next 2 sts, dc in next st, hdc in next 2 sts, 2 hdc in next st, hdc in next st, sc in last 10 sts, turn - 36 sts.
Row 5: Ch 2 (does not count as a st), hdc in first st, sc in next 9 sts, 2 hdc in next st, hdc in next 3 sts, 2 hdc in next st, hdc in next 2 sts, 2 hdc in each of next 2 sts, hdc in next 2 sts, 2 hdc in next st, hdc in next 3 sts, 2 hdc in next st, sc in next 9 sts, hdc in last st, turn - 42 sts.
Row 6: Ch 2, hdc in first st, sc in next 9 sts, hdc in next 22 sts, sc in next 9 sts, hdc in last st, turn - 42 sts.
Row 7: Ch 2, hdc in first st, sc in next 9 sts, hdc in st, 2 hdc in next st, hdc in next 5 sts, 2 hdc in next st, hdc in next 6 sts, 2 hdc in next st, hdc in next 5 sts, 2 hdc in next st, hdc in next st, sc in next 9 sts, hdc in last st - 46 sts.
Fasten off, leaving a long sewing length.
Hat Appliques
Skull
With smaller hook and B, ch 3.
Row 1: 2 sc in 2nd ch from hook, sc in next st, turn - 3 sc.
Row 2: Ch 1, 2 sc in first sc, sc in next sc, 2 sc in last sc, turn - 5 sc.
Row 3: Ch 1, sc in each sc across, turn.
Row 4: Ch 1, sc in first sc, [2 sc in next sc, sc in next sc] twice, turn - 7 sc.
Row 5: Ch 1, sc in each sc across, turn.
Row 6: Ch 1, skip first st, sc in next 4 sc, sc2tog over last 2 sts, turn - 5 sts.
Row 7: Ch 1, skip first st, sc in next 2 sc, sc2tog over next 2 sts, slip st in last st.
Fasten off, leaving a sewing length.
Cross Bones (make 2)
With smaller hook and B, ch 2.
First End: 4 sc in 2nd ch from hook; join with slip st in first sc, ch 11.
Second End: 4 sc in 2nd ch from hook; join with slip st in first sc. Fasten off, leaving a sewing length.
FINISHING
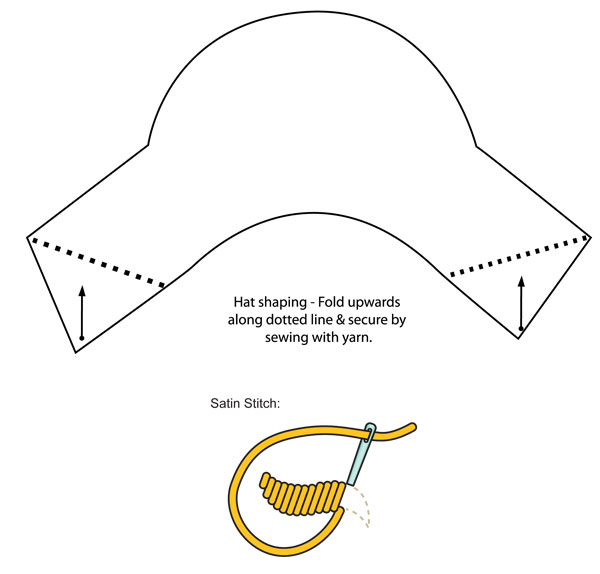
With right side facing upwards, locate the edge on one side of the hat. Referring to the schematic, fold this edge up in a triangular fashion to form a point at the tip of the edge. With yarn needle and A, whipstitch together in a few places. Repeat for the other edge.
Lay out Cross Bones in an "X" configuration on front of hat as pictured and with yarn needle and sewing length, whipstitch bones in place. With yarn needle and A, satin st 2 eyes and a triangular shaped nose as pictured on Skull. Whipstitch skull onto hat as pictured.
APPLIQUES
Eye Patch
Starting at top edge, with larger hook and A, ch 10.
Row 1: Working in back bumps only, sc in 2nd ch from hook and in each ch across, turn - 9 sc.
Row 2-5: Ch 1, sc in each st across, turn.
Row 6: Ch 1, skip first st, sc in next 6 sts, skip next st, sc in last st, turn - 7 sc.
Row 7: Ch 1, skip first st, sc in next 4 sts, skip next st, sc in last st, turn - 5 sc.
Row 8: Ch 1, skip first st, sc in next 2 sts, skip next st, sc in last st turn - 3 sc.
Edging and Ties
First Side: Ch 1, working across side edge of Eye Patch, work sc 8 sc evenly space across to next corner, ch 60 for tie (or desired length to tie around pumpkin). Fasten off.
Second Side: With larger hook and A, ch 60 (or desired length to tie around pumpkin), slip st to opposite top corner of Eye Patch, working across other side edge of Eye Patch, work 7 sc evenly spaced across to corner of Row 8, 2 sc in corner st, sc in next sc, 2 sc in next st, join with slip st in first sc of First Side. Fasten off. Weave and ends.
Pirate Eye
With larger hook and A, make an adjustable loop.
Rnd 1: Work 6 sc in loop; join with a slip st in first sc - 6 sc.
Rnd 2: Ch 1, 2 sc in each sc around; join with a slip st in first sc - 12 sc.
With yarn needle and B, straight st a ⅛" highlight in corner of Eye as pictured.
Mouth
With larger hook and A, ch 17.
Row 1: Working in the back bumps only, sc in 2nd ch from hook and in each across, turn - 16 sc.
Row 2: Ch 1, skip first st, sc in next 13 sts, skip next st, sc in last st, turn - 14 sc.
Row 3: Ch 1, skip first st, sc in next 11 sts, skip next st, sc in last st, turn - 12 sc.
Row 4: Ch 1, skip first st, sc in next 9 sts, skip next st, sc in last st, turn - 10 sc.
Row 5: Ch 1, skip first st, sc in next 7 sts, skip next st, sc in last st, turn - 8 sc.
Row 6: Ch 1, skip first st, sc in next 5 sts, skip next st, sc in last st, turn - 6 sc.
Edging: Ch 1, sc evenly around Mouth; join with a slip st in first sc. Fasten off. Weave in ends.
Teeth (make 3)
With larger hook and B, ch 4.
Row 1: Sc in 2nd ch from hook and in each across, turn - 3 sc.
Row 2: Ch 1, sc in each sc across. Fasten off, leaving a sewing length.
With yarn needle and sewing length, whipstitch teeth to mouth as pictured. Weave in ends.
FINISHING
Weave in ends. Attach self-stick hook-and-loop fastener (or other adhesive) to back of motifs. Arrange and stick to pumpkin.
ABBREVIATIONS: A, B = Color A, B; ch = chain; dc = double crochet; dc = double crochet; hdc = half double crochet; mm = millimeters; sc = single crochet; st(s) = stitch(es); [ ] = work directions in brackets the number of times specified.
Pattern © by Coats & Clark Inc. Reproduced with permission from Coats & Clark Inc. PurpleKittyYarns.com is not endorsed by Coats & Clark Inc. It is not permissible to contract production of projects made from designs published by Coats & Clark to a third party for sale or distribution.
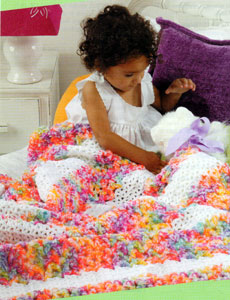
Kid's Digs LW1433
Skill Level: Easy
Designed by Mary Jane Protus.
Afghan measures approximately 41" wide by 53" long.
RED HEART® "Bright & Lofty™", Art. E725 (4 ounce/95 yard skein): 22 Ounces No. 9911 Snowcone CA.
RED HEART® "Super Saver®", Art. E300 (8 ounce/452 yard skein): 10 Ounces No. 311 White CB.
Crochet Hooks: 10mm [US N-15] and 6.5mm [US K10.5].
Yarn needle.
GAUGES: 3 V-sts = 4 ½"; 5 rows = 5" with larger hook and CA; 5 rows = 3" with smaller hook and CB.
CHECK YOUR GAUGE. Use any size hooks to obtain the gauges.
With larger hook and CA, ch 85.
Row 1 (Wrong Side): (Dc, ch 1, dc) all in 5th ch from hook, skip next 2 ch; (dc, ch 1, dc) all in next ch - v-st made; * skip next 2 ch, v-st in next ch; rep from * to last 2 ch; skip next ch, dc in last ch; turn.
Rows 2-5: Ch 3, * v-st in ch-1 sp of next v-st; rep from * to last st; dc in top of ch; turn. At end of Row 5, change to smaller hook and CB.
Row 6: With smaller hook and CB, ch 3, dc in first dc, v-st in ch-1 sp of next v-st, * v-st between next two v-sts, v-st in ch-1 sp of next v-st; rep from * to last st; 2 dc in top of ch; turn.
Rows 7-10: Ch 3, dc in first dc, * v-st in ch-1 sp of next v-st; rep from * to last st; 2 dc in top of ch; turn. At end of Row 10, change to larger hook and CA.
Row 11: With larger hook and CA, ch 3, * v-st in ch-1 sp of next v-st **, skip next v-st; rep from * to last st, end at **; dc in top of ch; turn.
Rows 12-15: Rep Rows 2-5.
Rep Rows 6-15 five more times - 7 CA sections. Fasten off.
Edging: With wrong side facing and larger hook, attach CA in any corner; ch 1, * (sc, ch 1, sc) all in corner, work sc evenly across to next corner; rep from * around; join with a sl st to first sc. Fasten off. Weave in ends.
ABBREVIATIONS: CA, CB = Color A, Color B; ch = chain; dc = double crochet; mm = millimeters; rep = repeat; sc = single crochet; sl = slip; sp = space; st(s) = stitch (es); * or ** = repeat whatever follows the * or ** as indicated.
Pattern © by Coats & Clark Inc. Reproduced with permission from Coats & Clark Inc. PurpleKittyYarns.com is not endorsed by Coats & Clark Inc. It is not permissible to contract production of projects made from designs published by Coats & Clark to a third party for sale or distribution.
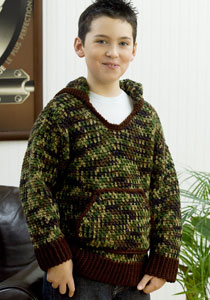
Kid's Hooded Sweatshirt WR1781
Designed by Karen Drouin.
Skill Level: Intermediate
Directions are for size 4; changes for sizes 6, 8 and 10 are in parentheses.
RED HEART® "Super Saver®": 3 (4, 5, 5) Skeins 971 Camouflage MC, 1 skein 365 Coffee CC.
Crochet Hooks: 3.75mm [US F-5], 5mm [US H-8].
2 Split lock stitch markers, yarn needle.
GAUGE: 16 sts = 4"; 16 rows = 4" in pattern with larger hook. CHECK YOUR GAUGE. Use any size hook to obtain the gauge.
To Fit Chest: 23 (25, 26½, 28)".
Finished Chest Measurements: 24½ (28½, 31½, 34½)".
NOTE: In pattern each sc and ch-1 (space and turning ch) counts as a stitch.
SPECIAL ABBREVIATION:
Dec (decrease) = draw up a loop in each of next 2 ch-1 (space or turning ch-1), yarn over and draw through all 3 loops on hook – 2 sts decreased.
BACK-Lower Ribbing: With smaller hook and CC, ch 10 (10, 12, 12).
Row 1 (Right Side): Sc in 2nd ch from hook and each ch across; turn – 9 (9, 11, 11) sc.
Rows 2-49 (2-57, 2-63, 2-69): Ch 1, working in back loops only, sc in each sc across; turn. Fasten off at end of last row.
Body-Row 1 (Right Side): With right side facing and larger hook, join MC to work across long edge of ribbing; ch 1, sc in first row end, * ch 1, skip next row end, sc in next row end; repeat from * across; turn – 49 (57, 63, 69) sts.
Row 2: Ch 1, skip first sc, * sc in ch-1 space, ch 1, skip next sc; repeat from * across; sc in turning ch-1; turn – 50 (58, 64, 70) sts (See Note above).
Rows 3-44 (51, 58, 65): Repeat Row 2 for pattern. Fasten off.
FRONT: Work same as for back through Row 30 (37, 40, 47).
Divide for Neck-Right Neck Edge- Row 31 (38, 41, 48): Ch 1, skip first sc, sc in next ch-1 space, [ch 1, skip next sc, sc in next ch-1 space] 10 (12, 14, 15) times; turn – 22 (26, 30, 32) sts.
Dec Row 32 (39, 42, 49): Ch 1, dec, * ch 1, skip next sc, sc in next ch-1; repeat from * across; turn – 20 (24, 28, 30) sts.
Row 33 (40, 43, 50): Work even in pattern.
Row 34 (41, 44, 51): Repeat Dec Row – 18 (22, 26, 28) sts.
Row 35 (42, 45, 52): Work even in pattern.
Row 36 (43, 46, 53): Repeat Dec Row – 16 (20, 24, 26) sts.
Row 37 (44, 47, 54): Work even in pattern.
Sizes 4 and 6 Only-Row 38 (45): Work even in pattern, placing a marker at neck edge for hood placement.
Rows 39-44 (46-51): Work even in pattern. Fasten off.
Sizes 8 and 10 Only-Row (48, 55): Repeat Decrease Row – (22, 24) sts.
Row (49, 56): Work even in pattern.
Row (50, 57): Work even in pattern, placing a marker at neck edge for hood placement.
Rows (51-58, 58-65): Work even in pattern. Fasten off.
Left Neck Edge-Row 31 (38, 41, 48): Skip next 2 (2, 1, 2) ch-1 spaces, join yarn in next sc; ch 1, [sc in next ch-1 space, ch 1, skip next sc] 10 (12, 14, 15) times, sc in turning ch-1; turn – 22 (26, 30, 32) sts.
Dec Row 32 (39, 42, 49): Ch 1, work in pattern across to last 2 ch-1, dec; turn – 20 (24, 28, 30) sts.
Rows 33-44 (40-51, 43-58, 50-65): Work same as for Right Neck.
SLEEVES: Work in ribbing same as for Back for 35 (37, 39, 41) rows. Fasten off.
Row 1 (Right Side): With right side facing and larger hook, join MC to work across long edge of ribbing; ch 1, sc in first row end, * ch 1, skip next row end, sc in next row end; repeat from * across; turn – 35 (37, 39, 41) sts.
Rows 2-4: Ch 1, skip first sc, * sc in ch-1 space, ch 1, skip next sc; repeat from * across; sc in turning ch-1; turn – 36 (38, 40, 42) sts.
Inc Row 5: Ch 1, sc in first sc, ch 1, * sc in next ch-1 space, ch 1 **, skip next sc; repeat from * to last sc, end at **; sc in last sc, ch 1, sc in turning ch-1; turn – 40 (42, 44, 46) sts.
[Work 5 rows even. Repeat Inc Row] 5 times – 60 (62, 64, 66) sts. Work 2 (6, 5, 5) rows even.
Size 8 and 10 Only: Repeat Increase Row – (68, 70) sts. Work (4, 8) rows even.
All Sizes: Fasten off.
POCKET: With larger hook and MC, ch 38 (38, 44, 44).
Row 1 (Right Side): Sc in 2nd ch from hook, * ch 1, skip next ch, sc in next ch; repeat from * across; turn.
Row 2: Ch 1, skip first sc, * sc in next ch-1 space, ch 1, skip next sc; repeat from * across; sc in turning ch-1; turn – 38 (38, 44, 44) sts.
Rows 3-9 (3-9, 3-11, 3-11): Repeat Row 2 for pattern.
Dec Row 10 (10, 12, 12): Ch 1, dec, work even in pattern to last 2 ch-1, dec; turn – 34 (34, 40, 40) sts.
Row 11 (11, 13, 13): Repeat Row 2.
Rows 12-19 (12-19, 14-21, 14-21): Repeat the last 2 rows 4 times – 18 (18, 24, 24) sts. Fasten off.
Pocket Edging: With right side facing and larger hook, join CC and work sc evenly around entire pocket, working 3 sc in corners; join with a slip st in first sc. Fasten off.
HOOD: With larger and MC ch 100 (100, 104, 104).
Row 1 (Right Side): Sc in 2nd ch from hook, * ch 1, skip next ch, sc in next ch; repeat from * across; turn.
Row 2: Ch 1, skip first sc, * sc in next ch-1 space, ch 1, skip next sc; repeat from * across; sc in turning ch-1; turn – 100 (100, 104, 104) sts.
Rows 3 and 4: Repeat Row 2 for pattern.
Dec Row 5: Ch 1, dec, work even in pattern to last 2 ch-1, dec; turn – 96 (96, 100, 100) sts.
Rows 6-25: Repeat Rows 2-5 five times – 76 (76, 80, 80) sts.
Sizes 8 and 10 Only-Rows 26 and 27: Repeat Row 2.
All Sizes: Fasten off. Weave in ends.
FINISHING: Place pocket on the center front with the bottom edge of pocket at Row 4; sew top and bottom of pocket in place. Sew shoulder seams. Place center of sleeve tops at shoulder seams and sew in place. Sew side and sleeve seams.
Fold hood in half and sew back seam. Pin hood in place matching ends of hood to markers and seam at center back; sew in place.
Hood/Neck Edging: With right side facing and smaller hook, join CC at seam of hood/front neck; ch 1, sc evenly around hood and front neck opening; join with a slip st in first sc. Work 1 more rnd of sc. Work 1 rnd of Reverse sc. Fasten off. Weave in ends.
Optional Tie: With smaller hook and CC, ch 175; slip st in each ch across. Fasten off. Weave in ends. Weave tie through 2nd rnd of edging. Tie an overhand knot in each end of tie.
ABBREVIATIONS: CC = contrast color; ch = chain; dec = decrease; inc = increase; MC = main color; mm = millimeters; rnd = round; sc = single crochet; st(s) = stitch (es); * or ** = repeat whatever follows the * or ** as indicated; [ ] = work directions in brackets the number of times specified.
Pattern © by Coats & Clark Inc. Reproduced with permission from Coats & Clark Inc. PurpleKittyYarns.com is not endorsed by Coats & Clark Inc. It is not permissible to contract production of projects made from designs published by Coats & Clark to a third party for sale or distribution.
Kitty, Kitty Halloween Headband WR1051
Skill Level: Easy
Designed by Julie Farmer. Each headband takes an hour or less to make.
Crochet these adorable headbands to compliment your child's (or your own) costume this Halloween season!
Red Heart® Super Saver®: 1 Skein No. 312 Black.
Crochet Hook: 5.5mm [US I-9].
Yarn needle, plastic headband.
GAUGE: 14 sts = 4"; 8 rows = 4" in sc. CHECK YOUR GAUGE. Use any size hook to obtain the gauge.
Ears measure approx 2.5" high.

Ear (Make 4): Ch 8.
Row 1: Sc in 2nd ch from hook and in each ch across; turn - 7 sc.
Rows 2 and 3: Ch 1, sc in each sc across; turn.
Row 4: Ch 1; draw up a lp in each of next 2 sc, yarn over and draw through all 3 Ips on hook - sc2tog made; sc in next 3 sc, sc2tog over last 2 sc; turn - 5 sc.
Row 5: Rep Row 2.
Row 6: Ch 1, sc2tog, sc in next sc, sc2tog; turn - 3 sc.
Row 7: Rep Row 2.
Row 8: Ch 1, draw up a lp in each of next 3 sc, yarn over and draw through all 4 lps on hook. Fasten off.
FINISHING: Sew 2 ears together along the 2 shaped sides leaving bottom open. Repeat with other 2 ears. Checking placement, sew bottom of ears to headband. Weave in ends.
ABBREVIATIONS: ch = chain; lp = loop; mm = millimeters; rep = repeat; rnd = round; sc = single crochet; sl = slip; st(s) = stitch(es); tog = together; * or ** = repeat whatever follows the * or ** as indicated.
Pattern © by Coats & Clark Inc. Reproduced with permission from Coats & Clark Inc. PurpleKittyYarns.com is not endorsed by Coats & Clark Inc. It is not permissible to contract production of projects made from designs published by Coats & Clark to a third party for sale or distribution.
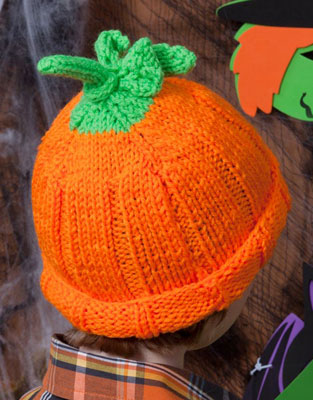
Knit Pumpkin Hat Pattern LW2829

Kids will love their bright knit pumpkin hat for the way it looks. Mom will love it for the way it keeps ears warm and easy washability. Pattern includes baby and adult sizes too, so everyone can be part of the fun.
Skill Level: EASY
Designed by Kathleen Sams.
Directions are for Baby hat; changes for child, adult, and large adult hats are in parentheses.
To Fit Head: 14 (16, 20, 22)".
RED HEART® Super Saver®: 1 skein each 254 Pumpkin A and 672 Spring Green B.
Knitting Needles: 5.5mm [US 9].
Yarn needle, stitch markers.
GAUGE: 22 sts = 4"; 22 rows = 4" in pattern. CHECK YOUR GAUGE. Use any size needles to obtain the gauge.
Special Abbreviation
ssk (slip, slip, knit) = slip next 2 sts knitwise, one at a time, to right needle, insert tip of left needle into these 2 sts from the front and knit together.
HAT
With A, cast on 49 (57, 65, 73) sts.
 Row 1 (Right Side): Knit.
Row 2: Purl.
Row 3: Knit.
Row 4: K1, [P4 (5, 6, 7), K2] 8 times.
Row 5: [P2, K4 (5, 6, 7)] 8 times, P1.
Repeat Rows 4 and 5 until 5 (6, 7, 9)" from beginning, end Row 4.
Shape Top
Row 1 (Right Side): [K2tog, K8 (10, 12, 14), slip 1, K1, psso, place marker] 4 times, K1 - 41 (49, 57, 65) sts.
Row 2 and all even Rows: Purl.
Row 3: [K2tog, Knit to 2 sts before marker, slip 1 K1, psso] 4 times, K1 - 33 (41, 49, 57) sts.
Stem
Join B and repeat Rows 2 and 3 until 17 sts remain, end Row 2.
Next Row (Right Side): [K2tog] 8 times, K1 - 9 sts.
Next Row: P1, [P2tog] 4 times - 5 sts. Cut yarn leaving 10" tail. Weave yarn through remaining sts and draw up firmly; fasten securely.
FINISHING
Sew back seam. Weave in ends.
Leaves (Make 3)
With B, cast on 5 sts.
Rows 1, 3, 5, 7, 9, 11: Purl.
Row 2: K2, yo, K1, yo, K2 - 7 sts.
Row 4: K3, yo, K1, yo, K3 - 9 sts.
Row 6: SSK, K5, K2tog - 7 sts.
Row 8: SSK, K3, K2tog - 5 sts.
Row 10: SSK, K1, K2tog - 3 sts.
Row 12: Slip 1, K2tog, psso.
Fasten off. Weave in ends. Sew leaves around stem as desired.
ABBREVIATIONS: A, B = color A, B; K = knit; mm = millimeters; P = purl; psso = pass the slipped st over; St st = Stockinette stitch (Knit on right side rows; Purl on wrong side rows.); st(s) = stitch(es); tog = together; yo = yarn over; * or ** = repeat whatever follows the * or ** as indicated; [ ] = work directions in brackets the number of times specified.
Pattern © by Coats & Clark Inc. Reproduced with permission from Coats & Clark Inc. PurpleKittyYarns.com is not endorsed by Coats & Clark Inc. It is not permissible to contract production of projects made from designs published by Coats & Clark to a third party for sale or distribution.
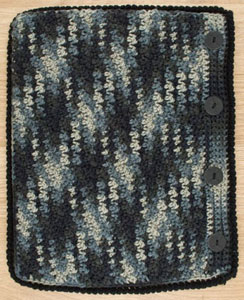
Laptop Case LW2273
Skill Level: Easy
Designed by Tracie Barrett
Case measures 15" wide x 11" long.
RED HEART® "Super Saver®": 2 balls 985 Urban Camo A; 1 ball 312 Black B.
Crochet Hook: 5.5mm [US I-9].
Yarn needle, four buttons - 1" diameter, matching thread and needle.
GAUGE: 13 sts = 4"; 12 rows = 4". CHECK YOUR GAUGE. Use any size needles to obtain the gauge.
CASE
Back Panel
With A, ch 46.
Row 1 (wrong side): Dc in 2nd ch from hook, *sc in next st, dc in next st; repeat from * across.
Row 2: Ch 1, turn, skip first st, *dc in next sc, sc in next dc; repeat from * across, dc in beginning ch. Repeat Row 2 until piece measures 11" from beginning, ending with wrong side row.
Last Round: Ch 1, work sc evenly around piece, working sc in each st and each edge of row and working 2 sc in each corner, slip st in first ch to join.
Fasten off.
Front Panel
With A, ch 46.
Work as for Back Panel until piece measures 10½" from beginning.
Row 1-2: Ch 1, turn, sc in each st across.
Buttonhole Row: Ch 1, turn, sc in first 3 sts, ch 3, skip 3 sts, *sc in next 9 sts, ch 3, skip 3 sts; repeat from * to last 3 sts, sc in last 3 sts.
Next Row: Ch 1, turn, sc in each st across, working 3 sc in ch-3 spaces.
Repeat Row 1.
Last Round: Ch 1, work sc evenly around piece, working sc in each st and each edge of row and working 2 sc in each corner, slip st in first ch to join.
Fasten off.
FINISHING
With wrong sides together and Front Panel on top, Join B with a sc in top left corner. Matching stitches and working in back loops only of both layers, sc around 3 sides to join layers. Leave top edge open. Do not turn. Working from left to right, ch 1, work in reverse single crochet in each st around, slip st in first st to join.
Fasten off.
Edging
Join B in corner of opening, sc evenly around opening, slip st in first st to join. Do not turn. Working from left to right, ch 1, work in reverse single crochet in each st around, slip st in first st to join.
Fasten off.
Weave in ends. Sew buttons on wrong side of Back Panel opposite buttonholes.
Abbreviations: A, B, C = Color A, B, C; ch = chain; dc = double crochet; mm = millimeters; sc = single crochet; st(s) = stitch(es); * or ** = repeat whatever follows the * or ** as indicated.
Pattern © by Coats & Clark Inc. Reproduced with permission from Coats & Clark Inc. PurpleKittyYarns.com is not endorsed by Coats & Clark Inc. It is not permissible to contract production of projects made from designs published by Coats & Clark to a third party for sale or distribution.
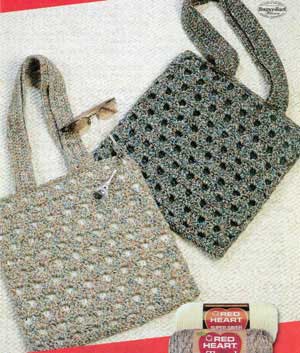
Lined Bags LW1351
Intermediate experience required.
Designed by Mary Jane Protus.
Bags measure 13" wide x 13" high.
RED HEART® "Tweed™", 100% Acrylic, Art. E717 (4 ounce skeins): 7 Ounces CA and Red Heart® Super Saver®, 100% Acrylic, Art. E300 (8 ounce solid/6 ounce multicolor skeins): 3 Ounces CB.
CA = No. 7071 Irish Coffee with CB = No. 313 Aran
CA = No. 7075 Moss with CB = No. 633 Dark Sage
Crochet Hooks: 5.5mm [US Size I-9] and 5mm [US Size H-8]. Yarn needle.
GAUGE: 14 dc = 4"; 7 rows = 4" in dc with CA and larger hook or with CB and smaller hook. CHECK YOUR GAUGE. Use any size hooks to obtain the gauge.
FRONT: With larger hook and CA, ch 47.
Row 1 (Wrong Side): Sc in 2nd ch from hook and in each ch across; turn - 46 sc.
Row 2: Ch 3, skip first sc, dc in next sc, * ch 2, skip 2 sc, dc in next 3 sc; rep from * to last 4 sc; ch 2, skip next 2 sc, dc in last 2 sc; turn.
Row 3: Ch 1, sc in first dc, * 5 dc in sp, skip next dc, sc in next dc; rep from * across working last sc in top of ch-3; turn.
Row 4: Ch 4 (counts as a dc and ch-1 sp), skip sc and next dc, dc in next 3 dc, * ch 2, skip next 3 sts, dc in next 3 dc; rep from * to last 2 sts; ch 1, skip next dc, dc in last sc; turn.
Row 5: Ch 3, 2 dc in ch-1 sp, skip next dc, sc in next dc, * 5 dc in next sp, skip next dc, sc in next dc; rep from * to last sp; 2 dc in last sp, dc in 3rd ch of ch-4; turn.
Row 6: Ch 3, skip first dc, dc in next dc, * ch 2, skip next 3 sts **, dc in next 3 sts; rep from * to last 2 sts, end at **; dc in next dc, dc in top of ch-3; turn.
Rep Rows 3-6 four more times. Fasten off.
BACK: With larger hook and CA, ch 48.
Row 1 (Right Side): Dc in 4th ch from hook and in each ch across; turn - 46 sts.
Row 2: Ch 3, skip first dc, dc in next dc and in each dc across, dc in top of ch-3; turn.
Rows 3-25: Rep Row 2. Fasten off.
FRONT LINING: With smaller hook and CB, ch 47. Work same as back over 45 sts.
STRAPS (Make 2): With larger hook and CA, ch 91.
Row 1 (Right Side): Sc in 2nd ch from hook and in each ch across; turn - 90 sc.
Rows 2 and 4: Ch 3, skip first sc, dc in next sc and in each sc across; turn.
Rows 3 and 5: Ch 1, sc in each dc across and in top of ch-3; turn. Fasten off at end of Row 5.
FINISHING: Sew right side of lining to wrong side of front at bottom edge. With wrong sides of front and bottom together, sew side and bot¬tom seams through all layers.
Edging-Rnd 1: With right side facing and larger hook, attach CA at a side seam; ch 1, sc around entire top edge, working through both layers of front; join with a sl st to first sc.
Rnd 2: Ch 1, sc in each sc around; join. Fasten off.
Sew each end of one strap to front as pictured; sew each end of second strap to the back. Weave in ends.
ABBREVIATIONS: CA, CB = Color A, Color B; ch = chain; dc = double crochet; mm = millimeters; rep = repeat; rnd = round; sc = single crochet; sl = slip; sp = space; st(s) = stitch (es); * or ** = repeat whatever follows the * or ** as indicated.
Pattern © by Coats & Clark Inc. Reproduced with permission from Coats & Clark Inc. PurpleKittyYarns.com is not endorsed by Coats & Clark Inc. It is not permissible to contract production of projects made from designs published by Coats & Clark to a third party for sale or distribution.
Other free crochet & knit purse patterns:
Little Angel Halloween Headband WR1051
Skill Level: Easy
Designed by Julie Farmer. Each headband takes an hour or less to make.
Crochet these adorable headbands to compliment your child's (or your own) costume this Halloween season!
Red Heart® Super Saver®: 1 Skein No. 321 Gold.
Crochet Hook: 5.5mm [US I-9].
Yarn needle, approximately 20" of craft wire, plastic headband.

Slightly bend one end of the wire so stitches won't slip off.
Make a slip knot as if you were going to begin a chain, then hold the wire opposite your crocheting hand with the bent end near the hook, put the hook under the wire and draw up a lp, yarn over and draw through 2 lps - one sc over the wire completed. Continue to crochet sc close together over the wire leaving last 1.5" free to attach to headband. Fasten off. Weave in ends.
Referring to picture, bend covered wire into a circle shape; use first bent end to join circle; use last 1.5" to attach to headband.
ABBREVIATIONS: ch = chain; lp = loop; mm = millimeters; rep = repeat; rnd = round; sc = single crochet; sl = slip; st(s) = stitch(es); tog = together; * or ** = repeat whatever follows the * or ** as indicated.
Pattern © by Coats & Clark Inc. Reproduced with permission from Coats & Clark Inc. PurpleKittyYarns.com is not endorsed by Coats & Clark Inc. It is not permissible to contract production of projects made from designs published by Coats & Clark to a third party for sale or distribution.
Little Devil Halloween Headband WR1051
Skill Level: Easy
Designed by Julie Farmer. Each headband takes an hour or less to make.
Crochet these adorable headbands to compliment your child's (or your own) costume this Halloween season!
Red Heart® Super Saver®: 1 Skein No. 319 Cherry Red.
Crochet Hook: 5.5mm [US I-9].
Yarn needle, plastic headband, polyester stuffing.
GAUGE: 14 sts = 4"; 8 rows = 4" in sc. CHECK YOUR GAUGE. Use any size hook to obtain the gauge.

Horn (Make 2): Ch 13.
Row 1 (Bottom): Sc in 2nd ch from hook and in each ch to end; turn - 12 sc.
Rows 2-6: Ch 1, sc in each sc across; turn.
Row 7: Ch 1; draw up a lp in each of next 2 sc, yarn over and draw through all 3 lps on hook - sc2tog made; sc in each sc to last 2 sc; sc2tog; turn - 10 sc.
Row 8: Rep Row 2.
Row 9: Rep Row 7 - 8 sc.
Row 10: Rep Row 2.
Rows 11 and 12: Rep Row 7 - 4 sc at end of Row 12.
Row 13: Ch 1, sc2tog, sc2tog; turn - 2 sc.
Row 14: Ch 1, sc2tog. Fasten off.
FINISHING: Sew sides together leaving the bottom open. Lightly stuff the horns. Checking placement, sew bottom of horns to headband. Weave in ends.
ABBREVIATIONS: ch = chain; lp = loop; mm = millimeters; rep = repeat; rnd = round; sc = single crochet; sl = slip; st(s) = stitch(es); tog = together; * or ** = repeat whatever follows the * or ** as indicated.
Pattern © by Coats & Clark Inc. Reproduced with permission from Coats & Clark Inc. PurpleKittyYarns.com is not endorsed by Coats & Clark Inc. It is not permissible to contract production of projects made from designs published by Coats & Clark to a third party for sale or distribution.
| Pattern Categories Browse the categories to help you find the patterns you're looking for. |
||
     
|
|
|

|
Navigation

All contents © 2003-2025 Purple Kitty LLC. All rights reserved.
Privacy Policy | FAQ | About Me | Newsletters | Sitemap