 |
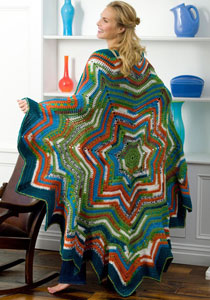
Red Heart Super Saver
7-Point Star Throw LW2032
Skill Level: Intermediate
Designed by Ann Regis.
Throw measures 62" diameter.
RED HEART® "Super Saver®": 4 skeins 946 Peruvian Print A, 2 skeins 656 Real Teal B, 1 skein each 624 Tea Leaf C and 256 Carrot D.
Crochet Hooks: 6.5mm [US K-10.5] and 6mm [US J-10].
Yarn needle.
GAUGE: 12 sts = 4"; 7 rows = 4" in dc with larger hook. CHECK YOUR GAUGE. Use any size hook to obtain the gauge.
Special Abbreviations
inc (increase) = 2 dc in next dc.
dec3 (decrease) = Yo and draw up a loop in next dc, yo and draw through 2 loops, skip next dc, yo and draw up a loop in next dc, yo and draw through 2 loops, yo and draw through all 3 loops on hook.
NOTE: Join and cut colors as required, always joining new color in a ch-2 space. When possible, carry yarns loosely along wrong side of work, twisting every other row to avoid long strands.
THROW
With larger hook and C, ch 5; join with a slip st to form a ring.
Round 1: Ch 3 (counts as a dc), 15 dc in ring; join with a slip st in top of ch-3 - 16 dc.
Round 2: Ch 3, dc in same st as joining, inc in each dc around; join - 32 dc.
Round 3: Ch 3, dc in same st as joining, [inc, dc in next dc] 15 times, inc in last dc; join - 49 dc.
Round 4: Join A in same st as joining, ch 3, dc in next dc, [inc, dc in next 3 dc, inc, dc in next 2 dc] 6 times, inc, dc in next 3 dc, inc; join - 63 dc.
Round 5: With C, ch 3, dc in next 2 dc, dec3, dc in next 3 dc, [ch 2, dc in next 3 dc, dec3, dc in next 3 dc] 6 times, ch 2; join.
Round 6: Join A in any ch-2 space; ch 3, * [inc] twice, dec3 (skipping dec3 of previous round), [inc] twice **, (dc, ch 2, dc) all in ch-2 space; repeat from * to last space, end at **; dc in last space; ch 1, hdc in top of ch-3 to join and form last space - row ended.
Round 7: Ch 3, * [inc] twice, dc in next 2 dc, dec3 (skipping dec3 of previous round), dc in next 2 dc, [inc] twice **, (dc, ch 2, dc) all in ch-2 space; repeat from * to last space, end at **; dc in last space, end row.
Round 8: Ch 3, * [inc] twice, dc in next 4 dc, dec3, dc in next 4 dc, [inc] twice **, (dc, ch 2, dc) all in ch-2 space; repeat from * to last space, end at **; dc in last space, end row.
Round 9: With C, ch 3, * inc, dc in next 7 dc, dec3, dc in next 7 dc, inc **, (dc, ch 2, dc) all in ch-2 space; repeat from * to last space, end at **; dc in last space, end row.
Round 10: With A, ch 3, * inc, dc in next 8 dc, dec3, dc in next 8 dc, inc **, (dc, ch 2, dc) all in ch-2 space; repeat from * to last space, end at **; dc in last space, end row.
Round 11: With D, ch 3, * inc, dc in next 9 dc, dec3, dc in next 9 dc, inc, (dc, ch 2, dc) all in ch-2 space; repeat from * to last space, end at **; dc in last space, end row.
Repeat Round 11 (working 1 more dc before and after center dec3) in colors as follows:
Rounds 12-13: A (working 1 dc in next 10 dc on Round 12, then in next 11 dc on Round 13).
Round 14: D.
Rounds 15-16: A.
Round 17: D.
Round 18: A.
Round 19: C.
Round 20: A.
Round 21: C.
Round 22: A.
Round 23: C.
Round 24: A.
Round 25: C. There will be 26 dc before and after center dec3. Cut yarn.
Round 26: Join A in any ch-2 space; ch 3, * [inc, dc in next 6 dc, dec3, dc in next 6 dc, inc, (dc, ch 2, dc) all in next dc] twice, inc, dc in next 6 dc, dec3, dc in next 6 dc, inc **, (dc, ch 2, dc) all in next ch-2 space; repeat from * to last space, end at **; dc in last space, end row - two ch-2 spaces have been added between each of the original ch-2 spaces.
Round 27: Ch 3, * inc, dc in next 7 dc, dec3, dc in next 7 dc, inc **, (dc, ch 2, dc) all in next ch-2 space; repeat from * to last space, end at **; dc in last space, end row.
Round 28: With C, ch 3, * inc, dc in next 8 dc, dec3, dc in next 8 dc, inc **, (dc, ch 2, dc) all in next ch-2 space; repeat from * to last space, end at **; dc in last space, end row.
Repeat Round 28 in colors as follows, working 1 more dc before and after dec3:
Rounds 29-30: A.
Round 31: D.
Round 32: A.
Round 33: D.
Round 34: A.
Rounds 35-38: B. Fasten off. Weave in ends.
Finishing
With right side facing and smaller hook, join C in any ch-2 space; ch 1, slip st evenly (being careful not to pull too tightly) around entire piece, working into each dc and ch-2 space; join. Fasten off.
With tapestry needle and D, work a running st along edge as follows: * bring yarn up through a stitch from wrong side to right side, then down through the next stitch, skip next 2 sts; repeat from * around. Fasten off. Weave in ends.

ABBREVIATIONS: A, B, etc. = color A, B, etc; ch = chain; dc = double crochet; dec = decrease; hdc = half double crochet; inc = increase; mm = millimeters; sc = single crochet; st(s) = stitch(es); yo = yarn over; * or ** = repeat whatever follows the * or ** as indicated; [ ] = work directions in brackets the number of times specified.
Pattern © by Coats & Clark Inc. Reproduced with permission from Coats & Clark Inc. PurpleKittyYarns.com is not endorsed by Coats & Clark Inc. It is not permissible to contract production of projects made from designs published by Coats & Clark to a third party for sale or distribution.
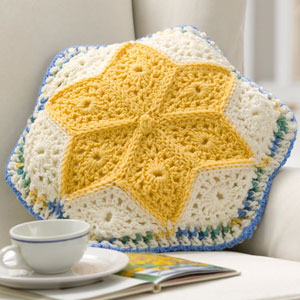
Alaska Snow Flowers Pillow WR2047
EASY
Designed by Joyce Nordstrom.
Pillow measures 12" x 12".
RED HEART® "Super Saver®": 1 skein each 316 Soft White MC, 347 Light Periwinkle A, 320 Cornmeal B, 20 yds 962 Seascape C.
Crochet Hook: 5.5mm [US I-9].
Pillow Form shaped to fit six-sided figure, Yarn needle.
GAUGE: 1 Diamond = 3½" wide x 5" long. CHECK YOUR GAUGE: Use any size hook to obtain the gauge.
SPECIAL ABBREVIATION:
Fpdc (front post double crochet) = Yo, insert hook from the front side of the work to back and to front again around the post of the indicated stitch on a previous row; yo and pull up a loop (3 loops on hook), yo and draw through two loops (2 loops on hook), yo and draw through two loops (1 loop on hook).

PILLOW FRONT & BACK
Diamond (Make 12 in MC, 6 in A, 6 in B)
Ch 5. Slip st into first ch to form a loop.
Round 1: Slip st into ch, ch 1; * [2 sc; hdc, dc, trc, ch 1 (for end space), tr, dc, hdc, 2 sc] all into ring; repeat from *. Slip st into top of ch-1 to join.
Round 2: Ch 3 (for hdc and ch 1): * [skip 1 st, hdc in next st, ch 1] twice, skip next st, [dc, ch 1, dc, ch 1] in ch-1 end space; [hdc in next st, ch 1, skip 1 st] 2 times; hdc in next st, ch 1**, hdc in next st, ch 1; repeat from *, ending at **, slip st into 2nd ch of beginning ch-3 (16 ch-1 spaces).
Round 3: Slip st in first ch-1 space; ch 2, * hdc, hdc in same space; [2 hdc in next space] twice; [2 dc, ch 1 for end space, 2 dc] in end space; [2 hdc in next space] 3 times; [hdc, ch 1 for side space, hdc] in next space; repeat from *; slip st in top of ch-2. Fasten off.
Arrange 12 diamonds to make flower shape as shown (each with 6 in MC, one with center in A and one with center in B). With wrong sides together and using matching color, slip st through back loops of diamonds to join.
Make center bobble
Attach matching flower color to any ch-1 end space at center of flower. Ch 3 (for dc), 5 dc in same space, drop loop of last dc, insert hook through top of ch-3, grasp loop and pull through to create bobble. Cut yarn, leaving tail to sew in place. Using long cut end, whip sides and end of bobble to cover center ends of flower diamonds.
Flower Border
Round 1: Join MC in any outside corner. Ch 2, * [fpdc around next st, hdc in next hdc] 4 times; fpdc around next st; hdc in ch-1 end space; dc in next ch-1 end space of joining, hdc in next ch-1 end space, [fpdc around next st, hdc in next hdc] 4 times, fpdc around next st; [hdc, ch 2, hdc] in ch-1 side space; repeat from * around, ending last repeat with slip st in top of beginning ch-2 (counts as last hdc). Fasten off.
Round 2: Join C in any ch-1 side space. Ch 3 for dc, * [hdc in hdc, fpdc around fpdc] 5 times, hdc in hdc, fpdc around dc, hdc in hdc, [fpdc around fpdc, hdc in next hdc] 5 times, [dc, ch 1, dc] in side space; repeat from * around, ending last repeat with slip st in top of ch-3. Fasten off.
Assemble Pillow: With Right Side facing, join MC in any outside ch-1 corner of one side of pillow. Ch 1, sc in same space, ch 2 for hdc, * fpdc around dc, [hdc in hdc, fpdc around fpdc] to next outside corner, [hdc, ch 1, hdc] in corner; repeat from * around. Repeat for other side of pillow. With wrong sides together, join A in any outside corner, inserting hook through matching corners of each side. Working from left to right, ch 1, [sc, ch 1, sc] in same corner, [sc in next hdc, ch 1, skip fpdc] around pillow, working [sc, ch 1, sc] in each outside corner. When pillow is half assembled, insert pillow form and work to end. Fasten off.
ABBREVIATIONS: ch = chain; dc = double crochet; hdc = half double crochet; mm = millimeters; sc = single crochet; st(s) = stitch(es); tr = treble crochet; yo = yarn over needle; [ ] = work directions in brackets the number of times specified; * or ** = repeat whatever follows the * or ** as indicated.
Pattern © by Coats & Clark Inc. Reproduced with permission from Coats & Clark Inc. PurpleKittyYarns.com is not endorsed by Coats & Clark Inc. It is not permissible to contract production of projects made from designs published by Coats & Clark to a third party for sale or distribution.
Alien Pillows WR1964
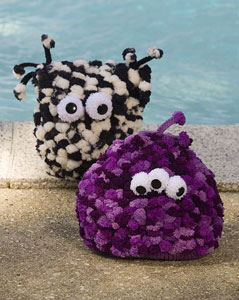
Designed by Heather Lodinsky
Skill Level: EASY
Black Rectangle Pillow measures 8" wide x 10" tall. Purple Oval Pillow measures 8" wide x 10" tall.
For Black Rectangle Pillow
RED HEART® "Pomp-a-Doodle™": 2 Balls in 9945 Night & Day A.
RED HEART® "Super Saver®": 1 Skein in 312 Black B.
2 black buttons: ⅞” diameter.
For Purple Oval Pillow
RED HEART® "Pomp-a-Doodle™": 2 Balls in 9930 Plush Plum A.
RED HEART® "Super Saver®": 1 Skein in 528 Medium Purple B.
3 black buttons: ¾” diameter.
For Both
RED HEART® "Super Saver®": 1 Skein in 311 White C or purchased white pompoms.
Knitting Needles: 5.5 mm [US 9] and 6.5 mm [US 10½].
Polyester stuffing.
Yarn needle.
GAUGE: 16 sts = 4"; 22 rows = 4" in garter stitch with smaller needles and B. CHECK YOUR GAUGE. Use any size needles to obtain the given gauge.
Note: Knit 2 stitches on thread between pompoms. Do not pull pompoms through stitches.
BLACK RECTANGLE PILLOW
Body
With larger needles and A, cast on 24 sts.
Work in garter stitch for 20".
Bind off.
Base
With smaller needles and B, cast on 10 sts.
Working in garter st, inc 1 st at beginning of every row 10 times - 20 sts.
Work even until piece measures 4" from beginning.
Dec 1 stitch at beginning of every row 10 times - 10 sts. Bind off.
Antennae (Make 6)
With smaller needles and B, cast on 12 sts.
Bind off, leaving a long tail.
Cut 2 pompoms from A for each Antenna.
Sew 2 pompoms to top of each Antenna.
FINISHING
Fold Body piece in half and sew side seams, leaving cast-on and bind-off edges open.
Make 2 pompoms, each 1½" diameter, from C.
Sew buttons on pompoms and sew to Front of Body.
Sew 3 antennae to each top corner.
Sew Base to open edge of Body, leaving an opening for stuffing.
Stuff with polyester filling.
Sew opening closed.
Weave in ends.
PURPLE OVAL PILLOW
Body
(Make 2)
With larger needles and A, cast on 30 sts.
Work in garter stitch for 5".
Dec 1 st at beginning of next 14 rows - 16 sts.
Bind off 2 stitches at beginning of next 2 rows, then 3 sts at beginning of next 2 rows - 6 sts.
Bind off.
Base
With smaller needles and B, cast on 10 sts.
Working in garter st, inc 1 st at beginning of every row 14 times - 24 sts.
Work even until piece measures 7" from beginning.
Dec 1 stitch at beginning of every row 14 times - 10 sts.
Bind off.
Antennae
(Make 3)
Work as for Rectangle Pillow Antennae.
FINISHING
Sew Body pieces together, leaving cast-on edges open.
Make 3 pompoms, each 1½" diameter, from C.
Sew buttons on pompoms and sew to Front of Body. Sew 3 antennae to top edge of Pillow.
Sew Base to open edge of Body, leaving an opening for stuffing.
Stuff with polyester filling.
Sew opening closed.
Weave in ends.
ABBREVIATIONS: A, B, etc = color A, B, etc; dec = decrease; inc = increase; K = knit; mm = millimeters; st(s) = stitch (es); St st = Stockinette stitch.
Pattern © by Coats & Clark Inc. Reproduced with permission from Coats & Clark Inc. PurpleKittyYarns.com is not endorsed by Coats & Clark Inc. It is not permissible to contract production of projects made from designs published by Coats & Clark to a third party for sale or distribution.
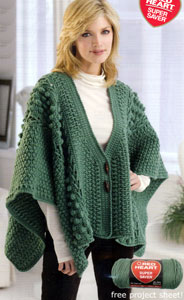
Aran Toggle Wrap LW1771
Skill Level: Easy
Designed by Nazanin S. Fard.
RED HEART® Super Saver™: 6 balls 631 Light Sage.
Crochet Hook: 6 mm [US J-10].
Two 1 ¾" toggle buttons.
Stitch markers.
Yarn needle.
GAUGE: 13 dcs = 4" in Mock Seed Stitch. CHECK YOUR GAUGE. Use any size hook to obtain the gauge given.
Shawl Width 47". Shawl Length 23".
NOTE: Shawl is worked from side to side.
RIGHT SIDE
Ch 149.
Row 1 (WS): Dc in 3rd ch from hook, dc in each ch across, turn.
Row 2: Ch 2 (counts as st here and throughout), *Fpdc in next st, Bpdc in next st; repeat from * across, turn - 148 sts.
Row 3: Ch 2, *Bpdc in next st, Fpdc in next st, repeat from * across, turn.
Row 4-17: Repeat Row 2-3 for Mock Seed st.
Row 18: Repeat Row 2.
Row 19: Ch 1, sc in every st across row, turn. Place marker after 74th st for center of Shoulder.
Row 20: Ch 3 (count as dc), dc in next st, *skip next 3 sts, tr in next st, dc in each skipped st working behind tr just made; repeat from * to marker for Front, [skip next st, dc in next 3 sts, working in front of 3 dc just made, tr in skipped st] to last 2 sts, dc in 2 sts for Back, turn.
Row 21: Ch 3, dc in next st, [skip next st, dc in each of next 3 dc, working behind 3 dc just made, tr in skipped st] across to marker for Back, [skip next 3 sts, tr in next st, dc in each of the 3 sts skipped in front of the tr just made] to last 2 sts, dc in 2 dc, turn.
Row 22: Ch 3 (count as dc), dc in each st across, turn.
Row 23: Ch 1, sc in next 2 sts, *bobble in next st, sc in next 3 sts; repeat from * to last 2 sts, bobble in next st, sc in last st, turn.
Row 24: Ch 3 (count as dc), dc in each st across, turn.
Row 25: Ch 1, sc in next 4 sts, *bobble in next st, sc in next 3 sc; repeat from * turn.
Row 26-29: Repeat Rows 22-25.
Row 30-31: Ch 1, sc in each st across, turn.
Row 32-33: Repeat Rows 20-21.
Row 34: Ch 1, sc in each st, across, turn.
Row 35: Ch 3, dc in each st, turn.
Row 36, 37: Repeat Rows 2 and 3.
Row 38: Repeat Row 2.
Shape Back Neck
Row 39: Work Row 3 on next 70 sts, turn.
Row 40-44: Working on 70 sts only for Back, repeat Rows 2-3. Do not fasten off.
RIGHT FRONT
Row 1: Skip next 32 sts along Row 38. Join second ball of yarn in next st, ch 1, sc in next st, hdc in next st, *Bpdc in next st, Fpdc in next st; repeat from * across, turn - 46 dc.
Rows 2, 4 and 6: Work as established to last 2 sts before hdc, hdc in next st, sc in next st, turn.
Rows 3, 5 and 7: Slip st in next st, sc in next st, hdc in next st, work as established across, turn.
Fasten off.
LEFT FRONT
Ch 38.
Row 1: Slip st in first 2 chs, sc in next ch, hdc in next ch, dc in each of the next 34 sts, turn.
Rows 2 and 4: Ch 2, *Fpdc in next dc, Bpdc in next dc; repeat from * to last hdc, Fpdc in hdc, Bpdc in sc, hdc in next slip st, sc in last slip st, turn.
Rows 3 and 5: Ch 4, slip st in first 2 chs, sc in next ch, hdc in next ch, Bpdc in next sc, Fpdc in next hdc, *Bpdc in next st, Fpdc in next st; repeat from * across, turn.
Row 6: Ch 2, *Fpdc in next dc, Bpdc in next dc; repeat from * to last hdc, Fpdc in hdc, Bpdc in sc, hdc in next slip st, sc in last slip st, ch 2 - 46 sts.
Fasten off.
LEFT SIDE
Return to Row 44 of Back Neck to work across all sts and join for Left Side.
Row 45: Work as established for 70 sts, ch 32, work across 46 sts of Left Front, turn.
Row 46: Work as established, working dc in each ch, across, turn - 148 sts. Place marker after 74th st for center of Shoulder.
Row 47: Ch 2, *Bpdc in next st, Fpdc in next st; repeat from * across, turn.
Row 48: Ch 2, *Fpdc in next st, Bpdc in next st; repeat from * across, turn.
Row 49-50: Ch 1, sc in each st, turn.
Row 51: Ch 3 (count as dc), dc in next st, *skip next 3 sts, tr in next st, dc in each skipped st working behind tr just made; repeat from * to marker for Front, [skip next st, dc in next 3 sts, working in front of 3 dc just made, tr in skipped st] to last 2 sts, dc in 2 sts for Back, turn.
Row 52: Ch 3, dc in next st, [skip next st, dc in each of next 3 dc, working behind 3 dc just made, tr in skipped st] across to marker for Back, [skip next 3 sts, tr in next st, dc in each of the 3 sts skipped in front of the tr just made] to last 2 sts, dc in 2 dc, turn.
Row 53: Ch 3 (count as dc), dc in each st across, turn.
Row 54 (WS): Ch 1, sc in next 2 sts, *bobble in next st, sc in next 3 sc; repeat from * to last 2 sts, bobble in next st, sc in top of beginning ch, turn.
Row 55: Ch 3 (count as dc), dc in each st across, turn.
Row 56: Ch 1, sc in next 4 sts, *bobble in next st, sc in next 3 sc; repeat from * across, turn.
Rows 57-60: Repeat Rows 54-56.
Rows 61-62: Ch 1, sc in each st, turn.
Rows 63-64: Repeat Rows 51-52.
Row 65: Ch 1, sc in each st, turn.
Row 66: Ch 2, *Fpdc in next st, Bpdc in next st; repeat from * across, turn.
Row 67: Ch 2, *Bpdc in next st, Fpdc in next st; repeat from * across, turn.
Row 68-83: Repeat Rows 66-67. Fasten off.
FINISHING
Neckband
Row 1: With wrong side facing, join yarn to front edge of Left Front and work in sc evenly around front edge, Back neck and Right Front edge, turn.
Rows 2-4: Ch 1, sc in each sc around, turn.
Round 5 (Buttonhole Row): Work in sc to beginning of neck shaping on Right Front edge, ch 3, skip next 3 sc, sc in each of next 5 sc, ch 3, skip next 3 sc, sc to the end, turn to work along bottom edge and sc evenly around bottom and side edges, join with a slip st to first st.
Round 6: Ch 1, sc in each st around, join with a slip st to first st.
Round 7: Work reverse sc in each st around join with a slip st to first st.
Fasten off.
Sew buttons opposite buttonholes. Weave in ends.
ABBREVIATIONS: ch = chain; dc = double crochet; Bpdc = Back post double crochet; Fpdc = Front post double crochet; hdc = half double crochet; mm = millimeters; sc = single crochet; st(s) = stitch(es); tr = triple or treble crochet; yo = yarn over needle; [ ] = work directions in brackets the number of times specified; * or ** = repeat whatever follows the * or ** as indicated.
Special Abbreviations:
Bobble: [Yo, draw up a loop, yo, pull through 2 loops] 4 times in same st, yo, draw through all loops on hook, ch 1. Ch 1 does not count as a stitch. Do not work any stitches in the ch-1 of Bobble.
Pattern © by Coats & Clark Inc. Reproduced with permission from Coats & Clark Inc. PurpleKittyYarns.com is not endorsed by Coats & Clark Inc. It is not permissible to contract production of projects made from designs published by Coats & Clark to a third party for sale or distribution.
Autumn Beauty Throw WR2040
Skill Level: EASY
Designed by Martha Brooks Stein
Throw measures 46" x 60".
RED HEART® "Classic®": 3 skeins each 365 Coffee A, 289 Copper B, 339 Mid Brown C and 286 Bronze D; 2 skeins 631 Light Sage E and 1 skein 762 Claret F.
Red Heart® Super Saver®: 1 skein 321 Gold G.
Crochet Hook: 5.5mm [US I-9].
Yarn needle.
GAUGE: Square = 7". CHECK YOUR GAUGE. Use any size hook to obtain the gauge.
Special Abbreviation:
sc2tog (sc dec) = Insert hook into st and draw up a loop. Insert hook into next st and draw up a loop. Yarn over, draw through all 3 loops on hook.

THROW
Square (Make 48)
With G, ch 3, slip st in first ch to form a ring.
Round 1: Ch 4 (counts as dc and ch-1), [dc in ring, ch 1] 7 times - 8 dc.
Fasten off.
Round 2: Join F in any ch-space, ch 2, dc in same space, * ch 1, 2 hdc in next ch-space, ch 1, (2 dc, ch 2, 2 dc) in next ch-space; repeat from * around, end ch 1, 2 hdc in next ch-space, 2 dc in first corner ch-space, ch 2, slip st in top of beginning ch to join. Fasten off.
Round 3: Join E in any corner space, ch 2, dc in same space, *[ch 1, 2 dc in next ch-space] twice, ch 1, (2 dc, ch 2, 2 dc ) in corner space; repeat from * around, end 2 dc in first corner space, ch 2, slip st in top of beginning ch to join.
Fasten off.
Round 4: Join D in any corner space, ch 2, dc in same space, *ch 1, [2 dc in next ch-space, ch 1] across to next corner space, work (2 dc, ch 3, 2 dc) in corner ch-space; repeat from * around, end [2 dc in next ch-space, ch 1] across to first corner space, 2 dc in first corner space, ch 2, slip st in top of beginning ch to join. Fasten off.
Round 5: Join C in any corner space, repeat Round 4.
Round 6: Join B in any corner space, repeat Round 4.
Round 7: Join A in any corner space, ch 1, 2 sc in same space, *sc in each dc and in each ch-space across to next corner space, work (2 sc, ch 2, 2 sc) in corner space; repeat from * around, end sc in each dc and in each ch- space across to next corner space, 2 sc in first corner space, ch 2, slip st in top of beginning ch to join. Fasten off, leaving a 16" tail to use in sewing.
FINISHING
With wrong side together, use long tails to whipstitch Squares together through the back loops only. Make 8 Strips of 6 Squares each. Sew 8 Strips together along long edges.
Border
Round 1: Working in back loops only, join A in 2nd ch of any corner ch-2 space, ch 1, sc in same loop, [sc in each sc across to next corner, working sc2tog in corner ch-spaces of adjoining Squares and working (sc, ch 2, sc) in each corner space of Throw] around to first corner space, sc, ch 2, slip st to first st to join. Fasten off.
Round 2: Join D in any corner ch-2 space, ch 2, dc in same space, *[ch 1, skip next sc, dc in next 2 sc] across to 1 st before next corner, ch 1, skip last sc, (2 dc, ch 2, 2 dc) in corner space; repeat from * around, end with ch 1, skip last sc, 2 dc in first corner space, ch 2, slip st in top of beginning ch to join. Fasten off.
Round 3: Join C in any ch-2 corner space, ch 2, dc in same space, *[ch 1, 2 dc in next ch-1 space] across to next corner space, ch 1, work (2 dc, ch 2, 2 dc); repeat from * around, end 2 dc in first corner space, ch 2, slip st in top of beginning ch to join. Fasten off.
Round 4: Join B in any corner space, ch 1, sc in same space, *[ch 4, sc in next ch-1 space] across to next corner, ch 4, work (sc, ch 4, sc) in corner space; repeat from * around, end with sc in first corner space, ch 4, slip st in first sc to join. Fasten off.
FINISHING
Weave in ends.
ABBREVIATIONS: ch = chain; ch-space = chain space; dc = double crochet; hdc = half double crochet; mm = millimeters; sc = single crochet; st(s) = stitch(es); * = repeat whatever follows the * as indicated; [ ] = work directions in brackets the number of times specified.
Pattern © by Coats & Clark Inc. Reproduced with permission from Coats & Clark Inc. PurpleKittyYarns.com is not endorsed by Coats & Clark Inc. It is not permissible to contract production of projects made from designs published by Coats & Clark to a third party for sale or distribution.
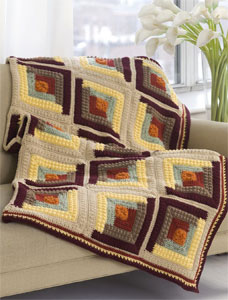
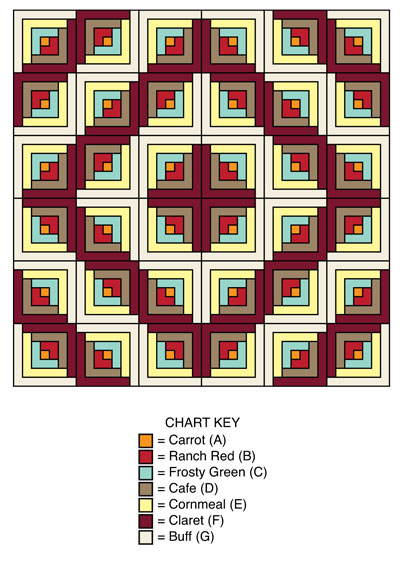
Autumn Log Cabin Throw WR1846
Throw measures 72" x 72".
Skill Level: INTERMEDIATE
Red Heart® Super Saver®: 1 Skein each 256 Carrot A, 332 Ranch Red B, and 4361 Frosty Green Fleck C; 2 skeins each 360 Cafe D, 320 Cornmeal E, and 378 Claret F; 3 skeins 334 Buff G.
Crochet Hook: 5mm [US H-8].
Yarn needle.
MOTIF (Make 36) Section 1: With A, ch 2.
Rnd 1 (Right Side): 8 Sc in 2nd ch from hook; join with a slip st in first sc; TURN.
Rnd 2: Ch 1, sc in next sc; * yo and draw up a loop in next sc, yo and draw through 1 loop on hook, [yo and draw through 2 loops] twice - long-dc made; (sc, long-dc) all in same place where first long-dc was made, sc in next sc; repeat from * twice more; (long-dc, sc, long-dc) all in last sc; join in first sc; turn.
Rnd 3: Ch 1, sc in first st, 3 hdc in next st for corner, [sc in next 3 sts, 3 hdc in next st] 3 times, sc in last 2 sts; join. Fasten off.
Section 2
Row 1: With right side facing, join B with sc in center hdc of any corner; sc in next 5 sts, 3 sc in next hdc, sc in next 6 sts; turn - 15 sc.
Rows 2-5: Ch 1, sc in each st to center sc of corner, 3 sc in next sc, sc in each st to end; turn - 23 sc at end of Row 5. Fasten off.
Section 3
Row 1: With right side facing, join C with sc in end of last row, sc in end of next 4 rows, 5 sc along edge of Section 1 to next corner, 3 sc in corner, 5 sc along edge of Section 1, sc in end of next 5 rows; turn - 23 sc.
Rows 2-5: Repeat Rows 2-5 of Section 2 - 31 sc at end of Row 5. Fasten off.
Section 4
Row 1: With right side facing, join D and sc in end of next 5 rows, sc in next 11 sc, 3 sc in next sc, sc in next 11 sc, sc in end of next 5 rows; turn - 35 sc.
Row 2: Ch 1, sc in first sc, [long-dc in next sc, sc in next sc] 8 times, (long-dc, sc, long-dc) all in corner sc, sc in next sc, [long-dc in next sc, sc in next sc] 8 times; turn - 37 sts.
Row 3: Repeat Row 2 of Section 2 - 39 sc.
Row 4: Repeat Row 2 of Section 4 except work sts in brackets 9 times instead of 8 times - 41 sts.
Row 5: Repeat Row 2 of Section 2 - 43 sts. Fasten off.
Section 5
Row 1: With right side facing, join E and sc in end of next 5 rows, sc in next 15 sc, 3 sc in next sc, sc in next 15 sc, sc in end of next 5 rows; turn - 43 sc.
Row 2: Repeat Row 2 of Section 4 except work sts in brackets 10 times instead of 8 times - 45 sts.
Row 3: Repeat Row 2 of Section 2 - 47 sc.
Row 4: Repeat Row 2 of Section 4 except work sts in brackets 11 times instead of 8 times - 49 sts.
Row 5: Repeat Row 2 of Section 2 - 51 sc. Fasten off.
Section 6
Row 1: With right side facing, join F and sc in end of next 5 rows, sc in next 21 sc, 3 sc in next sc, sc in next 21 sc, sc in end of next 5 rows; turn - 55 sc.
Row 2: Repeat Row 2 of Section 2 - 57 sc.
Row 3: Ch 1, sc in first sc, [ch 1, skip 1 sc, sc in next sc] 13 times, ch 1, skip 1 sc, 3 sc in next sc, [ch 1, skip 1 sc, sc in next sc] 14 times; turn - 59 sts.
Row 4: Ch 1, sc in first sc; (yo, insert hook in sc directly below the ch-1 and draw up a loop to height of row in work, yo and draw through all 3 loops on hook - long-hdc made; sc in next sc] 14 times, 3 sc in next sc, sc in next sc, [long-hdc, sc in next sc] 14 times; turn - 61 sts.
Row 5: Repeat Row 2 of Section 2 - 63 sc. Fasten off.
Section 7
Row 1: With right side facing, join G and sc in end of next 5 rows, sc in next 25 sts, 3 sc in next st, sc in next 25 sts, sc in end of next 5 rows; turn - 63 sc.
Row 2: Repeat Row 2 of Section 2 - 65 sc.
Row 3: Ch 1, sc in first sc, [ch 1, skip 1 sc, sc in next sc] 15 times, ch 1, skip 1 sc, 3 sc in next sc, [ch 1, skip 1 sc, sc in next sc] 16 times; turn - 67 sts.
Row 4: Ch 1, sc in first sc, [long-hdc, sc in next sc] 16 times, 3 sc in next sc, sc in next sc, [long-hdc, sc in next sc] 16 times; turn - 69 sts.
Row 5: Repeat Row 2 of Section 2 - 71 sc. Fasten off.
Motif Border
With right side facing, join G to any corner; ch 1, * (sc, hdc, sc) all in corner sc, 35 sc evenly spaced to next corner; repeat from * around; join in first sc. Fasten off.
FINISHING
Sew motifs together following diagram.
Outer Border
Rnd 1: With right side facing, join B in any sc; ch 1, sc around working 3 sc in each corner; join. There should be an odd number of sc between each center corner sc.
Rnd 2: Ch 1, sc in each sc around and work 3 sc in center corner sc; join. Fasten off.
Rnd 3: With right side facing, join E in any corner; ch 1, 2 sc in corner sc, [sc in each sc to next center corner sc, 3 sc in corner sc] 3 times, sc in each sc to next corner, work 1 more sc in same sc as first 2 sc; join.
Rnd 4: Ch 1, ** 3 sc in center corner sc, * ch 1, skip next sc, sc in next sc; repeat from * to next corner; ch 1, skip next sc; repeat from ** around; join. Fasten off.
Rnd 5: With right side facing, join F in any corner; ch 1, ** 3 sc in center corner sc, * sc in next sc, long-hdc; repeat from * to next corner; sc in next sc; repeat from ** around; join.
Rnd 6: Ch 1, sc in each st around and work 3 sc in center corner sc; join. Fasten off. Weave in ends.
ABBREVIATIONS: A, B, C, etc = color A, B, C, etc; ch = chain; dc = double crochet; hdc = half double crochet; mm = millimeters; rnd = round; sc = single crochet; st(s) = stitch (es); yo = yarn over; * or ** = repeat whatever follows the * or ** as indicated; [ ] = work directions in brackets the number of times specified.
Pattern © by Coats & Clark Inc. Reproduced with permission from Coats & Clark Inc. PurpleKittyYarns.com is not endorsed by Coats & Clark Inc. It is not permissible to contract production of projects made from designs published by Coats & Clark to a third party for sale or distribution.
Baby Black Cat Pattern LW2828

Knit this sweater and hat set and you'll have the cutest black kitten that ever crossed your path. Of course your kitten can be any Super Saver color that you desire. And (if it gets in the way) you can remove the tail after all the Halloween festivities.
Designed by Mary Jane Protus.
Skill Level: INTERMEDIATE
Sweater directions are for size 6 months. Changes for sizes 12 months, 18 months, and 24 months are in parentheses.
Hat directions are for size 6-12 months. Changes for sizes 12-24 months are in parentheses.
Finished Chest: 22 (24, 25, 26)"
Finished Length: 11 (12, 13, 14)"
Hat to Fit: 16-18 (19-21)" head circumference
RED HEART® Super Saver®: 1 (1, 1, 2) skeins 312 Black A, 1 skein 319 Cherry Red B.
Knitting Needles: 4.5 mm [US 7] and 6mm [US 10].
Stitch holders, stitch markers, two ⅝" buttons, yarn needle.
GAUGE: 15 sts = 4"; 20 rows = 4", in Stockinette st (knit on Right Side, p on Wrong Side) using larger needles. CHECK YOUR GAUGE. Use any size needles to obtain the gauge.
Special Stitches
M1 = Make 1 (Increase) — Lift strand between needles to left-hand needle and knit strand through the back loop, twisting it to prevent a hole.
skp = slip next stitch as if to knit to right needle, knit next stitch, lift slipped stitch over knit stitch and off needle.
s2kp = slip next 2 stitches as if to k2tog to right needle, knit next stitch, lift the 2 slipped stitches over knit stitch and off needle.
Pattern Stitches
1x1 Rib (multiple of 2 sts + 1)
Row 1 (Wrong Side): K1, *p1, k1; repeat from * to end of row.
Row 2: P1, *k1, p1; repeat from * to end of row.
Repeat Rows 1 and 2 for 1x1 Rib.
SWEATER
Back
With smaller needles and A, cast on 41 (45, 47, 49) sts.
Ribbing
Row 1 (Wrong Side): Knit.
Row 2: Knit.
Rows 3-7: Beginning with a Wrong Side row, work in 1x1 Rib for 5 rows.
Rows 8 and 9: Knit. Place a marker in last row for Wrong Side.
Change to larger needles.
Beginning with a Right Side (knit) row work even in St st until piece measures 9 (10, 11, 12)" from beginning, end with a Wrong Side (purl) row.
Shape Neck
Row 1 (Right Side): K15 (16, 17, 17) sts, join a 2nd ball of yarn, k11 (13, 13, 15) and place these sts on a holder for back neck, knit to end of row—15 (16, 17, 17) sts for each shoulder.
Work both shoulders at the same time using a separate ball of yarn for each shoulder.
Row 2: Purl across sts of both shoulders.
Row 3 (Right Side): Knit to last 3 sts of first shoulder, k2tog, k1; on 2nd shoulder, k1, skip, knit to end of row—14 (15, 16, 16) sts on each shoulder.
Rows 4-7: Repeat last 2 rows 2 more times—12 (13, 14, 14) sts on each shoulder.
Continue in St st over both shoulders until piece measures 11 (12, 13, 14)" from beginning. Bind off.
Front
Work same as back until piece measures 8 (9, 10, 11)" from beginning, end with a Wrong Side row.
Shape Neck
Row 1 (Right Side): K15 (16, 17, 17) sts, join a 2nd ball of yarn, k11 (13, 13, 15) and place these sts on a holder for front neck, knit to end of row—15 (16, 17, 17) sts for each shoulder.
Work both shoulders at the same time using a separate ball of yarn for each shoulder.
Row 2: Purl across sts of both shoulders.
Row 3 (Right Side): Knit to last 3 sts of first shoulder, k2tog, k1; on next shoulder, k1, skp, knit to end of row—14 (15, 16, 16) sts on each shoulder.
Rows 4-7: Repeat last 2 rows 2 more times—12 (13, 14, 14) sts on each shoulder.
Continue in St st over both shoulders until piece measures same as back. Bind off.
Sleeves (Make 2)
With smaller needles and A, cast on 25 (29, 31, 33) sts.
Ribbing
Row 1 (Wrong Side): Knit.
Row 2: Knit.
Rows 3-7: Work in 1x1 Rib for 5 rows.
Row 8: Knit.
Row 9: Knit across working 1 (1, 0, 2) increases (M1) near middle of row—26 (30, 31, 35) sts. Place a marker in last row for Wrong Side.
Beginning with a Right Side row, work even in St st for 2 (2, 4, 6) rows.
Increase Row (Right Side): K1, M1, knit to last st, M1, k1—28 (32, 33, 37) sts.
Work even in St st for 3 (5, 5, 5) rows.
Repeat Increase Row—30 (34, 35, 39) sts.
Repeat last 4 (6, 6, 6) rows 2 more times—34 (38, 39, 43) sts.
Work even in St st until piece measures 6½ (7½, 8½, 9½)" from beginning.
Bind off.
TAIL
With smaller needles and A, cast on 9 sts.
Work even in St st until piece measures 8" from beginning, end with a Wrong side row.
Shape Tip
Row 1: K2tog, knit to last 2 sts, k2tog—7 sts.
Row 2: Purl.
Repeat last 2 rows until only 3 sts remain. Cut yarn, leaving a long tail. Thread tail through sts of last row and pull to gather. Use remainder of tail to sew seam. Sew tail to center of back of sweater.
FINISHING
Sew right shoulder seam.
Neckband
Set Up: With Right Side facing, smaller needles and A, cast on 5 sts for button tab, working around neck edge and beginning at left side of neck edge, pick up and k11 sts across left front neck, knit across 11 (13, 13, 15) sts on front neck holder, pick up and k11 sts across right front neck, pick up and k8 sts across right back neck, knit across 11 (13, 13, 15) sts on back neck holder, pick up and k8 sts across left back neck—65 (69, 69, 73) sts.
Rows 1 and 2: Knit.
Rows 3 and 4: Beginning with a Wrong Side row, work in 1x1 Rib for 2 rows.
Row 5 (buttonhole): K1, *p1, k1; repeat from * to last 6 sts, p1, k2tog, yo, k1, p1, k1.
Rows 6 and 7: Beginning with a Right Side row, work in 1x1 Rib for 2 rows.
Rows 8 and 9: Knit.
Bind off as if to knit.
Sew left shoulder seam, leaving ends of neckband unsewn. Sew button to neckband, opposite buttonhole. Measure and mark 4½ (5, 5¼, 5¾)" from shoulder on front and back, for armhole. Place sleeve between markers and sew into armhole. Repeat for other sleeve. Sew sleeve and side seams. Weave in ends.
HAT
With smaller needles and A, Cast on 53 (59) sts.
Front Ribbing
Row 1 (Wrong Side): Knit.
Row 2: Knit.
Rows 3-7: Work in 1x1 Rib for 5 rows.
Row 8: Knit.
Row 9: K26 (29), M1, knit to end of row—54 (60) sts. Change to larger needles.
Beginning with a Right Side (knit) row work even in St st until piece measures 5½ (6½)" from beginning, end with a Wrong Side (purl) row. Place a marker at the beginning and end of this last row.
Shape Back of Hat
Row 1 (Right Side): *K4, k2tog; repeat from * to end of row—45 (50) sts.
Row 2: Purl.
Row 3: *K3, k2tog; repeat from * to end of row—36 (40) sts.
Row 4: Purl.
Row 5: *K2, k2tog; repeat from * to end of row—27 (30) sts.
Row 6: Purl.
Row 7: *K1, k2tog; repeat from * to end of row—18 (20) sts.
Row 8: Purl.
Row 9: *K2tog; repeat from * to end of row—9 (10) sts.
Row 10: Purl.
Row 11: K1 (0), *k2tog; repeat from * to end of row—5 sts.
Cut yarn, leaving a long tail. Weave tail through sts of last row and pull to gather. Fold cast-on edge in half (fold runs across top of head). Use remaining tail to sew back seam, from down to markers at beginning of back of head shaping.
EARS (make 2)
Back of Ear
with smaller needles and A, cast on 5 sts.
Row 1: K2, yo, k1, yo, k2—7 sts.
Row 2: Knit all sts, knitting into the back loop of each yo.
Row 3: K3, yo, k1, yo, k3—9 sts.
Row 4: Repeat Row 2.
Row 5: K4, yo, k1, yo, k4—11 sts.
Row 6: Repeat Row 2.
Row 7: K5, yo, k1, yo, k5—13 sts.
Row 8: Repeat Row 2.
Row 9: K6, yo, k1, yo, k6—15 sts.
Row 10: Repeat Row 2.
Row 11: K7, yo, k1, yo, k7—17 sts.
Row 12: Repeat Row 2.
Change to B.
Front of Ear
Row 1 (Right Side): With B, knit.
Row 2: Purl.
Row 3: Skp, k5, s2kp, k5, k2tog—13 sts.
Row 4: Purl.
Row 5: Skp, k3, s2kp, k3, k2tog—9 sts.
Row 6: Purl.
Row 7: Skp, k1, s2kp, k1, k2tog—5 sts.
Row 8: Purl.
Row 9: Skp, k1, k2tog—3 sts.
Cut yarn, leaving a long tail. Thread tail through sts of last row and pull to gather, knot and secure. Fold front of ear over back of ear, with A sew all edges together.
FINISHING
Neckband
Set Up: With Right Side facing, smaller needles and A, CO 18 (22) sts for buttonhole tab, beginning at lower front corner of hat, pick up and k41 (49) sts evenly spaced across lower edge (the lower edge is the edge that does not yet have ribbing) to opposite lower front corner—59 (71) sts.
Rows 1 and 2: Knit.
Rows 3 and 4: Beginning with a Wrong Side row, work in 1x1 Rib for 2 rows.
Row 5 (buttonhole): K1, *p1, k1; repeat from * to last 6 sts, p1, k2tog, yo, k1, p1, k1.
Rows 6 and 7: Beginning with a Right Side row, work in 1x1 Rib for 2 rows.
Rows 8 and 9: Knit.
Bind off as if to knit.
Sew button to neckband, opposite buttonhole.
Using photograph as a guide for placement, sew ears to top of hat. Weave in ends.
ABBREVIATIONS: A, B = Color A, Color B; k = knit; k2tog = knit next 2 sts together; p = purl; yo = yarn over; * = repeat whatever follows the * or ** as indicated.

Pattern © by Coats & Clark Inc. Reproduced with permission from Coats & Clark Inc. PurpleKittyYarns.com is not endorsed by Coats & Clark Inc. It is not permissible to contract production of projects made from designs published by Coats & Clark to a third party for sale or distribution.
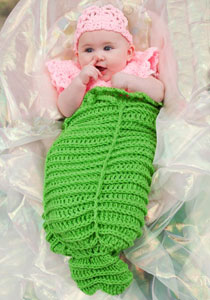
Baby Mermaid Cocoon LW2840
Baby will be a vision of cuteness in this cocoon with crocheted top and sweet tiara. It's perfect for Halloween or anytime baby needs to look cute while staying cozy.
Skill Level: EASY
Designed by Kim Guzman.
Directions are for Infant size 3 months; changes for sizes 6, 9 and 12 months are in parentheses.
Red Heart® Super Saver®: 1 skein each 672 Spring Green A and 373 Petal Pink B.
Crochet Hooks: 5.5mm [US I-9] and 6.5mm [US K-10.5].
Yarn needle; 2 split lock stitch markers.
GAUGE: 10 sts = 4"; 25 rows = 8" in sc with smaller hook. CHECK YOUR GAUGE. Use any size hook to obtain the gauge.
Finished chest measurements: 18½ (20½, 20½, 22½)".
Special Stitches
BPsc (Back Post Single Crochet) = insert hook from back to front to back around st, yarn over and draw loop through, yarn over and draw through 2 loops on hook.
Dc2tog (Double Crochet Two Together) = [yarn over and draw up a loop in next st, yarn over and draw through 2 loops] twice, yarn over and draw through all 3 loops on hook.
MERMAID TAIL
Round 1: Beginning at waist, with larger hook and A, ch 60; join with a slip st in first ch to form a ring being careful that ch is not twisted; change to smaller hook; ch 1, sc in each ch around; join with a slip st in first sc—60 sc.
Eyelet Round 2: Ch 3 (counts as hdc plus ch 1), skip first 2 sc, * hdc in next sc, ch 1, skip next sc; repeat from * around; join with a slip st to 2nd ch of ch-3.
Round 3: Ch 1, sc in each hdc and ch-1 space around; join to first sc. Change to larger hook.
Round 4: With larger hook, ch 3 (counts as first dc here and throughout), skip first sc, dc in each sc around; join to top of ch-3—60 dc.
Round 5: Ch 1, * BPsc; repeat from * around; join to first sc—60 BPsc.
Round 6: Ch 3, skip first sc, dc in each sc around; join.
Repeat Rounds 5 and 6 12 (13, 14, 14) times more.
Next Round: Repeat Round 5.
Next Round: Ch 1, skip first sc, dc in next sc (beginning dc2tog made), * dc2tog; repeat from * around; join to top of first dc—30 sts.
Next Round: Repeat Round 5—30 BPsc.
Next Round: Ch 1, skip first sc, dc in next sc, * dc2tog; repeat from * around; join—15 sts.
Next Round: Repeat Round 5—15 BPsc. Mark any st in this round.
Next Round: Ch 3, dc in same sc as joining, 2 dc in each sc around; join—30 dc.
Next Round: Repeat Round 5—30 BPsc.
Next Round: Repeat Round 6—30 sts.
Repeat last 2 rounds 3 times more. Fasten off, leaving a 12" tail for sewing.
Tail Indent
Lay garment flat with the yarn tail centered (front). With yarn needle and the 12" tail of yarn, beginning in the center of the last round of the Tail, weave the strand through the center of the stitches in a vertical line up to the marked round, then put needle and yarn through both layers of the fabric to the opposite (back) side and weave down through the center of the stitches; draw up firmly to form "indent" and fasten yarn securely.
Vertical lines
Holding larger hook and A on right side of fabric of the front, join yarn in a st on marked round about 2" away from Tail Indent; work a vertical chain st on the surface only up to Round 5 near waist. Fasten off.
Repeat 2nd vertical line approximately 4" from the first. Remove marker.
Waist Trim
Round 1: With larger hook, join A to work in unused loops of beginning ch; ch 1, sc in same st as joining, * skip 2 ch, Sh in next ch, skip 2 sc **, sc in next ch; repeat from * around, end at **; join to first sc.
Round 2: Slip st to first ch-1 space; ch 1, sc in same ch-1 space, [ch 3, sc in next ch-1 space] 3 times, * sc in next ch-1 space, [ch 3, sc in next ch-1 space] 3 times; repeat from * around; join. Fasten off.
Drawstring
With larger hook and A, make a 30" ch; slip st in 2nd ch from hook and in each ch across. Fasten off. Weave drawstring through the spaces of Eyelet Round 2.
MERMAID TOP
Back
** Row 1 (Right Side): With smaller hook and B, ch 25 (27, 27, 29); sc in 2nd ch from hook and in each ch across; turn—24 (26, 26, 28) sc.
Row 2: Ch 1, sc in each sc across; turn.
Repeat Row 2 until 14 (16, 16, 18) rows have been completed.
Shape Armhole
Row 1: Slip st across first 2 sc; ch 1, sc in next 20 (22, 22, 24) sc; turn leaving last 2 sc unworked.
Row 2: Ch 1, skip first sc, sc in each sc to last 2 sc, skip next sc, sc in last sc; turn—18 (20, 20, 22) sc. **
Row 3: Ch 1, sc in each sc across; turn.
Mark each end of last row. Repeat Row 3 until 8 (10, 10, 12) rows have been completed for Armhole.
Shape Shoulder-Next Row: Ch 1, sc in first 4 sc; turn.
Next Row: Ch 1, sc in 4 sc. Fasten off.
Opposite Shoulder
Skip 10 (12, 12, 14) sc of last long row for neck, join B in next sc; ch 1, sc in last 4 sc; turn.
Next Row: Ch 1, sc in 4 sc. Fasten off.
Front
Work same as for Back from ** to **.
Shape Armhole
Row 3: Repeat Row 2—16 (18, 18, 20) sc.
Mark each end of last row.
Row 4: Ch 1, sc in each sc across; turn.
Divide for Neck/Shoulder-Next Row: Ch 1, sc in first 7 sc; turn—7 sc.
Next Row: Ch 1, skip first sc, sc in next 6 sc; turn—6 sc.
Next Row: Ch 1, sc in first 4 sc, skip next sc, sc in last sc; turn—5 sc.
Next Row: Ch 1, skip first sc, sc in next 4 sc; turn—4 sc.
Next Row: Ch 1, sc in each sc across; turn.
Repeat last row until 10 (12, 12, 14) rows have been completed for Armhole. Fasten off.
Opposite Shoulder
Row 1: Skip next 2 (4, 4, 6) sc of last long row, join B in next sc; ch 1, sc in last 7 sc; turn.
Row 2: Ch 1, sc in 5 sc, skip next sc, sc in last sc; turn—6 sc.
Row 3: Ch 1, skip first sc, sc in 5 sc; turn—5 sc.
Row 4: Ch 1, sc in 3 sc, skip next sc, sc in last sc; turn—4 sc.
Row 5: Ch 1, sc in each sc across; turn.
Repeat Row 5 until 10 (12, 12, 14) rows have been completed for Armhole. Fasten off.
With yarn needle and B, sew side seams and shoulder seams.
Neck Trim
With right side facing and smaller hook, join B to a shoulder seam at neck edge; ch 1, sc evenly around; join to first sc. Fasten off.
Armhole Trim
Round 1: With right side facing and smaller hook, join B at top of side seam; ch 1, sc evenly around; join to first sc.
Round 2: Ch 1, sc in each sc around; join. Fasten off.
Repeat for opposite armhole.
Right Armhole Ruffle
Row 1: With right side facing, join yarn 3 rows directly below marker on Back and working through the fabric, ch 1, work 3 sc across 3 rows through fabric up to marker, work 13 (19, 19, 25) sc evenly across sc of Trim to next marker on Front, work 3 sc across 3 rows through fabric directly down from marker; turn—19 (25, 25, 31) sc.
Row 2: Ch 1, sc in same sc, * skip 2 ch, Sh, skip 2 sc, sc in next sc; repeat from * across; turn.
Round 3: Slip st to first ch-1 space; ch 1, sc in same ch-1 space, [ch 3, sc in next ch-1 space] 3 times, * sc in next ch-1 space, [ch 3, sc in next ch-1 space] 3 times; repeat from * across. Fasten off.
Repeat for Left Armhole beginning at marker on Front.
TIARA
Row 1: With smaller hook and B, ch 2; 5 sc in 2nd ch from hook; turn—5 sc.
Row 2: Ch 1, 2 sc in first sc, [sc in next sc, 2 sc in next sc] twice; turn—8 sc.
Row 3: Ch 1, 2 sc in first sc, [sc in next sc, 2 sc in next sc] 3 times, 2 sc in last sc; turn—13 sc.
Row 4: Ch 1, sc in first sc, [skip 2 ch, Sh, skip 2 sc, sc in next sc] twice; turn.
Round 5: Slip st to first ch-1 space; ch 1, sc in same ch-1 space, [ch 3, sc in next ch-1 space] 3 times, sc in next ch-1 space, [ch 3, sc in next ch-1 space] 3 times; do not fasten off; do not turn.
Tie-Next Row: Ch 1, sc in side of Row 3 and in side of Row 1 of Tiara; turn—2 sc.
Next Row: Ch 1, sc in 2 sc; turn.
Repeat last 2 rows until 32 rows have been completed.
Fasten off.
Repeat Tie on opposite side of Tiara: join yarn in Row 1; ch 1, sc in same row, sc in Row 3; turn. Work even in sc on these 2 sc for 32 rows.
ABBREVIATIONS: A, B = color A, B; ch = chain; dc = double crochet; hdc = half double crochet; mm = millimeters; sc = single crochet; st(s) = stitch (es); tog = together; * or ** = repeat whatever follows the * or ** as indicated; [ ] = work directions in brackets the number of times specified.
Pattern © by Coats & Clark Inc. Reproduced with permission from Coats & Clark Inc. PurpleKittyYarns.com is not endorsed by Coats & Clark Inc. It is not permissible to contract production of projects made from designs published by Coats & Clark to a third party for sale or distribution.
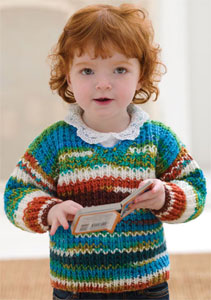
Baby Sweater LW2333
Skill Level: Easy
Designed by Trish Warrick.
Directions are for size 12 months; changes for sizes 18 months and 24 months are in parentheses.
Finished Chest: 24 (26, 28)".
Finished Length: 12 (12¾, 13½)".
RED HEART® "Super Saver®": 2 skeins 946 Peruvian Print. (See Notes section below regarding yardage).
Knitting Needles: 5mm [US 8].
Stitch holders (2), stitch markers (2), yarn needle.
GAUGE: 17 sts = 4"; 28 rows = 4" in Broken Rib. CHECK YOUR GAUGE. Use any size needles to obtain the gauge.
NOTES
Purchase 3 skeins of yarn if exact matching stripe pattern is desired on front and back pieces, and sleeves. Unwind yarn as necessary to matching color repeat to begin each piece.
Special Abbreviation
Ssk = Slip next 2 sts knitwise, one at a time to right needle; insert point of left needle into the fronts of these 2 sts and knit them together from this position.
P1, k1 Rib (worked over an even number of sts)
Row 1: * P1, k1; repeat from * to end.
Repeat Row 1 for P1, k1 Rib.
Broken Rib Pattern
Row 1 (Right Side): * P1, k1; repeat from * to end.
Row 2: Purl.
Repeat Rows 1 and 2 for Broken Rib.
SWEATER
Back
Cast on 52 (56, 60) sts. Work in P1, k1 rib for 1", end by working a wrong side row.
Begin Broken rib and work even until piece measures 7 (7½, 8)" from beginning, end by working a wrong side row.
Shape Armholes
Dec 1 st at each end of next 2 rows-48 (52, 56) sts **. Work even until armhole measures 5 (5¼, 5½)", end by working a wrong side row.
Shape Shoulders
Rib 13 (14, 15) sts and place on holder for left shoulder; bind off 22 (24, 26) sts for back neck, work to end of row. Continue on these 13 (14, 15) sts for right shoulder, p 1 row even. Bind off. With wrong side facing attach yarn to sts on holder and p across. Bind off.
Front
Cast on and work same as for Back to **. Work even for 1", end by working a wrong side row.
Divide for Neck Shaping
Next Row: Rib 22 (24, 26) sts, k2tog, join a separate skein of yarn matching color repeat if desired, ssk, work to end
of row. Working both sides at once with separate skeins of yarn, repeat decs at each neck edge every other row 10 (11, 12) times more-13 (14, 15) sts each side. Work even until armhole measures 5 (5¼, 5½)", end by working a wrong side row.
Shape Shoulders
Working both side at once with separate skeins of yarn, work 2 rows even. Bind off.
Sleeves (Make 2)
Cast on 26 (28, 30) sts. Work in P1, k1 rib for 1", end by working a wrong side row.
Begin Broken rib and shape sleeve by inc 1 st at each end next row, then every 4th row 8 times-44 (46, 48) sts. Work even until sleeve measures 8 (9, 10)" from beginning, end by working a wrong side row. Bind off.
FINISHING
Sew shoulder seams.
Neckband
With right side facing, begin at back right shoulder edge, pickup and k22 (24, 26) sts across back neck edge, 18
(19, 20) st down left front neck edge, place a marker on center st of V, and 18 (19, 20) sts up right front neck edge-58 (62, 66) sts.
Row 1: Begin P1, k1 rib and work to center st, p2tog, rib to end.
Row 2: Work even in rib.
Row 3: Repeat Row 1.
Row 4: K the k sts and slip the purl sts wyib.
Bind off loosely.
ABBREVIATIONS: Dec = decrease; inc = increase; k = knit; mm = millimeters; p = purl; st(s) = stitch(es); tog = together; wyib = with yarn in back; * or ** = repeat whatever follows the * or ** as indicated.
Pattern © by Coats & Clark Inc. Reproduced with permission from Coats & Clark Inc. PurpleKittyYarns.com is not endorsed by Coats & Clark Inc. It is not permissible to contract production of projects made from designs published by Coats & Clark to a third party for sale or distribution.
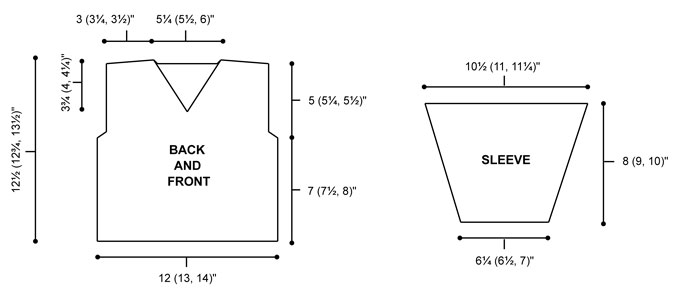
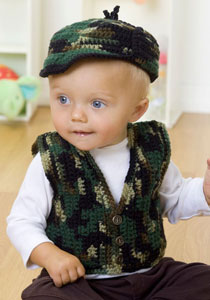
Baby's Gone a Hunting Vest and Hat WR1757
Designed by Karla Hastings
Skill Level: Intermediate
Directions are for 6 months; changes for 12, 18 and 24 months are in parentheses.
Chest: 17 (21, 22, 25)".
Length: 7½ (8½, 9, 10½)".
Hat Circumference: 16 (18)"
RED HEART® "Super Saver®": 2 skeins 971 Camouflage A, 1 skein 312 Black B for Hat.
Crochet Hook: 4.25 mm (US G-6).
Stitch marker.
Yarn needle.
GAUGE: 16 sc = 4"; 18 rows = 4". CHECK YOUR GAUGE. Use any size hook to obtain the gauge.
Note: Vest is worked from the center of Back to center of Right Front. Stitches are then picked up along opposite edge of foundation chain and worked to center of Left Front.
VEST
RIGHT BACK
With A ch 27 (31, 33, 39).
Row 1: Sc in 2nd ch from hook and each ch across, turn.
Row 2: Ch 1, sc in each sc across, turn – 26 (30, 32, 38) sts.
Repeat Row 2 until 6 (8, 10, 12) rows have been worked.
Shape Neck
Next Row: Ch 1, work in sc across, ch 5, turn.
Next Row: Sc in 2nd ch from hook and each ch and st across, turn – 30 (34, 36, 42) sts.
Work until 5 (7, 7, 9) rows have been worked for shoulder.
Shape Armhole
Row 1: Ch 1, sc in next 16 (16, 18, 20) sc, turn. Leave remaining sts unworked for armhole.
Row 2: Sc2tog for armhole, sc in each sc across, turn.
Row 3: Ch 1, sc in 13 (13, 15, 17) sc, sc2tog, turn.
Row 4: Sctog, sc in each sc across, turn.
Row 5: Ch 1, sc in 11 (11, 13, 15) sc, sc2tog, turn – 12 (12, 14, 16) sc.
Work for 7 rows.
Row 13: Ch 1, sc in 11 (11, 13, 15) sc, 2 sc in next sc, turn – 13 (13, 15, 17) sc.
Row 14: Ch 1, 2 sc in first sc, sc in each sc across, turn.
Row 15: Ch 1, sc in 13 (13, 15, 17) sc, 2 sc in next sc, turn – 15 (15, 18, 19) sc.
Row 16: Ch 1, 2 sc in first sc, sc in each sc across, turn – 16 (16, 18, 20) sc.
FRONT
Row 17: Ch 1, sc in 16 (16, 20) sc, ch 15 (19, 19, 23), turn.
Row 18: Sc in 2nd ch from hook and each ch and st across, turn - 30 (34, 36, 42) sts.
Work in sc until 5 (7, 7, 9) rows have been worked for shoulder.
Shape Neck
Row 1: Ch 1, sc to last 5 sts, slip st in next st, turn.
Row 2: Skip slip st, sc2tog, sc to end of row, turn.
Row 3: Ch 1, sc to 5 (7, 3, 3) sts before sctog, slip st in next st, turn.
Row 4: Skip slip st, sc2tog, sc to end of row, turn.
Row 5: Ch 1, sc to last 5 (7, 3, 3) sts before sctog, slip st in next st, turn.
Row 6: Sc2tog, sc to end of row, turn - 12 (12, 22, 28) sc.
For 18 and 24 months Only:
Row 7: Ch 1, sc to last (3, 3) sts before sctog, slip st in next st, turn.
Row 8: Sc2tog, sc to end of row, turn.
Row 9: Ch 1, sc to last (3, 3) sts before sctog, slip st in next st, turn.
Row 10: Sc2tog, sc to end of row, turn (14, 20) sts.
For 24 months Only:
Row 11: Ch 1, sc to last (3) sts before sctog, slip st in next st, turn.
Row 12: Sc2tog, sc to end of row, turn - (16) sc.
For All Sizes:
Work 3 rows in sc on 12 (12, 14, 16) sc. Fasten off.
LEFT BACK
Working along opposite side of foundation chain at center of Back, work 26 (30, 32, 38) scs. Work as for Right Side reversing shaping.
FINISHING
Sew Shoulders together.
Armband: With right side facing, join yarn at center of underarm, work sc evenly around armhole, join with a slip st to first sc. Fasten off. Repeat for second armhole.
Edging
Mark for 3 buttons on Right Front.
Round 1: With right side facing, join yarn in any st and work in sc evenly around lower edge, Front edges and neck edge, working 3 sc in corners and ch 2 opposite where marked for buttons on Left Front for buttonholes, slip st to first sc to join.
Round 2: Ch 1, sc in each sc, working 3 sc in corners and 2 sc in each ch-2 space, slip st to first sc to join. Fasten off.
Weave in ends. Sew buttons opposite buttonholes.
HAT
With A, ch 4, slip st to first ch to form a ring.
Round 1: Work 6 sc in ring. Place a marker for beginning of round.
Round 2: Ch 1, work 2 sc in each st, slip st in first sc to join, turn - 12 sc.
Round 3: Ch 1, [2 sc in next st, sc in next st] around, slip st in first sc to join, turn - 18 sc.
Round 4: Ch 1, [2 sc in next st, sc in next 2 sts] around, slip st in first sc to join, turn - 24 sc.
Round 5: Ch 1, [2 sc in next st, sc in next 3 sts] around, slip st in first sc to join, turn - 30 sc.
Round 6: Ch 1, [2 sc in next st, sc in next 4 sts] around, slip st in first sc to join, turn - 36 sc.
Round 7: Ch 1, [2 sc in next st, sc in next 5 sts] around, slip st in first sc to join, turn - 42 sc.
Round 8: Ch 1, [2 sc in next st, sc in next 6 sts] around, slip st in first sc to join, turn - 48 sc.
Round 9: Ch 1, [2 sc in next st, sc in next 7 sts] around, slip st in first sc to join, turn - 54 sc.
Round 10: Ch 1, [2 sc in next st, sc in next 8 sts] around, slip st in first sc to join, turn - 60 sc.
Round 11: Ch 1, [2 sc in next st, sc in next 9 sts] around, slip st in first sc to join, turn - 66 sc.
For Larger Size Only:
Round 12: Ch 1, [2 sc in next st, sc in next 10 sts] around, slip st in first sc to join, turn - 72 sc.
For All Sizes:
Next Round: Ch 1, sc in each sc around, slip st in first sc to join, turn - 66 (72) sts.
Repeat last Round until 10 rounds have been worked.
Visor
Row 1: Ch 1, sc in next 9 (10) sc, 2 sc in next 2 sc, sc in next 9 (10) sc, turn - 22 (24) sts.
Row 2: Ch 1, sc2tog, sc in next sc 1 (0) time, [sc in next sc, 2 sc in next sc, sc in next 2 sc] across to last 3 (2) sts, sc in next sc 1 (0) time, sc2tog.
Rows 3-4: Ch 1, sc2tog, sc in each sc across to last 2 sts, sc2tog, turn. Fasten off.
Edging: With right side facing, join B in next st on Hat after last st on first row of Visor and ch 1, sc in each st around to st before first st of first row of Visor. Fasten off.
Ear Flap
With right side facing, skip 4 sc from edge of Visor. Join A in next st.
Row 1: Ch 1, sc in next 12 sc, turn.
Rows 2-8: Repeat Row 1.
Rows 9-11: Sc2tog, sc in each sc to last 2 sc, sc2tog, turn. Fasten off.
Count 16 sts from opposite side of Visor and join yarn. Work as for first Ear Flap.
Edging: Join B in any st and ch 1, sc in each st and row around edges of Hat, Visor and Ear Flaps.
FINISHING
With B, make 2 twisted cords, each 11" long. Attach to one end to point of each Ear Flap. Fold Ear Flaps up and tie cords together on top of Hat. Weave in ends.
ABBREVIATIONS: ch = chain; mm = millimeters; sc = single crochet; st(s) = stitch(es); [ ] = work directions in brackets the number of times specified.
Pattern © by Coats & Clark Inc. Reproduced with permission from Coats & Clark Inc. PurpleKittyYarns.com is not endorsed by Coats & Clark Inc. It is not permissible to contract production of projects made from designs published by Coats & Clark to a third party for sale or distribution.
| Pattern Categories Browse the categories to help you find the patterns you're looking for. |
||
     
|
|
|

|
Navigation

All contents © 2003-2025 Purple Kitty LLC. All rights reserved.
Privacy Policy | FAQ | About Me | Newsletters | Sitemap