 |
Bonny Baby
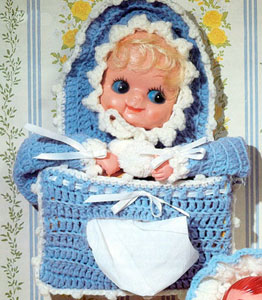
Tissue Box Holder
Materials
3 ½ oz. 4-ply "main color" knitting yarn (baby blue shown)
"Contrasting color" knitting yarn (white shown) for trim
Size F hook
4" vinyl doll mask
Lg. (1 ¾”) baby hands
2, 1 ¼" white pom-poms
1 ⅓ yds. ¼”-wide white satin ribbon
Polyfil
Starting at back of bonnet with main color (blue) ch 6 and sl st to join, forming ring; ch 3 and turn.
Rnd 1: (Ch 3 acts as first dc); dc 13 in ring, then sl st to join (14 dc made); ch 3 and turn.
Rnd 2: 1 dc in back loop in same loop as join; 2 dc in back loop of top of each dc in rnd 1 (28 dc), ch 3 and turn.
Rnd 3: Working in back loop of top of each dc, dc in next dc, *2 dc in next dc, 1 dc in next 2 dc*; repeat between * around, ending rnd with sl st to join, ch 3 (38 dc).
Rnd 4: Repeat between * in rnd 3 (52 dc). End each row with sl st and ch 3 and turn.
Rnd 5: Repeat rnd 4 (69 dc).
Rnd 6: Repeat rnd 5, ending with 92 dc. Cut yarn with 3" allowance, pull through last stitch and end off by weaving several stitches at back of work. This completes the base for the head and cap.
Body of Baby
Rows 1-13: Continue from where you ended at the back of the bonnet. Attach yarn. Ch 3, *dc in back loops of previous row, making 29 dc. (First ch 3 counts as 1 dc.) You have a total of 30 dc. Ch 3 and turn at end of row. Repeat from * for 12 more rows.
Row 14: For tissue opening dc in back loops of the next 6 dc, ch 3 and join with sl st in top of eighth dc of row 13 (equal to 8 dc), sl st in top of next 15 dc of previous row; ch 3, 7 dc to end of row; ch 3 and turn.
Row 15: 7 dc in back loop of next 7 dc of previous row; ch 14 (be sure to keep chain straight), dc in top of ch 3 of previous row and dc in next 7 dc to end of row; ch 3 and turn.
Row 16: Dc in top of 7 dc of previous row; dc in back loop of each of ch 14 and in next 8 dc to end of row (30 dc); ch 3 and turn.
Rows 17 & 18: 29 dc in back loops of dc of previous row (30 dc in each row, counting ch 3 as 1 dc). There are 3 rows above opening. Fasten off.
Arms
Ch 13 and join to make circle, making sure ch is straight, ch 3 for first dc, then using back loop of ch, make 13 dc in chain and join with sl st. Ch 3 and *make 13 dc in back loops of previous row, joining with sl st (14 dc, counting ch 3 as first dc), ch 3 and turn. Repeat from * 7 more times for a total of 9 rows. Fasten off.
With contrasting color ch 3, 1 dc in each dc of previous row, making pc every fifth dc, ending with sl st. Fasten off. This forms a cuff. Make two arms. Stuff with polyfil and attach arms to back of body by sewing at 2nd and 3rd rows about 2 dc in from pc edging. Bring arms forward, catch st them to front of body so that the arms lay across front of body. (Refer to photo.) Weave a 12" piece of ¼" wide satin ribbon through the cuff, going through every other dc of the cuff. Place end of hands under ribbon, pull tight, and tie with a bow to hold hands in place.
Finishing
Cut two pieces of ¼” wide satin ribbon, each 12" long. Attach a piece of ribbon to each side of top row of pocket in the first and the 30th dc in row, just behind the top row of the pocket. Weave ribbons through every other dc of top row so that the two ends meet at the center. Place a travel-size box of tissues in pocket (size of box is 6 ⅝" x 4 ½" x 1 ⅜"). Pull ribbons tight at top of tissue box and tie with a bow at center.
Contrasting Border Trim
Attach contrasting yarn (white) to the 1st dc of row 18. Ch 1, sc in 4 sts, picot (pc) at top of 4th st, making 5 sc. Continue across row. Hold the last loop on your hook. To form the pocket, fold work forward to the top of row 3 of the beginning of the body. Sl st through the top of 1st dc. Always catching one st from each side, continue with 5 sc and 1 pc around the whole piece, going down the side, across the bottom, up the other side, and around the bonnet and down to the beginning. Sl st into beginning of the round and fasten off.
Ruffle Around Face
Attach main color yarn in top of ch 3 of fourth rnd of the back of the bonnet. Dc in front loop of each dc in fourth row; join with sl st, ch 3, turn. Dc in each dc from previous row, at end sl st, ch 1. 1 sc in each dc around, join by sl st. Fasten off. (To make a shell: 2 dc, 1 trc, 2 dc in st.) Using contrasting color, ch 3, 1 dc, 1 trc, 2 dc in next st, *skip 1 sc, sc in next sc, skip 1 sc, make a shell in next sc; repeat from * around. Fasten off.
Make a chain of 100 ch for the tie. On the inside of the bonnet, pick up each sc and weave the chain through each one. The chain will be in front of each shell and behind each sc.
Place face in opening, draw chain tight and tie with a bow to hold the face in place. Attach pom-pom to each end of chain as trimming.
Other great patterns from Doll Delights in Crochet:
Pattern © 1981 by Plaid Enterprises, Inc. Reproduced with permission from Plaid. PurpleKittyYarns.com is not endorsed by Plaid.
| Pattern Categories Browse the categories to help you find the patterns you're looking for. |
||
     
|
|
|

|
Navigation

All contents © 2003-2025 Purple Kitty LLC. All rights reserved.
Privacy Policy | FAQ | About Me | Newsletters | Sitemap