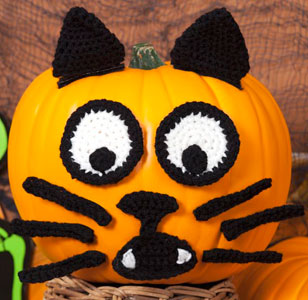
This scary cat is a scream! Crochet these appliques and simply attach to your pumpkin. It's a great alternative to using a knife to cut out the shapes.
Skill Level: EASY
Designed by Nancy Anderson.
Red Heart® Super Saver®: 1 skein each 312 Black A and 316 Soft White B.
Crochet Hooks: 3.75mm [US F-5] and 3.5mm [US E-4].
Stitch markers.
Yarn needle.
Self-stick hook-and-loop fasteners, double sided tape or glue dots for attaching to pumpkin.
GAUGE: With larger hook, 8 sts and 9 rows sc = 2"; Cat's eye = 2¾" in diameter. CHECK YOUR GAUGE. Use any size hook to obtain the gauge given.
Special Stitches
sc2tog: [Insert hook in next st, yo, draw yarn through st] twice, yo and draw through all 3 loops on hook.
NOTE: Use these appliques on a whole pumpkin. Yarn appliques are not for use near candle flames or lit bulbs.
Work in back bumps of chains: Turn foundation ch over to the wrong side, insert hook in the bump formed at the back of the ch and proceed with the st as usual.
APPLIQUES
Eyes (make 2)
With larger hook and B, make an adjustable loop.
Round 1: Work 6 sc in loop; join with a slip st in first sc - 6 sc.
Round 2: Ch 1, 2 sc in first 5 st, 3 sc in last st; join with a slip st in first sc - 13 sc.
Round 3: Ch 1, starting in first st, [sc in next st, 2 sc in next st] 6 times, sc in last st; join with a slip st in first sc - 19 sc.
Round 4: Ch 1, starting in first st, [sc in next 2 sts, 2 sc in next st] 6 times, sc in last st; join with a slip st in first sc - 25 sc. Fasten off B, join A.
Round 5: With A, ch 1, [sc in next 3 sts, 2 sc in next st] 6 times, sc in last st; join with a slip st in first sc - 25 sc.
Pupil (make 2)
With larger hook and B, make an adjustable loop.
Round 1: Work 6 sc in loop; join with a slip st in first sc - 6 sc. Fasten off, leaving a sewing length.
With yarn needle and sewing length, whipstitch pupils to Eyes as pictured. Weave in ends.
Nose
Starting with the crocheted line that connects the nose to the mouth, leaving a sewing length, with larger hook and A, leaving a sewing length, ch 4.
Row 1: Working in the back bumps, sc in 2nd ch from hook and in each ch across, turn to work across row-end st - 3 sc.
Row 2: Ch 1, work 3 sc in row-end st, turn - 3 sc.
Row 3: Ch 1, 2 sc in first st, sc in next st, 2 sc in last st, turn - 5 sc.
Row 4: Ch 1, starting in first st, [2 sc in st, sc in next st] twice, 2 sc in last st, turn - 8 sc.
Row 5: Ch 1, 2 sc in first st, sc in next 6 sts, 2 sc in last st - 10 sc. Fasten off.
Mouth
Starting at bottom edge, with larger hook and A, ch 12.
Row 1: Working in the back bumps, sc in 2nd ch from hook and in each ch across, turn - 11 sc.
Row 2: Ch 1, skip first st, sc in next 8 sts, skip next & slip st in last st, turn - 9 sts.
Row 3: Ch 1, skip first st, sc in next 8 sts, skip next & slip st in last st, turn - 7 sts.
Row 4: Ch 1, skip first st, sc in next 8 sts, skip next & slip st in last st, turn - 5 sts.
Row 5: Ch 1, skip first st, sc in next 8 sts, skip next & slip st in last st, turn - 3 sts.
Edging: Ch 1, sc evenly around, working 3 sc across side edge, 2 sc in next corner, sc in each st across bottom edge, 2 sc in corner st, work 3 sc evenly spaced across side edge, 2 sc in corner st, sc in each st across top edge; join with a slip st in first sc. Fasten off.
With yarn needle and sewing length, whipstitch Nose to center top of Mouth as pictured.
Teeth
With yarn needle and B, make pointed teeth by inserting needle close to the outside edge of the mouth as pictured, insert needle back into mouth piece about ⅜" in from edge. Work another straight st at an angle to the first to form triangular shape. Work another straight st in the middle to fill in tooth.
Ear (make 2)
Starting at bottom, with larger hook and A, ch 10.
Row 1: Working in the back bumps, sc in 2nd ch from hook and in each ch across, turn - 9 sc.
Row 2: Ch 1, sc in each st across, turn.
Work now progresses in rounds.
Round 3: Ch 1, working in back loops only, sc in each st across, rotate, sc in each row-end sts across side edge, rotate, working along opposite side of foundation ch, sc in each ch across side edge; join with a slip st in first sc - 22 sc.
Round 4: Work in a spiral now and throughout remainder of Ear, sc in each st around - 22 sc. Mark first st of round and move marker up as work progresses.
Round 5: [Sc in next 9 sts, sc2tog over next 2 sts] twice - 20 sts.
Round 6: [Sc in next 8 sts, sc2tog over next 2 sts] twice - 18 sts.
Round 7: [Sc in next 7 sts, sc2tog over next 2 sts] twice - 16 sts.
Round 8: Sc in each st around - 16 sc.
Round 9: [Sc in next 6 sts, sc2tog over next 2 sts] twice - 14 sts.
Round 10: [Sc in next 5 sts, sc2tog over next 2 sts] twice - 12 sts.
Round 11: [Sc in next 4 sts, sc2tog over next 2 sts] twice - 10 sts.
Round 12: [Sc in next 3 sts, sc2tog over next 2 sts] twice - 8 sts.
Round 13: [Sc2tog over next 2 sts] around - 4 sts. Fasten off, leaving a sewing length. With yarn needle, weave sewing length though sts in last round, gather tightly and secure. Weave in ends.
Whiskers (make 6)
With larger hook and A, ch 13.
Row 1: Working in the back bumps, sc in 2nd ch from hook and each ch across, turn - 12 sc.
Row 2: Ch 1, sc in each st across. Fasten off.
FINISHING
Weave in ends. Attach self-stick hook-and-loop fastener (or other adhesive) to back of motifs. Arrange and stick to pumpkin.
ABBREVIATIONS: A, B = Color A, B; ch = chain; dc = double crochet; hdc = half double crochet; mm = millimeters; sc = single crochet; st(s) = stitch(es); [ ] = work directions in brackets the number of times specified.
Pattern © by Coats & Clark Inc. Reproduced with permission from Coats & Clark Inc. PurpleKittyYarns.com is not endorsed by Coats & Clark Inc. It is not permissible to contract production of projects made from designs published by Coats & Clark to a third party for sale or distribution.