 |
Beeton's Book of Needlework | Tatting Instructions
TATTING INSTRUCTIONS
The needlework called Tatting in England, Frivolité in French, and Frivolitäten in German, is a work which seems, from all accounts, to have been in favour several generations ago. Modern ingenuity has discovered some ways of improving on the original plan of tatting, which was, indeed, rather a primitive sort of business as first practised. To Mrs. Mee, one of our most accomplished artistes in all matters connected with the work-table, belongs, we believe, the introduction of the plan of working from the reel instead of the shuttle. By this alteration the advantage of the shuttle being constantly kept filled with cotton was gained, and the necessity also obviated for frequently joining the thread; and to Mdlle. Riego, equally distinguished in all details appertaining to the employment of the needle, ladies are indebted for an arrangement by which the same thread used in the making of the pattern is used for fastening the work. The old plan only provided for the working of the different portions which constituted the pattern, and then these portions had to be sewn together with a needle and thread. The ingenious workers on the Continent have also given much attention of late to the art of tatting, and our instructions now printed comprise what we consider the best mode of learning and doing this exceedingly interesting and fashionable work.
Tatting differs entirely from crochet, and is composed of stitches forming knots. It is intended as an imitation of point lace, and is especially used for trimming under-linen, on account of its strength.
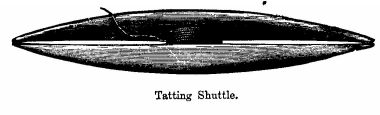
To make the stitches or knots a small instrument is used, called a shuttle. This shuttle consists of two oval pieces, flat on one side and convex on the other, and is made of wood or ivory.
The two oval pieces are joined together by a strong cross-piece. The illustration shows the construction of the shuttle. These shuttles are made in ivory, pearl, tortoiseshell inlaid with pearl, and silver; they are also manufactured in coloured bone, black, red, and white. The best to work with are the pearl for a white shuttle, and the inlaid tortoiseshell for a black shuttle; the prices vary from sixpence to one shilling and two-and-sixpence each. In selecting a shuttle be careful to see that the ends close, as if dropped it soon becomes unthreaded, which is very inconvenient. The cotton intended for the work is wound round this shuttle, and the thickness of the cotton varies according to the style of work. It is better to use the proper tatting cotton, because it is stronger than the ordinary kinds; this is manufactured by Messrs. Walter Evans and Co. for the purpose. Their Boar's Head Cotton is also frequently used, and answers very well.
Shuttles.
These are made in 3 sizes:--Finest, No. 1; No. 2, useful medium size; No. 3, the largest.
The Way to Hold the Hands.
Take the shuttle in the right hand, between the thumb and second finger, and allow the forefinger to remain at liberty, and rest the under part of the shuttle between the second and third and on the middle finger. Place the thread round the three middle fingers of the left hand, so as to form a loop, keeping the second and third fingers a little apart, and bring the cotton again between the thumb and forefinger, letting the end fall within the palm of the hand, while the end of cotton which holds on to the shuttle passes over the thumb-nail.
To Make a Stitch.
Keep the hands in the position above described; pass the shuttle at the back, through the loop--that is, between the second and third fingers. Take the end of the shuttle which comes out from the loop between the forefinger and thumb of the right hand, and strain the cotton very tightly towards the right. When the cotton is drawn through the loop, this cotton must not be impeded by the fourth finger; it should, on the contrary, slide over it, and be drawn tight. It should divide the loop into two parts. After this withdraw the second left-hand finger, which is above the cotton, and pass it again under that cotton, so as to draw up the loop. A half-stitch is thus formed, and must be tightened by being drawn closely to the forefinger and thumb of the left hand. For the remaining half of the stitch keep the hands in the same position, but, instead of letting the cotton fall over the thumb, pass this cotton over the back of the hand; then let the shuttle fall between the second and third fingers of the left hand, in front, and take it out again at the back, strain the cotton very tightly, withdraw the second finger from the loop, letting the cotton which is behind the hand sweep over the fingers. When this is done, guide with the unoccupied fingers of the left hand this second half-stitch up to the other, thus completing one stitch.
The Way to Make a Loop in Tatting.
When a certain number of stitches are made, very tightly draw in the loop by straining the cotton until the first stitch touches the last, and thus a loop is formed. During this process the stitches should be held tightly between the forefinger and thumb.
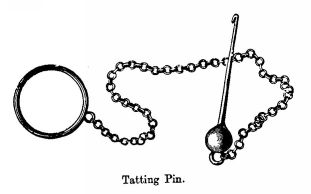
The Way to Make a Purl.
A purl is a small loop of cotton often used as an edging in tatting, as, for instance, round the outer edge of the ovals in tatted insertion No. 2. The following is the easiest method of making a purl:--The stitches are not made quite closely together at the place where a purl is to be made; about one-sixth of an inch is left between each. This space is left free until the loop is made by uniting the stitches; then the small piece of cotton in the space bulges out between the stitches, and forms the purl. If several are required a small space is left between every two or three stitches, according to the desired number. Care must be taken in that case that the small pieces of cotton left be all of the same length, so that the purl may be perfectly even. The purl can also be made thus: At the same time with the end of thread take the tatting-pin or a very large darning needle or knitting needle in the left hand, so that the point may come out farther than the row of stitches; if then you wish to make a purl, throw the cotton on the pin before making the stitch; then fasten this stitch, and push it at once close to the preceding; the pin with the cotton should come above the stitches. Do not take out the pin before all the purl and all the stitches are completed and joined together.
Joining the Work.
Place the tatting-pin in the loop that is to be joined, and with the hook draw the thread of the loop--that is, round the hand through it--pass the shuttle through this loop, and draw it up tightly close to the stitches.
A "straight" or double thread is used to join various parts of the work, and forms very beautiful patterns. Without the straight thread we should be unable to imitate point lace patterns, or, indeed, to execute any designs but those composed of circles, ovals, &c. To use this straight thread 2 shuttles are required; they should be of different colours. Sometimes one end of thread is left attached to the reel instead of using the second shuttle. In commencing a loop the straight thread is held between the second and third fingers of the left hand, about 2 or 3 inches from the work; the other shuttle is held as usual in the right hand, and the stitches and purls worked with it upon the foundation of the straight thread of the second shuttle.
| Pattern Categories Browse the categories to help you find the patterns you're looking for. |
||
     
|
|
|

|
Navigation

All contents © 2003-2025 Purple Kitty LLC. All rights reserved.
Privacy Policy | FAQ | About Me | Newsletters | Sitemap